
Learning how to crochet a Summer Time kerchief is a delightful way to bring style, comfort, and creativity into your warm-weather wardrobe. This versatile crochet accessory is light, breezy, and the perfect companion for sunny days. Whether you’re lounging at the beach, strolling through a weekend market, or simply trying a new crochet project, the Summer Time kerchief offers the ideal blend of function and fashion.
Crocheting your own kerchief allows you to personalize the color, texture, and size to suit your style. It’s also a wonderful beginner-friendly project that doesn’t take long to complete, making it a satisfying and quick addition to your collection. Using lightweight yarns and simple crochet stitches, this project will keep you cool and stylish all summer long.
In this article, we’ll walk you through how to crochet a Summer Time kerchief, step by step. You’ll also learn which yarns are best, the most suitable stitches to use, and how to finish your kerchief with finesse. Let’s dive into the joy of crochet and bring this beautiful accessory to life!
1. Choosing the Right Yarn and Hook
The first step in how to crochet a Summer Time kerchief is selecting the right yarn and crochet hook. This choice is essential because the kerchief is designed to be light and breathable.
Start by opting for a cotton or bamboo blend yarn, which is both soft and ideal for warm weather. These materials are gentle on the skin and allow air to circulate, making your kerchief wearable for long hours. Avoid heavy or thick yarns, as they can feel too warm and bulky for summer use.
For the hook size, refer to the yarn label, but generally, a 3.5 mm to 4.5 mm hook works well for a lightweight kerchief. This size ensures that the stitches aren’t too tight, preserving the breezy feel of the design.
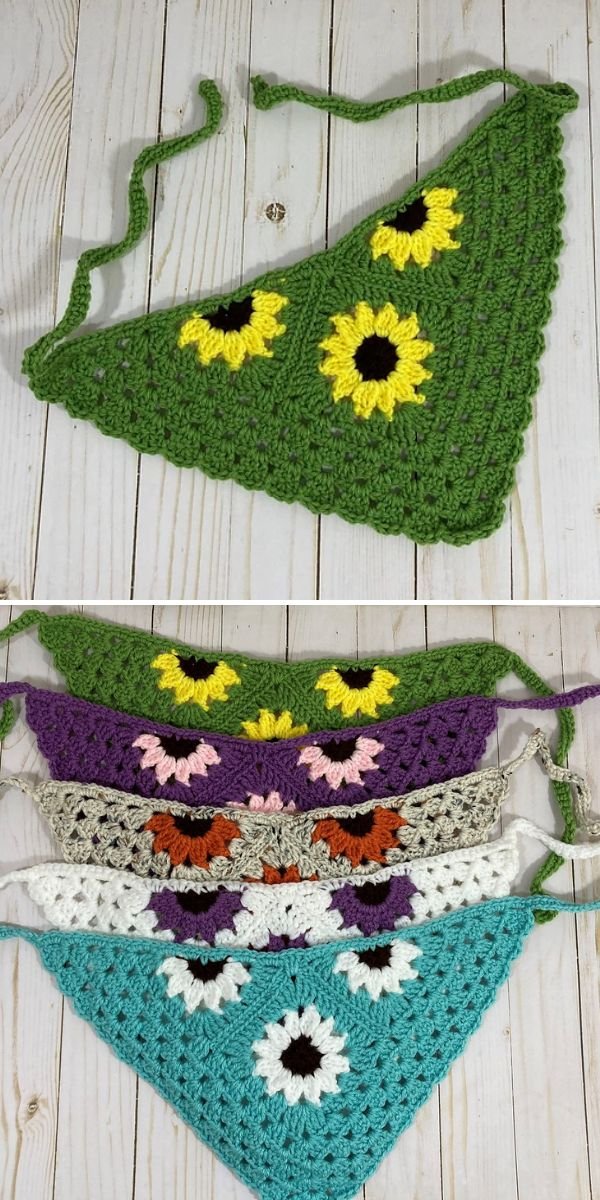
Consider the color of your yarn—lighter shades like pastels, white, or seafoam green evoke summer vibes and reflect heat better than darker colors. If you’re making this as a gift, think about colors the recipient would love.
It’s always a good idea to make a gauge swatch before starting the full piece. This ensures your kerchief will come out the desired size. A standard triangle kerchief usually measures around 18 inches on each side but can be adjusted to your liking.
Remember to keep the look and comfort of your finished project in mind when choosing materials. With the right yarn and hook, crocheting your Summer Time kerchief becomes a much more enjoyable experience.
2. Basic Stitches You Need to Know
Before you begin stitching, let’s go over the essential crochet stitches used in most kerchief patterns. These basic skills are beginner-friendly and provide a clean, stylish look.
The chain stitch (ch) is the foundation of your kerchief. You’ll use this stitch to form the base and build the shape of the triangle. Practice creating even chains to keep your kerchief neat.
Next is the single crochet (sc), which gives a tight, dense texture. It’s often used at the borders or in rows to add structure. You’ll also come across the double crochet (dc), which creates an open and flowy feel, ideal for lightweight designs.
Many kerchiefs also include increases to expand the triangle. The easiest way to do this is to work two stitches into one, commonly in the center of each row. This technique helps shape the triangle beautifully.
You might want to add a touch of elegance using shell stitches or lace motifs, which provide a feminine, decorative element to your kerchief. Don’t be afraid to experiment once you’re comfortable with the basics.
Practice your stitches on a small swatch before starting the full piece. This helps build confidence and prevents frustration down the line. Consistent tension and smooth stitching are key for a polished finish.
By mastering these basic crochet techniques, you’re setting yourself up for success with your Summer Time kerchief project. Each stitch brings you closer to a beautiful handmade accessory.
3. Step-by-Step: How to Crochet a Summer Time Kerchief
Now that your yarn is chosen and you’ve brushed up on your stitches, it’s time to begin the fun part: how to crochet a Summer Time kerchief step by step!
Start by chaining 4 stitches and joining them into a ring using a slip stitch. This forms the tip of your triangle. From here, you’ll be working in rows that expand outward.
In Row 1, chain 3 (this counts as your first double crochet), and work 2 more double crochets into the ring. This forms your first row with 3 stitches. Turn your work.
In Row 2 and beyond, chain 3 at the beginning of each row, then work one double crochet into each stitch, with two double crochets in the center stitch of each row. This keeps the triangle expanding symmetrically.
Continue repeating this row pattern, adding a few stitches each time. Keep your edges clean by maintaining a consistent stitch count increase. After 10-15 rows, your kerchief should take on a clear triangle shape.
Once your kerchief has reached the desired size, you can add a border for extra flair. A row of single crochet around the edges can make it look more finished, or you can use picot stitches for a delicate, lacy look.
Finish off by weaving in your yarn ends with a tapestry needle, and consider blocking your kerchief to give it a smooth, professional appearance. Your handmade accessory is now ready to wear!
4. Styling and Wearing Your Crochet Kerchief
After mastering how to crochet a Summer Time kerchief, the next step is enjoying it as part of your summer style. This versatile piece can be worn in many fun and fashionable ways.
The most classic way is to tie it around your head, bandana-style. Simply fold the triangle and tie the ends at the back of your head for a chic, bohemian vibe. It keeps your hair in place and adds a handmade touch to your look.
You can also wear it as a neck scarf, which adds a pop of texture to your outfit. This works especially well for cooler summer evenings or breezy beach walks.
Try tying it around your ponytail or bun for a playful hairstyle upgrade. It’s a stylish way to accessorize without too much effort. Plus, it makes a great handmade gift for friends and family!
Some people love using crochet kerchiefs as bag accessories—simply tie it around the strap of your favorite tote for a splash of color and texture.
You can also pair it with matching crochet tops or dresses for a coordinated summer outfit. Handmade pieces like this often spark compliments and conversations.
However you choose to wear it, your Summer Time kerchief will showcase your creativity, personal style, and crochet skills all at once.
FAQ – How to Crochet a Summer Time Kerchief
Q: What type of yarn is best for a Summer Time kerchief?
A: Lightweight cotton or bamboo yarns are ideal. They’re breathable, soft, and perfect for warm-weather wear.
Q: Is this a beginner-friendly crochet project?
A: Yes! It uses basic stitches like chain, double crochet, and simple increases, making it great for those new to crochet.
Q: How long does it take to crochet a kerchief?
A: Depending on your skill level, it can take anywhere from 2 to 5 hours. It’s a quick and satisfying project!
Q: Can I make this kerchief larger or smaller?
A: Absolutely. Just keep adding rows to make it bigger, or stop earlier if you want a smaller version.
Q: Do I need to block the kerchief after finishing it?
A: Blocking isn’t required, but it helps shape the kerchief and smooth out any uneven stitches for a professional finish.
Q: What outfits pair well with a crochet kerchief?
A: Crochet kerchiefs go well with summer dresses, tank tops, denim jackets, or even as a beach accessory. They’re incredibly versatile.
Learning how to crochet a Summer Time kerchief is a fun and fulfilling way to explore your creativity. This project offers the perfect blend of beauty, functionality, and personal expression. From choosing the right yarn to mastering the stitches and styling your final piece, the kerchief becomes more than just an accessory—it’s a testament to your skill and dedication.
If this article helped you in your crochet journey, we’d love to hear from you! 💬 Leave a comment with your honest opinion, share your results, or suggest other crochet projects you’d like to see next. Your feedback helps us grow and inspires new content for our creative community.