
Starting your own DIY Toiletry Cube Step by Step project is not just a fun and creative experience—it’s also a practical solution for keeping your toiletries organized during travel or at home. If you love sewing or crafting, making a toiletry cube from scratch gives you the chance to customize it exactly how you want. In this guide, we’ll walk you through the entire process of creating a toiletry cube, ensuring it is functional, stylish, and durable.
Creating a DIY Toiletry Cube Step by Step means you can choose your own fabrics, colors, and size, making it the perfect fit for your needs. Whether you want a waterproof cube for travel or a soft fabric cube for home use, this tutorial will cover all the essentials. The best part is that you don’t need to be an expert in sewing to achieve professional-looking results.
This comprehensive guide will break down the project into clear sections, each focusing on important aspects of making your own DIY Toiletry Cube Step by Step. From gathering materials to adding finishing touches, you’ll learn everything needed to confidently complete your toiletry cube.
1. Choosing the Right Materials
Selecting the proper materials is crucial for a successful DIY Toiletry Cube Step by Step project. The fabric you choose will determine both the look and the durability of your cube. Waterproof or water-resistant fabrics like nylon, canvas, or laminated cotton are excellent choices for travel cubes that might be exposed to moisture.
Consider adding a sturdy lining to give your toiletry cube structure. A firm interfacing or fusible fleece can help your cube stand upright and protect the contents inside. The lining should complement your outer fabric while being easy to clean.
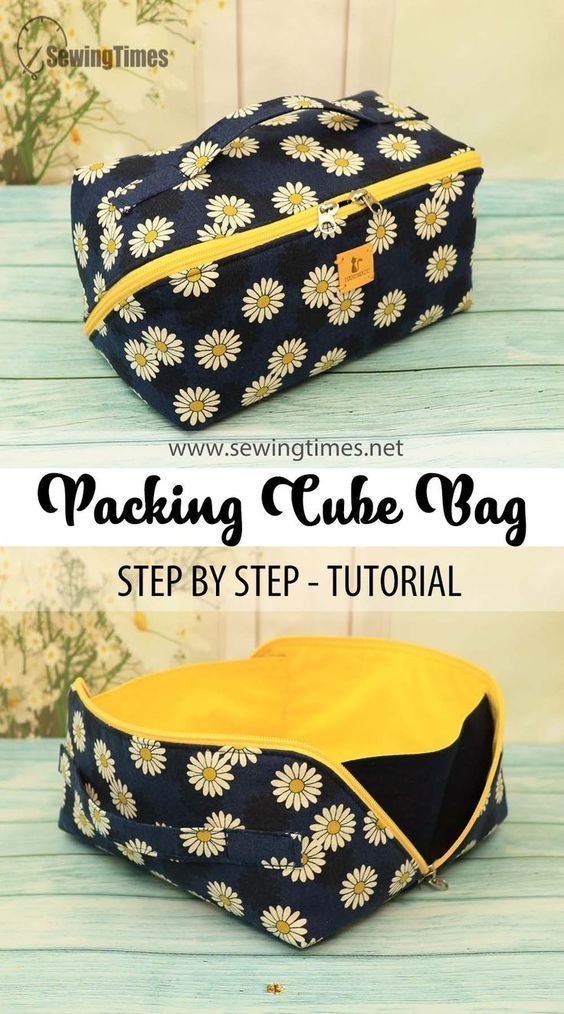
Zippers are essential components of your DIY Toiletry Cube Step by Step. Choose high-quality, smooth-gliding zippers that won’t snag or break easily. A zipper with a wide opening can make it much easier to access your items inside the cube.
You’ll also need to think about handles or straps. Webbing or fabric handles can make your cube more portable and practical. A small loop can also be useful for hanging the cube on hooks or bathroom rails during use.
Thread quality matters too. Using strong polyester or nylon thread ensures your seams will hold up over time. Choose a color that blends in or adds a stylish contrast to your toiletry cube.
Lastly, gather your basic sewing tools. You’ll need fabric scissors, pins or clips, a ruler or measuring tape, and a sewing machine. If you’re hand-sewing, ensure you have sharp needles suitable for the thickness of your fabric.
2. Cutting and Preparing Your Pieces
The first step in constructing your DIY Toiletry Cube Step by Step is cutting your fabric and interfacing pieces accurately. Begin by creating or printing a pattern based on the desired dimensions of your cube. A common size is around 9 inches wide, 6 inches tall, and 4 inches deep, but you can adjust this according to your needs.
Lay your fabric out on a flat surface and pin or trace your pattern onto the fabric before cutting. Be sure to cut out all parts, including the main panels, side pieces, bottom, and top sections. If using interfacing, cut matching pieces for added support.
Mark the position of the zipper opening on your top panel. Precision is key here to ensure the zipper fits correctly and operates smoothly. A chalk pencil or fabric marker can help you keep these marks clean and visible.
If you’re adding interior pockets, cut out smaller fabric rectangles and prepare them with folded edges for neatness. These pockets can hold smaller items like toothbrushes or razors inside your toiletry cube.
Prepare the zipper by sewing zipper tabs onto the ends to prevent bulk in the seams. This will give your DIY Toiletry Cube Step by Step a cleaner, more professional finish and ensure the zipper lies flat.
Before sewing anything together, double-check that all your pieces align correctly and that you have the right number of parts. A careful check at this stage can save time and frustration later.
3. Assembling the Toiletry Cube
Now it’s time to start sewing your DIY Toiletry Cube Step by Step. Begin by attaching the zipper to the top panel. Sew one side of the zipper to one edge of the top piece, then attach the other side. Use a zipper foot for better control and neat stitching.
Once your zipper is in place, join the side panels to the top piece. Take care to align edges and corners accurately, pinning or clipping as needed. Sew slowly to keep your seams straight and even.
After the sides are attached, sew the bottom piece to the assembly. This will start to form the cube shape. Be mindful of turning the corners properly so the cube retains a boxy structure rather than appearing rounded.
Add any interior pockets or elastic loops at this stage if you haven’t done so already. It’s easier to sew these in while the panels are still mostly flat rather than after the cube is fully formed.
Next, attach the lining pieces by sewing them together in the same way as the outer cube. Slip the lining inside the cube, wrong sides together, and baste or sew around the zipper seam to secure the layers.
Finally, sew on any handles or hanging loops. Reinforce these areas with extra stitching since they’ll bear the weight of the cube when carried or hung up.
4. Finishing Touches and Customization
The final steps in your DIY Toiletry Cube Step by Step are about making it polished and personalized. Start by inspecting all seams inside and out to ensure there are no gaps or weak points. Trim any loose threads and tidy up your stitching.
If desired, you can topstitch around the zipper and cube edges to give it a crisp, finished appearance. This can also add strength to the seams and help the cube hold its shape.
Consider adding decorative elements such as embroidered initials, iron-on patches, or fabric paint designs. These personal touches will make your toiletry cube unique and special.
You might want to apply a fabric protector spray to help resist stains and water. Just be sure to test on a scrap piece first to avoid discoloring your fabric.
If you plan to gift your toiletry cube, you can make a matching set of smaller cubes or pouches. This is a thoughtful addition that adds extra usefulness and charm.
Lastly, give your DIY Toiletry Cube Step by Step a final press with an iron, if the fabric allows. This will smooth out any wrinkles from the sewing process and give it a store-bought look.
FAQ about DIY Toiletry Cube Step by Step
Q: Do I need advanced sewing skills for this project?
No, this DIY Toiletry Cube Step by Step is suitable for beginners who are comfortable using a sewing machine and following basic instructions.
Q: Can I make a waterproof toiletry cube?
Yes, by using waterproof fabrics like laminated cotton or nylon and adding a water-resistant lining, you can create a waterproof cube.
Q: What size should my toiletry cube be?
The size depends on your needs, but a common size is 9x6x4 inches. You can easily adjust the dimensions to fit larger or smaller items.
Q: How do I clean my toiletry cube?
Most toiletry cubes made with washable fabrics can be hand-washed or spot-cleaned with mild soap and water. Always check the fabric care instructions.
Q: Can I sew the toiletry cube by hand?
While possible, sewing by machine is faster and provides stronger seams, especially for thick fabrics or layers.
Q: How long does it take to complete this project?
On average, the DIY Toiletry Cube Step by Step can be completed in 2-3 hours, depending on your sewing experience.
Creating your own DIY Toiletry Cube Step by Step is a fun, rewarding project that combines functionality with creativity. We’ve covered everything from choosing materials and cutting pieces to assembling the cube and adding custom touches. Now it’s your turn to try this project at home! We’d love to hear your honest feedback and any suggestions you might have to improve this tutorial. Share your experience and ideas in the comments below!