
If you are passionate about sewing and love functional yet decorative projects, the Honeycomb Basket Sewing Pattern is the perfect choice. This delightful design combines practicality with a unique geometric aesthetic, creating a basket that stands out in any home. Whether you’re organizing small items or looking for a handmade gift idea, the Honeycomb Basket Sewing Pattern will inspire you to get creative with your sewing machine.
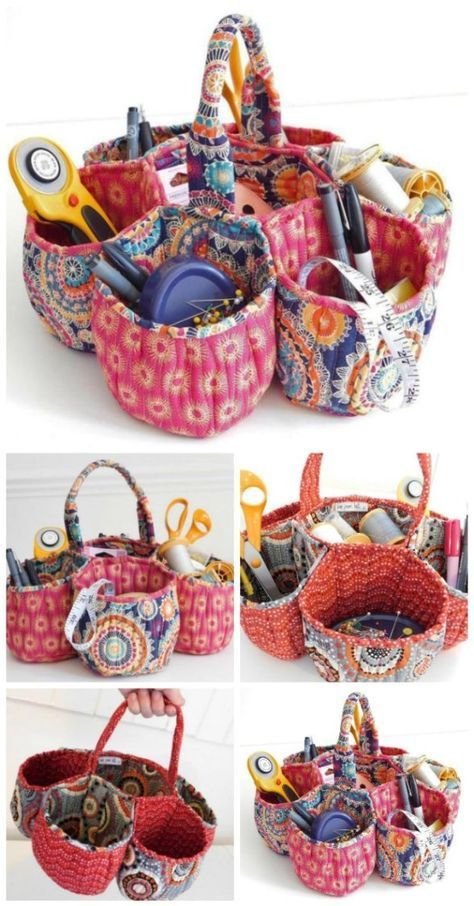
The Honeycomb Basket Sewing Pattern is known for its charming hexagon shape that resembles a honeycomb structure. This design is not only beautiful but also sturdy and versatile, making it ideal for storing craft supplies, toys, or even as a stylish planter cover. With easy-to-follow steps and room for customization, this pattern suits sewists of all levels, from beginners to seasoned pros.
In this article, you’ll discover tips, materials, and step-by-step guidance to help you bring your Honeycomb Basket Sewing Pattern to life. We will explore techniques to enhance durability, add personal touches, and ensure your finished basket is both functional and eye-catching. Let’s dive into the world of fabric baskets and explore the endless possibilities of this fun sewing project.
1. Materials and Tools for Your Honeycomb Basket Sewing Pattern
To begin your Honeycomb Basket Sewing Pattern, it’s essential to gather the right materials and tools. The choice of fabric, stabilizers, and notions will impact the basket’s structure and appearance.
Choose cotton fabric or canvas for the outer layer of your Honeycomb Basket Sewing Pattern. These fabrics are durable and easy to work with, providing both structure and style. You can mix and match prints or stick to solid colors for a minimalist look.
For the inner lining, consider lightweight cotton or a coordinating fabric that complements your outer layer. This allows the interior of your basket to look just as polished as the outside, enhancing the finished product.
Stabilizers play a vital role in creating a sturdy basket. Fusible fleece, interfacing, or foam stabilizers help the Honeycomb Basket Sewing Pattern maintain its shape over time. Make sure to select a stabilizer that provides enough body without making the basket too rigid.
Essential tools include scissors, rotary cutters, rulers, pins, clips, and a reliable sewing machine. A walking foot can also be helpful when working with layers of fabric and stabilizer, ensuring smooth stitching.
Don’t forget coordinating thread for both the outer and inner fabrics. This small detail adds a professional touch to your Honeycomb Basket Sewing Pattern and enhances the basket’s overall appeal.
Finally, consider optional additions such as fabric glue, decorative buttons, or embroidery floss if you wish to add embellishments to your basket. Personalization transforms a simple basket into a thoughtful handmade treasure.
2. Cutting and Preparing Your Fabric Pieces
Once you’ve gathered your materials, it’s time to prepare your fabric for sewing. Precision in cutting and preparation is key to achieving a polished Honeycomb Basket Sewing Pattern.
Begin by creating or downloading a template for the hexagon pieces that form the honeycomb design. Accurate templates ensure that your pieces fit together seamlessly and the basket’s structure is symmetrical.
Lay your fabric flat and use a rotary cutter and ruler to cut the hexagon shapes. Take your time during this step to prevent frayed edges and uneven cuts, which can affect the final look of your Honeycomb Basket Sewing Pattern.
Cut the same number of hexagons from your stabilizer material. These pieces will be fused or sewn to the fabric to provide strength and structure to the basket’s walls.
Iron the stabilizer onto the wrong side of your fabric hexagons, following the manufacturer’s instructions. This helps the pieces hold their shape and ensures your Honeycomb Basket Sewing Pattern stays crisp and clean.
Arrange the hexagons on your work surface to plan the design. This is your chance to play with color combinations and placement before committing to stitching the pieces together.
Pin or clip your hexagons in the desired order. Using clips can help avoid distortion in the fabric layers as you begin assembling your Honeycomb Basket Sewing Pattern.
3. Sewing the Honeycomb Shape Together
With your pieces prepared, it’s time to sew the hexagons together to form the honeycomb structure. This part of the Honeycomb Basket Sewing Pattern brings your project to life.
Begin by sewing hexagon pieces together along one edge, right sides facing. Use a 1/4 inch seam allowance for clean, consistent seams. Backstitch at the beginning and end of each seam for added durability.
Continue joining hexagons in rows or clusters, depending on your chosen design. The goal is to form panels that will later be joined to create the basket’s honeycomb shape.
Press the seams open as you go. This step is crucial for reducing bulk and achieving a flat, professional finish in your Honeycomb Basket Sewing Pattern.
Once your panels are assembled, sew the sides together to form the basket’s body. Be patient during this step, ensuring that corners align and seams meet neatly.
Attach the base piece, carefully sewing around the edges. This secures the structure and forms the bottom of your Honeycomb Basket Sewing Pattern.
Finish the raw edges with binding or an overlock stitch for a clean look and to prevent fraying. This detail enhances the basket’s durability and presentation.
4. Adding Personal Touches and Finishing Your Basket
The final stage of creating your Honeycomb Basket Sewing Pattern is all about adding your unique style and making sure the basket is ready for use.
Consider topstitching around the upper edge of the basket. This not only gives a polished finish but also reinforces the top edge, helping the basket maintain its shape.
Add handles or loops if desired. Fabric handles, rope, or leather strips can be sewn or riveted into place, adding functionality to your Honeycomb Basket Sewing Pattern.
Decorate your basket with fabric appliqués, buttons, or embroidery. These embellishments make your basket truly one of a kind and can reflect the recipient’s personality if the basket is a gift.
If your basket will be used for heavier items, consider adding extra stabilizer to the base or sewing additional seams to strengthen the structure. This ensures your Honeycomb Basket Sewing Pattern can handle daily use.
Give the basket a final press with an iron to smooth any wrinkles and help set the seams. This finishing touch gives your project a crisp, professional appearance.
Take photos of your finished Honeycomb Basket Sewing Pattern and share your creation with friends or on social media. Seeing your work appreciated by others is one of the joys of handmade crafts.
FAQ About Honeycomb Basket Sewing Pattern
What is the best fabric for a Honeycomb Basket Sewing Pattern?
The best fabrics are medium-weight cotton, canvas, or home décor fabrics. These materials provide the right balance of durability and flexibility for creating a sturdy basket.
Do I need a special sewing machine to make a Honeycomb Basket Sewing Pattern?
No, a standard sewing machine works well. However, using a walking foot or heavy-duty needle can make sewing through layers easier.
Can beginners make a Honeycomb Basket Sewing Pattern?
Absolutely! The pattern is beginner-friendly, especially if you take your time and follow step-by-step instructions carefully.
How can I customize my Honeycomb Basket Sewing Pattern?
You can customize it by choosing different fabric prints, adding appliqués, embroidery, or decorative handles. The possibilities are endless!
Is interfacing necessary for the Honeycomb Basket Sewing Pattern?
Yes, interfacing or stabilizer is recommended to give the basket structure and help it maintain its shape over time.
What size is a typical Honeycomb Basket Sewing Pattern?
The size can vary depending on the template used, but most baskets are designed to be about 6 to 10 inches tall, with a similar diameter across the top.
PATTERN HERE
Creating a Honeycomb Basket Sewing Pattern is a rewarding sewing project that combines creativity, functionality, and style. From choosing your fabrics to adding the final stitches, every step allows you to express your unique vision and create something truly special. We hope this guide has inspired you to try this fun and practical pattern. If you’ve enjoyed this tutorial or have suggestions for future topics, please leave your sincere opinion and ideas in the comments below. Happy sewing!