
The Star in a Star Quilt Block – Free Pattern is a timeless and elegant design that adds a layer of depth and complexity to any quilting project.
This block features a smaller star nested within a larger star, creating a stunning visual effect that captures the eye and adds a touch of sophistication to your quilt.
The pattern is versatile and can be customized with different color schemes and fabrics, making it suitable for both traditional and modern quilts.
In this article, we’ll guide you through the steps of creating the Star in a Star Quilt Block using a free pattern. Whether you’re a beginner eager to learn or an experienced quilter looking for a new challenge, this block offers a perfect balance of simplicity and detail.
We’ll cover everything from selecting your fabrics to piecing the block together, ensuring you have all the information you need to create a beautiful quilt block.
The Star in a Star Quilt Block is not only visually appealing but also offers a great opportunity to practice precise cutting and piecing skills.
This block can be used as the focal point in a quilt, or repeated to create an intricate and cohesive design. Let’s dive into the details and start quilting!
1. Choosing the Perfect Fabrics for Your Star in a Star Quilt Block
Selecting the right fabrics is a crucial step in creating the Star in a Star Quilt Block – Free Pattern. The key to a successful block is the contrast between the inner and outer stars, so it’s important to choose fabrics that will highlight this design element.
Start by selecting two fabrics with a strong contrast for the inner and outer stars. You can use a solid color for one star and a patterned fabric for the other to create a striking contrast. For a more subtle look, choose fabrics in different shades of the same color family, such as light blue and navy, or opt for contrasting colors like red and white for a classic look.
The background fabric is just as important as the star fabrics. It should complement the star fabrics without overpowering them. Light neutrals like white, cream, or light gray are popular choices for the background, as they allow the stars to stand out. However, you can experiment with darker or more vibrant backgrounds depending on the overall look you’re going for.
When choosing your fabrics, consider the overall theme and color scheme of your quilt. The Star in a Star Quilt Block can be the centerpiece of your design, so think about how the colors will work together in the context of the entire quilt. Don’t be afraid to play with different fabric combinations to find the one that speaks to you.
If you’re using prints, pay attention to the scale of the patterns. Smaller prints work well for the stars, as they don’t distract from the block’s design. Larger prints can be used for the background if you want to add a bit of texture without detracting from the stars.
Before you start cutting your fabric, lay out your chosen fabrics together to see how they interact. This will give you a better idea of how the finished block will look and allow you to make any necessary adjustments before you begin.
2. Cutting and Preparing Your Fabric Pieces
Once you’ve chosen your fabrics for the Star in a Star Quilt Block – Free Pattern, it’s time to cut and prepare them for sewing. Accurate cutting is essential for ensuring that the pieces fit together perfectly and that the stars are well-defined.
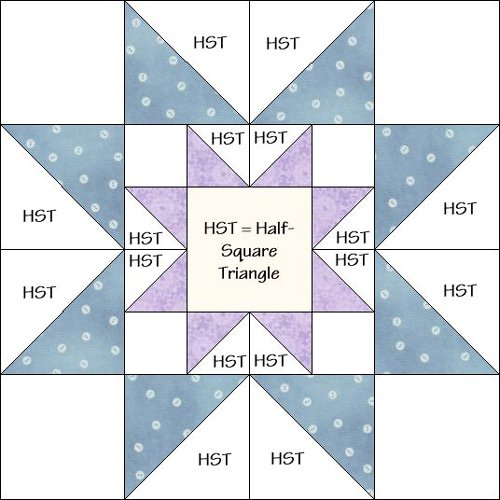
Begin by cutting your fabric into squares and triangles according to the pattern instructions. The Star in a Star Quilt Block typically requires several squares for the inner and outer stars, as well as the background fabric. You’ll also need to cut some of the squares into half-square triangles (HSTs) to form the star points.
To achieve precise cuts, use a rotary cutter, a self-healing cutting mat, and an acrylic ruler. Measure each piece carefully and double-check your measurements before cutting to avoid mistakes. If you’re new to quilting, it’s a good idea to cut a few extra pieces to practice with before working on the actual block.
After cutting your pieces, take a moment to organize them by size and color. This will make the assembly process smoother and help you keep track of your progress. You might find it helpful to label the pieces or arrange them on a design board to visualize how they’ll come together.
For the half-square triangles, mark a diagonal line on the wrong side of the fabric squares using a fabric marker or chalk pencil. This line will serve as a guide when sewing the triangles together. Make sure the lines are straight and accurately placed, as this will affect the final appearance of the star points.
Before sewing, consider lightly starching your fabric pieces. Starching helps prevent the fabric from stretching or distorting, especially when working with bias edges. Lightly spray the fabric with starch and press it with an iron to set the starch.
With your fabric pieces cut and prepared, you’re now ready to start assembling the Star in a Star Quilt Block. Taking the time to cut and organize your fabric carefully will pay off in the accuracy and overall quality of your finished block.
3. Assembling the Star in a Star Quilt Block
Now that your fabric pieces are prepared, it’s time to assemble the Star in a Star Quilt Block. This process requires careful attention to detail, as the accuracy of your seams will determine the crispness of the star shapes.
Start by sewing the half-square triangles (HSTs) that form the points of the stars. Pair each triangle with its corresponding background triangle, and sew along the marked diagonal line. Use a 1/4-inch seam allowance, which is standard in quilting. After sewing, press the seams open or to one side, depending on your preference. Pressing the seams open can reduce bulk and help the block lie flat.
Next, piece together the smaller, inner star. Arrange the HSTs and squares according to the pattern, making sure the star points align properly. Sew the pieces together row by row, pressing the seams after each row. Accuracy is key here, as even small deviations can affect the alignment of the stars.
Once the inner star is complete, move on to the outer star. The process is similar, but on a larger scale. Arrange the pieces for the outer star around the inner star, ensuring that the points of both stars align and create a cohesive design. Sew the outer star pieces together, then attach them to the inner star.
After the stars are assembled, add the background pieces to complete the block. This step involves sewing squares or rectangles of the background fabric around the stars to create a finished square block. Pay close attention to the alignment of the pieces to maintain the symmetry of the block.
Once the block is fully assembled, give it a final press to set the seams. Use a hot iron with steam, and be careful not to stretch the fabric as you press. The block should lie flat, with sharp points and well-defined star shapes.
Congratulations! You’ve completed your Star in a Star Quilt Block. This intricate design is sure to be a highlight of any quilt, showcasing your quilting skills and attention to detail.
4. Incorporating the Star in a Star Quilt Block into Your Quilts
The Star in a Star Quilt Block – Free Pattern is a versatile design that can be used in a variety of quilting projects. Whether you’re making a full-sized quilt, a wall hanging, or a table runner, this block adds a touch of elegance and complexity to your work.
One of the most popular ways to use the Star in a Star Quilt Block is as the central motif in a quilt. The nested stars create a focal point that draws the eye, making it a perfect centerpiece for a medallion quilt. Surround the block with borders and additional blocks to frame it and build out the quilt.
You can also use the Star in a Star Quilt Block in a sampler quilt. Sampler quilts feature different blocks, each showcasing a different technique or design. The Star in a Star block is a great choice for a sampler, as it demonstrates advanced piecing skills and creates visual interest.
If you’re making a larger quilt, consider repeating the Star in a Star Quilt Block in a grid pattern. This creates a quilt with a uniform yet intricate design, where the stars seem to interlock and create a secondary pattern. You can experiment with different color placements to achieve various effects.
The Star in a Star Quilt Block can also be used in smaller projects, such as table runners, placemats, or pillows. These projects are a great way to practice the block on a smaller scale before committing to a larger quilt. They also make thoughtful handmade gifts that are sure to be cherished.
When quilting your finished project, consider using quilting designs that enhance the star shapes. Straight-line quilting, stitch-in-the-ditch, or echo quilting are all good options that emphasize the geometric patterns of the stars without overshadowing them.
No matter how you choose to use the Star in a Star Quilt Block, it’s sure to be a standout feature in your quilt. Its intricate design and visual impact make it a favorite among quilters and a great way to showcase your creativity.
FAQ: Star in a Star Quilt Block – Free Pattern
Q: Is the Star in a Star Quilt Block suitable for beginners?
A: The Star in a Star Quilt Block is suitable for quilters with some experience due to the precise cutting and piecing required. However, determined beginners can certainly try it with careful attention to detail and practice.
Q: What size is the finished Star in a Star Quilt Block?
A: The size of the finished Star in a Star Quilt Block can vary depending on the pattern, but it’s typically around 12 inches square. Be sure to check the pattern instructions for the specific size.
Q: Can I use prints for the Star in a Star Quilt Block?
A: Yes, you can use prints, but it’s important to choose ones with the right scale and contrast. Smaller prints work well for the stars, while larger prints are better for the background.
Q: How do I ensure my star points are sharp?
A: Precision in cutting and sewing is key to achieving sharp star points. Use a 1/4-inch seam allowance and press your seams carefully. Pinning the pieces before sewing can also help maintain accuracy.
Q: What quilting designs work best with the Star in a Star Quilt Block?
A: Simple quilting designs like straight lines or echo quilting work well with this block. These designs enhance the geometric patterns without competing with the star design.
Q: Can I make a quilt using only the Star in a Star Quilt Block?
A: Absolutely! Repeating the Star in a Star Quilt Block in a grid pattern creates a stunning quilt with a uniform yet intricate design. You can also mix it with other blocks for variety.
Join our VIP broadcast list and gain access to exclusive patterns, all for free. As a VIP member, you’ll receive the best patterns daily, delivered directly to your device. ✨📱 It’s a unique opportunity to stay up-to-date with the latest trends and designs, curated just for you. Don’t miss out on enhancing your projects and discovering new inspirations with the best patterns every day! 🎨🔝
Conclusion
The Star in a Star Quilt Block – Free Pattern is a beautiful and challenging design that brings a touch of elegance to any quilt. Whether you’re using it as a focal point or incorporating it into a larger quilt, this block is sure to impress with its intricate nested stars.
We hope this tutorial has provided you with the inspiration and guidance you need to create your own Star in a Star Quilt Block. If you have any questions or suggestions, please leave a comment below. We’d love to see your finished blocks and hear about your quilting experiences. Happy quilting!