
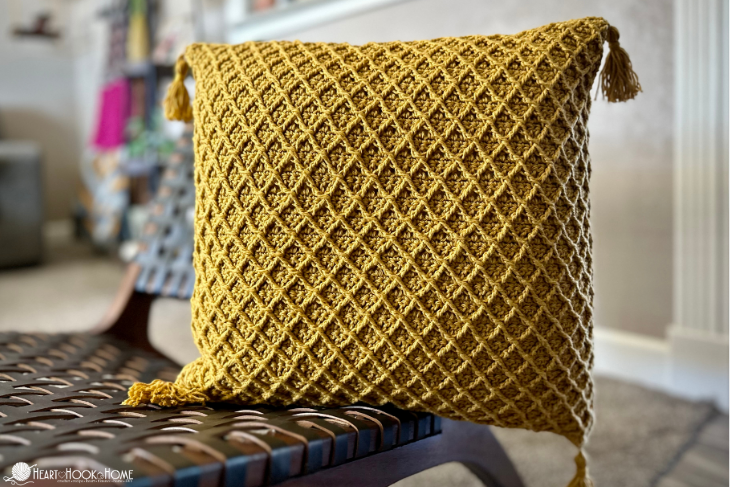
Creating a Diamond Pillow Cover: Free Crochet Pattern is a fantastic way to add a touch of elegance and handmade beauty to your home. Whether you’re a beginner or an experienced crocheter, this project is a perfect blend of creativity and functionality. In this guide, we will walk you through the entire process, ensuring that you have a seamless experience crafting your very own diamond-patterned pillow cover.
Crochet has long been cherished as an art form that blends tradition with modern designs. By following this free crochet pattern, you will not only enhance your skills but also create a stunning home decor piece that showcases intricate details and textures. This crochet pillow cover is designed to be both stylish and cozy, making it a great addition to any living space.
If you’re ready to embark on this creative journey, gather your materials and let’s dive into the step-by-step process of making a Diamond Pillow Cover. This tutorial will guide you through everything, from selecting the right yarn to adding the finishing touches, ensuring a beautifully crafted piece.
1. Materials Needed for the Diamond Pillow Cover
Before you begin crocheting your Diamond Pillow Cover, it’s important to gather all the necessary materials. Having everything ready will make the process smooth and enjoyable.
Choosing the Right Yarn
The type of yarn you choose significantly impacts the final look and feel of your pillow cover. Opt for soft, durable yarn that complements your home decor. Cotton or acrylic blends work well for this project.
Crochet Hook Size
Using the right crochet hook size ensures that your stitches are even and the fabric is not too tight or too loose. A 5.0mm (H) crochet hook is recommended for this pattern.
Additional Tools
Apart from yarn and a crochet hook, you’ll need a yarn needle, scissors, and stitch markers to keep track of your pattern and finish the project neatly.
Pillow Insert
To give your pillow cover structure, use a 16×16 inch pillow insert. This ensures that your crochet piece fits snugly and looks well-formed.
Stitch Knowledge
Before starting, ensure you’re familiar with basic crochet stitches like chain (ch), single crochet (sc), double crochet (dc), and slip stitch (sl st). These fundamental stitches are essential for creating the diamond pattern.
Color Selection
For an eye-catching diamond pattern, use contrasting colors. A mix of neutral and bold hues can make your pillow cover stand out while matching your decor.
2. Step-by-Step Instructions
Now that you have your materials ready, let’s begin crafting the Diamond Pillow Cover: Free Crochet Pattern.
Step 1: Creating the Foundation Chain
Start by making a foundation chain that measures the width of your pillow. A good starting point is 50-60 chains, depending on your gauge and yarn thickness.
Step 2: Establishing the Base Row
Work a single crochet (sc) row across the foundation chain. This creates a sturdy base for the diamond pattern.
Step 3: Forming the Diamond Pattern
The diamond design is achieved through a combination of double crochet (dc) and chain spaces (ch sp). Follow a pattern of increasing and decreasing stitches to shape the diamond motifs.
Step 4: Maintaining Stitch Consistency
To ensure an even texture, maintain a consistent tension throughout the project. This prevents the fabric from looking uneven or stretched.
Step 5: Creating the Back Panel
Repeat the same pattern for the back panel or use a solid stitch pattern for a simpler look. This provides durability and contrast to the front design.
Step 6: Joining the Pieces
Once both panels are complete, use a slip stitch (sl st) or whip stitch to join them. Leave an opening to insert the pillow and then securely close it.
3. Finishing Touches and Styling
After assembling your crochet pillow cover, it’s time to add the finishing details that make it unique and stylish.
Adding Decorative Edges
Enhance your pillow cover with a scalloped or ribbed border to give it a polished and decorative touch.
Blocking the Fabric
For a professional look, block your crochet piece by gently steaming or wetting it and laying it flat to dry. This helps set the stitches in place.
Choosing the Right Closure
Consider adding buttons, zippers, or ties to make the cover removable and washable.
Customizing the Design
Personalize your diamond pillow cover by experimenting with different colors, stitch variations, or even adding embroidered details.
Matching Home Decor
Coordinate your pillow cover with other handmade crochet pieces like blankets, rugs, or table runners to create a cohesive interior look.
Care and Maintenance
To keep your crochet pillow cover in top condition, hand wash it with mild detergent and let it air dry to maintain its shape and texture.
4. Frequently Asked Questions (FAQ)
What type of yarn is best for a crochet pillow cover?
Cotton or acrylic yarn works best as they are durable, soft, and easy to maintain.
How do I make my diamond pattern more prominent?
Using a contrasting color combination and maintaining consistent stitch tension will help highlight the diamond pattern.
Can I make this pillow cover in different sizes?
Yes! Simply adjust the foundation chain and stitch count to match your desired pillow size.
Is this pattern suitable for beginners?
Yes, this pattern uses basic crochet stitches, making it beginner-friendly with a bit of patience and practice.
How can I make the cover removable for washing?
Adding a zipper, buttons, or a flap closure allows for easy removal and washing.
Can I use this pattern for a cushion instead of a pillow?
Absolutely! Just ensure the dimensions match your cushion insert for a perfect fit.
Creating a Diamond Pillow Cover: Free Crochet Pattern is a rewarding and enjoyable project that enhances both your crochet skills and home decor. With the right materials, stitches, and finishing touches, you can craft a beautiful and functional piece that adds warmth and style to any space.
We hope this guide has helped you successfully complete your crochet pillow cover. If you have any questions or suggestions, feel free to leave a comment below. Happy crocheting!