
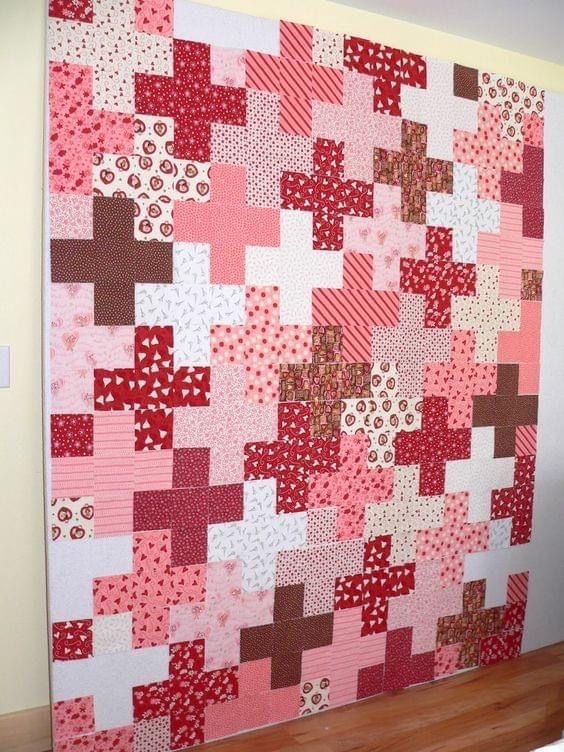
The Easy Plus Quilt Pattern is one of the most beginner-friendly and visually appealing quilt designs. It combines simplicity with versatility, making it a great choice for both novice quilters and experienced ones looking for a quick project.
This pattern is characterized by its geometric layout, typically featuring plus signs arranged in a structured yet dynamic way.
Whether you are making a quilt for personal use, as a gift, or for sale, the Easy Plus Quilt Pattern offers endless possibilities for color combinations and fabric choices. It allows you to create something unique while sticking to a simple design framework. The best part? This quilt pattern works well with various fabric types and sizes, giving you complete creative freedom.
In this guide, we will explore the key aspects of making an Easy Plus Quilt Pattern, including essential materials, step-by-step instructions, fabric selection tips, and quilting techniques. By the end of this article, you’ll have all the knowledge needed to create a stunning plus quilt with confidence.
1. Materials and Tools Needed for an Easy Plus Quilt Pattern
To start your quilting journey, you need the right materials and tools. Having everything prepared in advance makes the process smoother and more enjoyable.
Fabric Selection
- Choose high-quality cotton fabric, as it is easy to work with and durable.
- Opt for contrasting colors to make the plus signs stand out.
- Consider using pre-cut fabric bundles for convenience.
Essential Tools
- Rotary cutter and cutting mat for precise fabric cutting.
- Quilting ruler to measure and align pieces accurately.
- Sewing machine with a quarter-inch foot for consistent seam allowances.
Additional Supplies
- Thread in a coordinating color to blend with your fabric.
- Quilting pins or clips to hold pieces in place while sewing.
- Iron and pressing board to keep seams crisp and flat.
2. Step-by-Step Guide to Making an Easy Plus Quilt Pattern
Now that you have all the materials, let’s go through the process of making the quilt step by step.
Cutting the Fabric
- Cut squares of fabric in equal sizes to create uniform plus signs.
- Ensure you have a balanced mix of background and focal fabric.
- Double-check measurements to avoid inconsistencies.
Arranging the Plus Signs
- Lay out the squares on a flat surface before sewing.
- Experiment with different color placements to find the best arrangement.
- Keep a photo reference to maintain the layout while sewing.
Sewing the Pieces Together
- Start by sewing small sections, then join them into larger blocks.
- Use a quarter-inch seam allowance to ensure accuracy.
- Press seams open or to the side to reduce bulk.
Assembling the Quilt Top
- Connect all blocks row by row while keeping the pattern aligned.
- Pay close attention to seam intersections for a clean finish.
- Once all rows are connected, press the entire quilt top thoroughly.
Adding Batting and Backing
- Choose a soft batting material to add warmth and structure.
- Secure the quilt layers using safety pins or basting spray.
- Ensure all layers are smooth and wrinkle-free before quilting.
Quilting and Binding
- Stitch in the ditch along the seams for a simple, clean look.
- Experiment with free-motion quilting for added texture.
- Finish with a coordinated binding fabric for a polished edge.
3. Choosing the Right Color Combinations for an Easy Plus Quilt Pattern
Color choice plays a major role in the overall look of your quilt. The right combinations can make your design pop and enhance its aesthetic appeal.
Classic Black and White
- A timeless option that creates a bold contrast.
- Works well in modern or minimalist home decor.
- Ideal for gifting due to its universal appeal.
Bright and Cheerful Colors
- Great for baby quilts and playful designs.
- Yellow, pink, and turquoise create a fun and energetic feel.
- Perfect for seasonal quilts with vibrant themes.
Earth Tones and Neutrals
- Creates a warm, cozy, and rustic aesthetic.
- Works beautifully with farmhouse-style decor.
- Browns, beiges, and greens offer a natural look.
Monochrome Gradient
- A modern approach using different shades of one color.
- Gives a sophisticated and elegant appearance.
- Ideal for professional-looking quilts.
Random Scrappy Look
- Uses leftover fabric for an eco-friendly approach.
- Creates a charming, vintage-style quilt.
- Perfect for using up small fabric scraps.
4. Common Mistakes and How to Avoid Them When Making an Easy Plus Quilt Pattern
Even with a simple pattern, mistakes can happen. Here are some common pitfalls and how to avoid them.
Incorrect Measurements
- Always measure twice before cutting fabric.
- Use a quilting ruler to ensure straight edges.
- Keep a cutting chart handy for reference.
Mismatched Seams
- Pin fabric pieces carefully before sewing.
- Press seams open for better alignment.
- Sew slowly to maintain accuracy.
Uneven Fabric Stretching
- Avoid pulling fabric too tightly while sewing.
- Let the sewing machine feed the fabric naturally.
- Use quality fabric to minimize stretch.
Skipping the Pressing Step
- Pressing seams helps create a professional finish.
- A steam iron works best for crisp seams.
- Don’t skip pressing between each step.
Rushing Through Quilting
- Take your time to stitch carefully and evenly.
- Use quilting gloves for better grip and control.
- Start with simple quilting techniques before advancing.
Poor Binding Finish
- Trim excess batting before adding the binding.
- Use binding clips to secure edges before sewing.
- Finish with a hand-stitched or machine-sewn binding.
FAQ About Easy Plus Quilt Pattern
1. What is the best fabric to use for an Easy Plus Quilt Pattern?
High-quality cotton fabric is the best choice due to its durability and ease of use.
2. How big should my quilt blocks be?
Standard blocks range from 5 to 10 inches, depending on the desired quilt size.
3. Can I use pre-cut fabric for this quilt?
Yes! Charm packs and layer cakes are excellent for simplifying the process.
4. What quilting techniques work best with this pattern?
Simple stitch-in-the-ditch or free-motion quilting both complement this design well.
5. How long does it take to complete an Easy Plus Quilt Pattern?
It depends on experience level, but most quilters finish in a few days to a week.
6. What is the best way to wash a finished quilt?
Use cold water, gentle detergent, and air dry to maintain fabric integrity.
HERE PATTERN
The Easy Plus Quilt Pattern is a fantastic project for quilters of all skill levels. With its simple construction, endless customization options, and timeless appeal, it is an excellent choice for anyone looking to create a beautiful quilt. By following the step-by-step guide, choosing the right fabrics, and avoiding common mistakes, you can successfully complete your quilt with confidence.
Have you tried making an Easy Plus Quilt Pattern before? Share your thoughts, experiences, and any suggestions in the comments below!