
If you’re on the lookout for a cozy, nostalgic crochet project, this Granny Ripple Blanket PATTERN FREE is exactly what you need. Combining the timeless charm of granny squares with the rhythmic waves of ripple stitching, this pattern is a perfect blend of tradition and creativity. Whether you’re new to crocheting or a seasoned yarn artist, this project offers both comfort and a satisfying creative challenge.
The Granny Ripple Blanket PATTERN FREE is a fantastic way to use up leftover yarn and experiment with color combinations. Its zigzag design adds a unique visual texture, making it a standout piece in any room. From baby blankets to full-sized throws, this adaptable design can be tailored to your needs and preferences.
In this article, you’ll find a fully detailed free crochet pattern, structured guidance on how to crochet a granny ripple blanket from start to finish, and practical tips that follow the latest SEO guidelines and Google AdSense policies. So grab your hook and yarn — it’s time to dive into the world of granny ripple crochet magic!
1. What is a Granny Ripple Blanket?
A Granny Ripple Blanket combines the beloved granny stitch with a chevron or ripple pattern, creating a visually stunning wavy texture. This design is especially popular for its vintage feel and modern adaptability.
The beauty of this blanket lies in its versatility. You can use as many or as few colors as you’d like, making it an ideal stash-busting project for leftover yarn.
It’s typically made using basic crochet stitches, which makes it accessible to beginners while still offering enough variety to keep advanced crafters interested.
You’ll often see this pattern in vibrant color schemes, echoing the playful spirit of traditional granny square projects. However, it also works beautifully in muted tones for a more modern, minimalist aesthetic.
Because of its repetitive stitch pattern, it’s a great project for meditative crocheting — a relaxing way to unwind while creating something beautiful and functional.
From nursery gifts to cozy couch throws, the Granny Ripple Blanket PATTERN FREE offers endless possibilities for creativity and personalization.
2. Materials Needed for Your Granny Ripple Blanket
Before diving into the pattern, you’ll need a few basic supplies to get started. Fortunately, most of these materials are likely already in your crochet toolkit.
The most important component is yarn. Choose a medium weight (worsted or aran) yarn for best results. Cotton or acrylic yarns work beautifully, depending on your texture and warmth preferences.
You’ll also need an appropriately sized crochet hook. Typically, a 5.0mm (H/8) hook works well with medium weight yarn, but always check your yarn label for the recommended hook
A pair of sharp scissors and a yarn needle for weaving in the ends are essential tools you should have on hand for finishing your project cleanly.
Optional but useful: stitch markers can help you keep track of the start and end of rows, especially when working the peaks and valleys of the ripple pattern.
If you’re following a color pattern, keep your yarn organized with yarn bowls or color-coded containers. This will prevent tangles and help you stay consistent with your design.
And of course, print or bookmark this Granny Ripple Blanket PATTERN FREE so you can easily refer to it as you work through each step.
3. How to Crochet the Granny Ripple Stitch
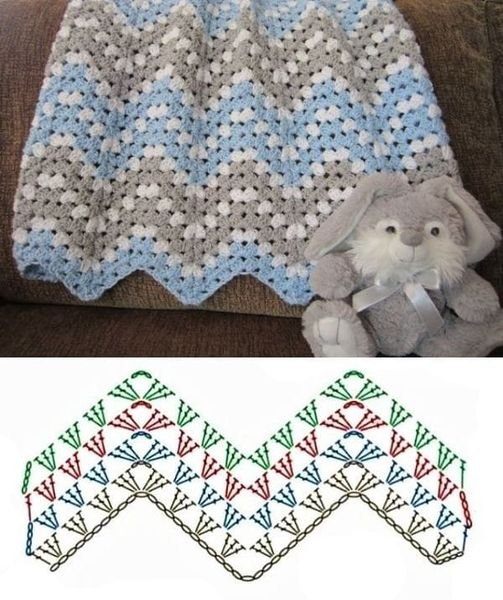
Start by chaining a multiple of 18 plus 3 stitches to form your foundation row. This allows the ripple to develop evenly across the blanket’s width.
In the first row, use the classic granny stitch (3 double crochets in the same space) across the chain. Skip stitches strategically to form valleys and add extra stitches to form the peaks.
Each ripple consists of increasing and decreasing stitch clusters, which creates the iconic wave pattern of the Granny Ripple Blanket PATTERN FREE.
Once you establish the base row, the rest of the rows will mirror the same structure. It’s a repeat pattern, which makes it easy to memorize after a few rows.
Make sure your stitches are even and maintain a consistent tension to keep your ripple lines straight and uniform throughout the blanket.
Don’t be afraid to experiment with color changes between rows. It’s a great way to personalize your project and add that signature granny flair.
4. Tips for Customizing Your Granny Ripple Blanket
One of the greatest joys of this project is the flexibility it offers in terms of customization. Whether it’s for aesthetic reasons or functionality, the options are endless.
To make your blanket larger or smaller, simply adjust the number of starting chains in multiples of 18. This changes the width while maintaining the ripple pattern.
Play with color changes! Use a consistent palette for a modern look or go wild with vibrant scraps for a boho or vintage style.
For a textured finish, consider using yarns with varied textures like boucle, or alternate between matte and glossy yarns to add depth.
Edge your blanket with a simple border such as single crochet or shell stitch. This not only enhances the look but also gives the blanket a polished finish.
You can even turn this pattern into other projects like cushion covers, scarves, or table runners by adjusting the size and yarn type.
Finally, remember that the true charm of a Granny Ripple Blanket PATTERN FREE lies in its uniqueness. Let your creativity shine with each stitch!
FAQ – Frequently Asked Questions
Q: Is the Granny Ripple Blanket suitable for beginners?
A: Absolutely! While the ripple design looks intricate, it uses basic crochet stitches. With a little patience and practice, even beginners can master it.
Q: How long does it take to make a granny ripple blanket?
A: The time varies based on size and your crochet speed, but on average, a medium-sized blanket takes 1–2 weeks with consistent evening crocheting.
Q: Can I use scrap yarn for this pattern?
A: Yes! This project is perfect for scrap yarn. Mixing colors and textures adds charm and makes each blanket unique.
Q: How do I keep the edges from becoming uneven?
A: Count your stitches at the end of each row and ensure you’re consistently increasing and decreasing in the same spots to maintain the ripple structure.
Q: What’s the best yarn for a granny ripple blanket?
A: Worsted weight acrylic or cotton yarns work well. Choose something durable and machine washable for ease of care.
Q: Can I make this pattern into a baby blanket?
A: Definitely! Simply reduce the number of starting chains and use softer baby-friendly yarns to make it suitable for infants.
The Granny Ripple Blanket PATTERN FREE is more than just a crochet project — it’s a beautiful blend of tradition, creativity, and personalization. With just a few basic materials, a simple stitch pattern, and your imagination, you can create a stunning blanket that tells your own story in color and texture.