
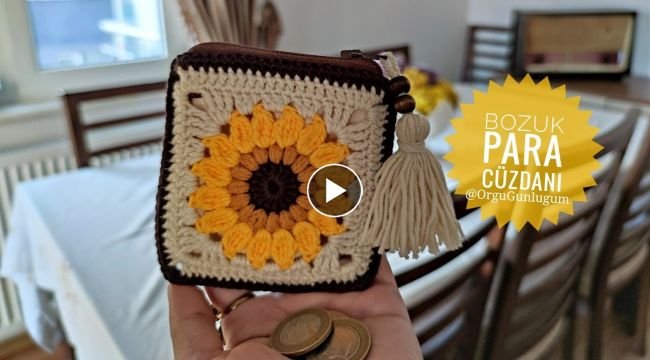
If you’re passionate about crochet and love creating adorable, functional accessories, then Sunflower Patterned Coin Mini Wallet Making is a must-try project. This charming and practical little wallet brings the beauty of sunflowers to your everyday essentials while keeping your coins safe and stylish. Whether you’re a beginner or an experienced crocheter, this project is a delightful way to combine your love of crafting with a functional outcome.
Incorporating floral elements into crochet designs has always been popular, and sunflowers — with their bright, cheerful appeal — stand out as a timeless favorite. This pattern brings together the sunny charm of nature with a touch of practicality. The small size makes it perfect for quick projects or even handmade gifts, and the sunflower design is perfect for spring and summer fashion accessories.
This guide to Sunflower Patterned Coin Mini Wallet Making will walk you through the process step-by-step, ensuring your wallet turns out both beautiful and durable. With the right yarn, hook, and creativity, you’ll be able to craft a mini wallet that not only holds your coins but also turns heads with its cute design. Let’s dive in!
1. Choosing Materials for Your Sunflower Wallet
When beginning your Sunflower Patterned Coin Mini Wallet Making journey, choosing the right materials sets the foundation for a successful project. High-quality yarn will ensure the wallet is soft, strong, and visually appealing.
Cotton yarn is often the best choice for crochet wallets due to its durability and clean stitch definition. Pick colors that reflect the natural tones of a sunflower — golden yellow for petals, brown for the center, and green for the leafy border if desired.
Select a crochet hook size that suits your yarn. Typically, a 2.5mm to 3.5mm hook works well for small accessories like this. A tighter stitch helps maintain the wallet’s shape and durability.
You’ll also need a zipper or button closure to finish the wallet securely. Choose a matching or contrasting color for added visual appeal. A small lining fabric can also add structure and keep the interior smooth.
Other helpful tools include stitch markers, scissors, and a tapestry needle for weaving in ends. Having everything ready before you begin keeps your workflow smooth and enjoyable.
By selecting quality tools and materials, your finished mini wallet will not only look fantastic but last for years of everyday use.
2. Step-by-Step: Crafting the Sunflower Center
The heart of your Sunflower Patterned Coin Mini Wallet Making begins with the sunflower center. This part captures attention immediately, so focus on tight, even stitches and a round shape.
Start with a magic ring in dark brown yarn to mimic the sunflower’s core. Work single crochets (sc) into the ring, then pull it tight to close. This technique ensures a neat, hole-free center.
Continue working in rounds, increasing evenly to keep the shape flat. You might use double crochet (dc) stitches in the second or third round for added dimension and texture.
Use stitch markers to keep track of each round’s start. This small tip avoids confusion and keeps your work neat and symmetrical.
Once the circle reaches the desired size — about the size of a coin — you can fasten off and switch to the petal color. This center will serve as the focal point of your wallet.
A well-crafted center sets the tone for the rest of the design. Take your time and ensure your stitches are consistent before moving on.
3. Adding Petals and Shaping the Wallet
After finishing the sunflower center, it’s time to crochet the petals. This step transforms your wallet from basic to beautiful and highlights the floral theme perfectly.
Attach golden yellow yarn and work a petal pattern around the circle. A common method is chaining 5–6, then working back with half double crochets (hdc) and slip stitches to form each petal.
Repeat the petal sequence around the center, adjusting the number of stitches to ensure fullness. The petals should be consistent in size and spacing for a polished appearance.
If you want to go beyond a flat sunflower, consider adding layers or a ruffled edge for a 3D effect. This gives your mini wallet a unique texture and appeal.
Once the flower is complete, it’s time to crochet the body of the wallet. You can either build out from the sunflower circle or attach the flower to a crocheted square or rectangle base.
Be sure to leave an opening at the top for inserting your coins, and consider crocheting a flap or attaching a zipper as a closure option. This adds functionality without compromising style.
At this point, your mini wallet is taking shape and reflecting the cheerful essence of the sunflower — both useful and decorative.
4. Finishing Touches and Styling Options
With the main structure complete, now it’s time to give your Sunflower Patterned Coin Mini Wallet those final details that make it truly special.
One option is to sew or glue a fabric lining inside. This not only enhances durability but also prevents small items like coins from slipping through crochet gaps.
Secure your chosen closure — whether it’s a button, snap, or zipper — to ensure the wallet remains practical. For a rustic look, consider wooden buttons. For modern flair, a metallic zipper works great.
If you’re feeling creative, you can add embellishments such as leaves, vines, or even a tiny bee or ladybug to add whimsy to the sunflower theme.
Adding a small wrist strap or keyring attachment can make your wallet even more functional, letting you clip it to a bag or carry it easily on the go.
Blocking your finished piece helps set the shape and improves the overall look. Simply pin it into shape and lightly steam or dampen to fix it in place.
Your finished wallet is now ready to be used, gifted, or sold! Every stitch reflects your effort and creativity, and the sunny design is sure to brighten someone’s day.
FAQ – Sunflower Patterned Coin Mini Wallet Making
Q1: Is this project suitable for crochet beginners?
Yes! While some experience with basic stitches is helpful, even beginners can follow this project with patience and attention to detail.
Q2: How long does it take to complete a mini sunflower wallet?
Depending on your skill level, you can expect to finish in 2–4 hours. It’s a quick and satisfying project for a weekend or evening craft session.
Q3: Can I use other flower designs instead of sunflowers?
Absolutely! You can adapt the pattern to use daisies, roses, or any flower of your choice. The structure remains the same, only the motif changes.
Q4: What type of yarn works best for this project?
Cotton yarn is ideal due to its structure and stitch clarity. Acrylic is also fine but may stretch more over time.
Q5: Can I sell the wallets I make using this pattern?
Yes, handmade products can be sold, especially if you’ve added your personal touch. Just be sure not to resell copyrighted patterns.
Q6: Is lining the wallet necessary?
It’s optional but recommended for added strength and to keep smaller items secure. Lining also gives a more professional finish.
In this article, we explored the creative process of Sunflower Patterned Coin Mini Wallet Making — from selecting materials to shaping the sunflower and adding functional touches. This project combines the joy of crochet with the practicality of a mini wallet, making it a perfect addition to your handmade collection or a thoughtful gift idea.
With just a few materials and some creativity, you can craft a vibrant, cheerful wallet that brings sunshine wherever it goes. Whether you’re keeping your own coins safe or sharing your work with others, this sunflower wallet is bound to spread smiles.
We’d love to hear your thoughts! Have you tried this pattern? Do you have tips, suggestions, or ideas for future projects? Leave your honest feedback and help us improve with your insights. Happy crocheting!