
If you’ve been searching for a fun and creative way to craft your perfect makeup bag: step-by-step tutorial, you’ve just landed in the right place. Whether you’re a DIY enthusiast or a beginner looking for an easy project, this guide will help you create a stylish and practical makeup bag tailored exactly to your needs. Imagine having a custom-made bag that not only holds your beauty essentials but also reflects your personality!
In this detailed guide, you will discover how to craft your perfect makeup bag: step-by-step tutorial with clear instructions and helpful tips. No more hunting for the ideal makeup bag at the store when you can make one that’s the perfect size, design, and color. Plus, crafting your own bag can be a satisfying and relaxing activity.
Throughout this article, we’ll walk through each stage of creating your makeup bag. From gathering your materials to adding personal touches, every detail is covered to help you succeed. Get ready to craft your perfect makeup bag: step-by-step tutorial and enjoy a handmade accessory that’s as unique as you are!
1. Choosing the Right Materials
The first step to craft your perfect makeup bag: step-by-step tutorial is selecting high-quality materials that suit your style and practical needs. Fabric is the star of the show, so choose one that’s both durable and easy to clean, such as cotton, canvas, or faux leather. Consider waterproof linings if you plan to carry liquid products.
Zippers and closures are also important in the craft your perfect makeup bag: step-by-step tutorial process. A sturdy zipper will keep your cosmetics secure, while magnetic snaps or buttons can add decorative flair. Choose hardware that complements your fabric choice for a cohesive look.
You’ll also need interfacing to give your bag structure. This helps your makeup bag keep its shape and withstand daily use. In this craft your perfect makeup bag: step-by-step tutorial, we recommend medium-weight fusible interfacing for a balance of flexibility and sturdiness.
Don’t forget thread! Select a thread that matches or contrasts with your fabric, depending on the effect you want. Strong polyester thread works well for sewing makeup bags that last. This detail can really enhance your craft your perfect makeup bag: step-by-step tutorial project.
Consider embellishments like patches, embroidery, or iron-on designs. Adding these personal touches will make your makeup bag truly unique and special. When you craft your perfect makeup bag: step-by-step tutorial, small details can make a big difference.
Lastly, gather basic tools like fabric scissors, pins, a ruler, and a sewing machine (or needle if hand-sewing). Having everything ready ensures a smooth and enjoyable crafting experience as you craft your perfect makeup bag: step-by-step tutorial.
2. Cutting and Preparing Your Fabric
Now that your materials are ready, it’s time to start cutting and prepping as part of your craft your perfect makeup bag: step-by-step tutorial. Measure and mark your fabric carefully before cutting. Precision at this stage will help ensure your bag looks neat and professional.
Cut two pieces of outer fabric and two pieces of lining fabric to your desired size. A common size for makeup bags is 10 inches by 7 inches, but you can customize this to fit your needs. Remember, part of the fun when you craft your perfect makeup bag: step-by-step tutorial is designing it to your liking!
Next, cut your interfacing to match the outer fabric pieces. Fuse the interfacing to the wrong side of the outer fabric using an iron. This will give your bag the needed structure, a key step in our craft your perfect makeup bag: step-by-step tutorial.
If you’re adding any embellishments or designs, now is the perfect time. Apply patches, embroidery, or appliqués to the outer fabric pieces before sewing them together. Personalizing your project is one of the joys when you craft your perfect makeup bag: step-by-step tutorial.
Mark where your zipper will go. Using pins or fabric clips will help keep everything in place as you work. In this craft your perfect makeup bag: step-by-step tutorial, taking time to align parts carefully pays off in a polished final product.
Finally, press all your pieces with an iron to remove wrinkles and set your markings. This step ensures everything is smooth and easy to work with as you continue to craft your perfect makeup bag: step-by-step tutorial.
3. Assembling the Makeup Bag
It’s time to bring your pieces together in this exciting stage of the craft your perfect makeup bag: step-by-step tutorial. Start by attaching the zipper. Place one outer fabric piece right side up, align the zipper face down along the top edge, and place the lining fabric right side down on top. Sew along the edge to secure.
Repeat this with the other side of the zipper, attaching the remaining outer and lining fabric pieces. This sandwich technique creates a clean and professional finish, an essential step in our craft your perfect makeup bag: step-by-step tutorial.
Open the fabric pieces and press them away from the zipper. Topstitch along the zipper edge to keep the fabric flat and prevent it from catching in the zipper teeth. Topstitching adds durability and a neat appearance to your craft your perfect makeup bag: step-by-step tutorial project.
Next, align the outer fabrics right sides together and the linings right sides together. Pin or clip around the edges, leaving a small gap in the lining for turning the bag right side out. Careful alignment is key in this stage of the craft your perfect makeup bag: step-by-step tutorial.
Sew around the perimeter, going slowly over the zipper area. This will help prevent your machine needle from breaking. Accuracy here is important to achieve a sleek look when you craft your perfect makeup bag: step-by-step tutorial.
Once sewn, trim excess fabric at the corners to reduce bulk. Turn your bag right side out through the gap, and push out the corners carefully. Sew the gap in the lining closed by hand or machine, completing this part of your craft your perfect makeup bag: step-by-step tutorial.
4. Adding the Final Touches
Your bag is nearly complete, but no craft your perfect makeup bag: step-by-step tutorial would be finished without those final details. Give your bag a final press to make sure it looks crisp and polished.
If desired, add a fabric tag or label to personalize your bag further. A label adds a professional touch and makes your creation feel extra special. In this craft your perfect makeup bag: step-by-step tutorial, we encourage you to celebrate your craftsmanship!
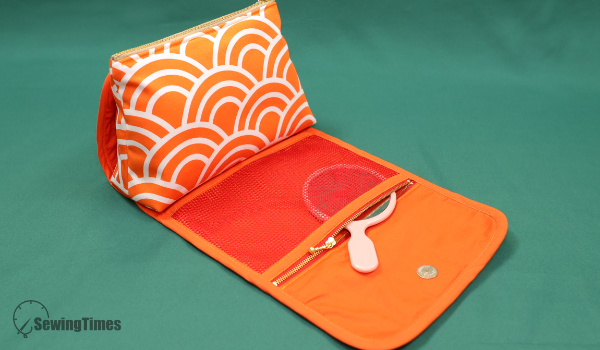
Consider adding interior pockets for better organization. You can sew small fabric pockets to the lining before assembling, or add elastic bands to hold brushes. These additions take your craft your perfect makeup bag: step-by-step tutorial to the next level.
Another fun option is to attach a wrist strap or handle. This makes your bag easy to carry and adds functionality. Small details like this enhance the practicality of your craft your perfect makeup bag: step-by-step tutorial.
You can also decorate the zipper pull with beads, tassels, or charms. This small feature adds style and personality to your bag. Personal touches make your craft your perfect makeup bag: step-by-step tutorial truly yours.
Finally, admire your finished bag! Take a moment to appreciate the effort you put into your project. Share your creation with friends or on social media — your craft your perfect makeup bag: step-by-step tutorial could inspire others to start crafting too.
FAQ
How do I choose the best fabric for a makeup bag?
Look for durable, easy-to-clean fabrics like cotton, canvas, or faux leather. Waterproof lining is a smart choice to protect against spills.
Is it possible to make a makeup bag without a sewing machine?
Yes, you can hand-sew a makeup bag, though it will take longer. Use strong thread and small, tight stitches for the best results.
What size should I make my makeup bag?
It depends on your needs! A standard size is about 10 by 7 inches, but you can adjust based on what you plan to carry.
How do I make my makeup bag waterproof?
Use waterproof lining fabric or apply a fabric sealant spray. Both options help protect against leaks.
Can I wash my handmade makeup bag?
Yes, if you used washable materials. Spot clean or gently hand wash, depending on your fabric choice.
What are some easy ways to personalize my makeup bag?
Try adding patches, embroidery, appliqués, or custom zipper pulls. These additions are simple but make a big impact.
By following this craft your perfect makeup bag: step-by-step tutorial, you’ve learned how to select materials, cut fabric, assemble your bag, and add special touches that reflect your style. We hope this guide has inspired you to create a makeup bag that’s beautiful, functional, and uniquely yours. If you enjoyed this project, please leave a sincere opinion below and share any suggestions for future tutorials — your feedback helps us improve and create content that you love!