
If you’re looking for an easy idea to make pompom hearts with your fingers, you’ve just found a fun and creative project that’s perfect for beginners and experts alike. With just some yarn, your fingers, and a little patience, you can create beautiful pompom hearts that are great for decorating gifts, accessories, or even your home. This technique is simple and doesn’t require any special tools, making it ideal for anyone who loves crafts or wants to try something new.
The charm of making pompom hearts with your fingers lies in its simplicity and versatility. Whether you are a crochet enthusiast or someone exploring fiber crafts for the first time, this project allows you to express creativity without complicated steps. It’s a wonderful activity to do with kids, friends, or on your own during a relaxing afternoon.
In this article, you will discover a step-by-step guide on how to create these adorable heart-shaped pom-poms. We’ll explore the materials you need, tips for perfect shapes, and creative ways to use your finger pompom hearts. Let’s dive into this delightful journey of yarn crafting!
1. Materials You Need for Pompom Hearts
To get started on this easy idea to make pompom hearts with your fingers, you’ll need some basic supplies that you probably already have at home. The best part is that this project is budget-friendly and doesn’t require expensive tools.
First, you will need yarn. Choose soft yarn in the colors you want for your pompom hearts. Red, pink, and white are classic choices, but feel free to experiment with bright or pastel tones. Thicker yarn tends to create fluffier pom-poms.
Secondly, have a pair of scissors ready. Sharp craft scissors work best for cutting through the yarn cleanly, which is important for shaping your pompom into a heart later.
You’ll also want to have some cardboard or paper templates on hand if you’d like help with trimming your pompom hearts. While this is optional, it can make the shaping process easier, especially if you want uniform hearts for a garland or other project.
Many crafters like to use a crochet hook or yarn needle for tying off the center of their pompom securely. While this isn’t strictly necessary, it can make the process a bit smoother, especially if your fingers feel clumsy tying knots with yarn.
Finally, make sure you have a comfortable workspace with good lighting. Making pompom hearts with your fingers is a relaxing activity, so set up a cozy spot where you can focus and enjoy the process.
2. Step-by-Step Guide to Make Pompom Hearts
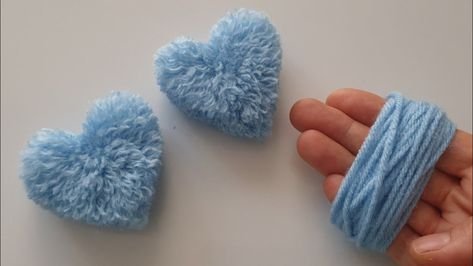
The easy idea to make pompom hearts with your fingers begins with wrapping yarn around your fingers. Start by choosing two or three fingers depending on the size of heart you want. The more you wrap, the fuller your pompom will be.
Begin wrapping your chosen yarn snugly around your fingers. Keep the wraps tight enough that they stay in place, but not so tight that you can’t slide them off later. Aim for about 40 to 50 wraps for a small pompom heart.
Once you’ve finished wrapping, gently slide the yarn bundle off your fingers. Take a piece of yarn about 12 inches long and tie it tightly around the middle of the bundle. This center tie is what holds your pompom together, so make sure it’s secure with a double knot.
Use sharp scissors to cut through all the loops on either side of the center tie. Be careful not to cut the center string itself. At this point, you’ll have a basic round pompom.
To shape your pompom into a heart, start trimming the yarn carefully. Cut a small notch at the top center to form the heart’s dip, and then round the sides into a heart shape. Go slowly, trimming little by little to get a symmetrical result.
After shaping, fluff up your pompom heart with your fingers. If needed, do a bit more trimming until you’re happy with the shape. The more you practice this technique, the easier it will become to create beautiful, even heart shapes.
3. Creative Ways to Use Pompom Hearts
Now that you’ve mastered this easy idea to make pompom hearts with your fingers, let’s look at fun ways to use your creations. These little hearts can brighten up many different projects!
You can string your pompom hearts onto yarn or ribbon to create a festive garland. This makes a lovely decoration for Valentine’s Day, weddings, or even a cozy corner of your home.
Another great idea is to glue your pompom hearts onto greeting cards. They add a soft, tactile touch that makes your handmade cards extra special for birthdays, anniversaries, or holidays.
If you enjoy accessorizing, attach a keyring or clip to your pompom heart and turn it into a bag charm or keychain. This is a wonderful handmade gift that shows you put thought and love into your craft.
For those who like to crochet or sew, pompom hearts can be sewn onto blankets, pillows, or hats as embellishments. They add texture and color to your fiber art projects in a fun and unique way.
You can also use small pompom hearts to decorate gift packages. Simply tie them onto the ribbon of a wrapped present for an adorable finishing touch that the recipient can keep.
Finally, consider making mini pompom hearts to use as confetti or table decor for parties. These tiny hearts look sweet scattered across a table and are easy to make in bulk.
4. Tips for Perfect Finger Pompom Hearts
Achieving the perfect pompom heart shape can take a little practice, but these tips will help you succeed with your easy idea to make pompom hearts with your fingers.
Choose yarn that is soft but holds its shape well. Acrylic or cotton blends often work better than very silky yarns, which can slip and be harder to trim neatly.
When tying the center of your pompom, pull the string as tight as possible without breaking it. A secure center tie ensures that your pompom doesn’t fall apart as you trim and shape it.
Trim slowly and evenly on both sides of the pompom. Start with larger cuts to rough out the shape, and then make small snips to refine the heart curves. Sharp scissors make a big difference here.
Fluff your pompom often as you trim. This helps you see where additional trimming is needed and ensures your heart is full and even on all sides.
If you want matching hearts for a project like a garland, make a cardboard heart template to guide your trimming. Hold it behind the pompom as you trim for more accuracy.
Lastly, don’t be discouraged if your first heart isn’t perfect. With each attempt, your technique will improve, and you’ll soon be making beautiful, fluffy pompom hearts with ease!
FAQ
How long does it take to make a pompom heart?
On average, it takes about 10 to 15 minutes to make one pompom heart once you’re familiar with the process. Beginners might take a little longer as they practice the wrapping and trimming techniques.
Can I use crochet yarn for pompom hearts?
Yes! Crochet yarn works beautifully for making pompom hearts with your fingers. Just make sure the yarn is soft enough to fluff but firm enough to hold its shape.
What size should my pompom hearts be?
The size is up to you. Using two fingers will create smaller hearts, while three or four fingers will give you larger ones. Adjust the number of wraps to achieve your desired fullness.
Do I need any special tools for this project?
No special tools are required. All you need are your fingers, yarn, scissors, and optionally a crochet hook or yarn needle for tying.
Can kids make pompom hearts?
Absolutely! This is a kid-friendly project, but young children should be supervised when using scissors.
What are the best occasions to use pompom hearts?
Pompom hearts are perfect for Valentine’s Day, weddings, baby showers, or any occasion where you want to add a touch of handmade charm to your decorations.
Creating pompom hearts with your fingers is a delightful and accessible craft that anyone can enjoy. This easy idea to make pompom hearts with your fingers requires minimal materials and offers endless possibilities for creative expression. From garlands to gifts, these soft little hearts can brighten up any project. I hope this guide has inspired you to give it a try! Please leave your honest opinion and any suggestions for future tutorials — I’d love to hear from you!