
If you are searching for a Teddy Bear Quilt Bag Tutorial, you’ve come to the right place! This comprehensive guide will walk you through creating a charming quilted bag that features the beloved teddy bear motif. Whether you’re making this for yourself, a child, or as a thoughtful handmade gift, this Teddy Bear Quilt Bag Tutorial will help you achieve beautiful results even if you’re a beginner.
The charm of a Teddy Bear Quilt Bag lies in its ability to blend functionality with nostalgic sweetness. Imagine carrying a bag that not only holds your essentials but also showcases an adorable teddy bear pattern crafted with care. Throughout this Teddy Bear Quilt Bag Tutorial, we’ll cover design choices, material selection, cutting, piecing, and finishing your project like a pro.
Crafting a quilted bag is not just about sewing—it’s a creative journey where fabric, pattern, and imagination come together. This Teddy Bear Quilt Bag Tutorial will guide you step-by-step so you can create a unique accessory that reflects your personality and style. Let’s dive into the details!
1. Choosing the Right Materials for Your Teddy Bear Quilt Bag
The first step in this Teddy Bear Quilt Bag Tutorial is gathering the right materials. High-quality fabric ensures durability and a professional finish. Look for cotton quilting fabrics with teddy bear prints or soft solid colors that complement the design.
Batting is essential in any quilted project, and your Teddy Bear Quilt Bag is no exception. Choose a medium-loft batting that gives structure without making the bag too bulky. This will provide the right amount of padding to protect the bag’s contents while maintaining flexibility.
Thread selection is equally important. Use strong polyester or cotton thread that matches or contrasts beautifully with your fabrics. A good-quality thread enhances the durability and appearance of your stitches.
Handles and closures give your bag functionality. In this Teddy Bear Quilt Bag Tutorial, we recommend fabric handles for a soft finish, but you can also opt for leather or rope handles for added character. Magnetic snaps or zippers are great choices for secure closure.
Consider using interfacing for additional stability. This optional but beneficial material helps maintain the shape of your bag over time. Fusible interfacing is easy to apply and works well in quilted bag projects like this one.
Lastly, gather basic sewing supplies such as scissors, rotary cutter, cutting mat, quilting ruler, pins, and your sewing machine. Having everything at hand will make your quilting journey smoother and more enjoyable.
2. Cutting and Piecing Your Teddy Bear Quilt Bag
The cutting process is where your Teddy Bear Quilt Bag Tutorial truly begins to take shape. Start by measuring and cutting your main fabric panels. Typically, two panels measuring around 14 x 16 inches work well, but you can adjust this based on your preferred bag size.
Next, cut your batting and lining fabric to match the size of your main panels. This ensures everything aligns perfectly when you assemble the bag. Don’t forget to cut additional pieces for pockets or decorative accents if desired.
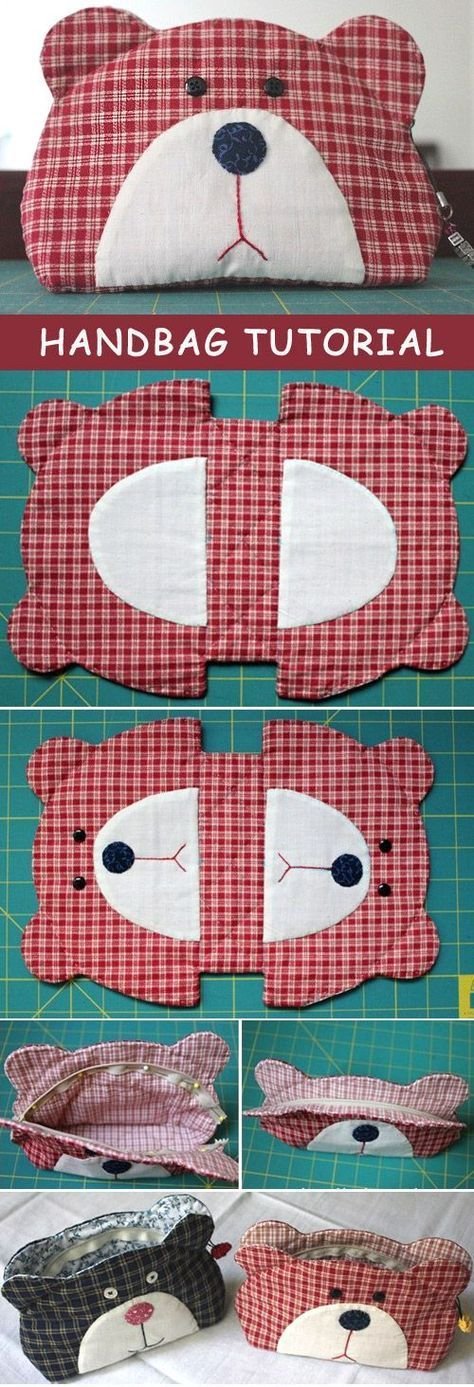
When piecing together your teddy bear design, consider using appliqué or patchwork techniques. Cut out bear shapes from your chosen fabrics and arrange them creatively on your panels. This is where your bag starts to come alive with personality!
Use a zigzag or blanket stitch to secure your appliqué pieces. This Teddy Bear Quilt Bag Tutorial encourages experimenting with different stitching styles to add texture and charm to your design.
After appliquéing your teddy bears, quilt your panels by stitching through the fabric, batting, and lining layers. You can choose straight lines, crosshatch, or free-motion quilting to enhance your bag’s look.
Trim any excess batting or lining from the edges of your quilted panels. This ensures a neat and professional finish as you prepare to assemble the bag.
3. Assembling the Teddy Bear Quilt Bag
Assembling your Teddy Bear Quilt Bag is a satisfying part of this creative process. Begin by placing your quilted panels right sides together and sewing along the sides and bottom edges. Use a ¼-inch seam allowance for precision.
To give your bag a flat bottom, create boxed corners. Mark and cut small squares (usually 2 inches) from the bottom corners, then match and sew the open edges together. This step gives your Teddy Bear Quilt Bag structure and depth.
If you’re adding pockets, now is the time. Sew patch or zipper pockets onto the lining panels before assembling the lining. This adds functionality to your bag without complicating construction.
Create your handles by folding and stitching fabric strips or attaching pre-made handles. Make sure they are securely sewn into the top edge of the bag. Even weight distribution ensures long-term durability.
Once your outer bag and lining are complete, insert the lining into the outer bag with right sides facing. Sew around the top edge, leaving a small opening to turn the bag right side out.
After turning, press the bag’s top edge and topstitch all around for a clean, finished look. Your Teddy Bear Quilt Bag is now ready for use or gifting!
4. Finishing Touches and Styling Your Teddy Bear Quilt Bag
This Teddy Bear Quilt Bag Tutorial wouldn’t be complete without discussing those extra touches that make your bag unique. Add buttons, ribbons, or embroidery to give your teddy bear design even more personality.
Consider adding a fabric tag or label with your name or a fun message. This small detail transforms your Teddy Bear Quilt Bag into a true keepsake or meaningful gift.
You might want to line your bag with a contrasting fabric that complements the outer teddy bear theme. Every time you open your bag, it’s a delightful surprise that reflects thoughtful design.
If you’re feeling adventurous, add decorative quilting stitches along the handles or the top edge of your bag. These little accents enhance both durability and style.
Don’t forget about practical enhancements like adding feet to the bottom of your bag. These help protect the fabric when you set the bag down, preserving your work for years to come.
Finally, consider coordinating your Teddy Bear Quilt Bag with other quilted accessories, like a matching pouch or wallet. A set like this makes a beautiful, cohesive handmade collection.
FAQ: Teddy Bear Quilt Bag Tutorial
Q: Is this Teddy Bear Quilt Bag Tutorial suitable for beginners?
Yes! This Teddy Bear Quilt Bag Tutorial is designed with beginners in mind. The steps are broken down clearly, and you can adjust the complexity of the design based on your skill level.
Q: What size should I make my Teddy Bear Quilt Bag?
The size is customizable, but a common choice is about 14 x 16 inches. Feel free to adjust dimensions based on your needs and preferences.
Q: Can I make the Teddy Bear Quilt Bag without a sewing machine?
While it’s possible to sew by hand, a sewing machine will make the process faster and more durable. Hand stitching works well for smaller details or appliqué.
Q: What fabrics work best for this bag?
Quilting cotton is highly recommended. It’s easy to work with and offers durability. You can also experiment with denim, canvas, or blends for added strength.
Q: How can I personalize my Teddy Bear Quilt Bag?
There are many ways—try different teddy bear fabrics, add embellishments like buttons or embroidery, or use contrasting linings and handles to create a unique look.
Q: How do I care for my quilted bag?
Spot clean or gently hand wash your Teddy Bear Quilt Bag. Avoid harsh detergents and air dry to preserve the fabric and quilting details.
PATTERN HERE
Creating your own Teddy Bear Quilt Bag is a rewarding and fun project that combines practicality with creativity. In this Teddy Bear Quilt Bag Tutorial, we covered everything from material selection and cutting to assembly and final styling. Now it’s your turn to bring your vision to life! We hope this guide inspires you to try new techniques and make something truly special. Please leave your sincere opinion about this tutorial and feel free to share suggestions or your own creative ideas—we’d love to hear from you!
If you’d like, I can help create images, diagrams, or printable patterns to go along with this article. Let me know!