
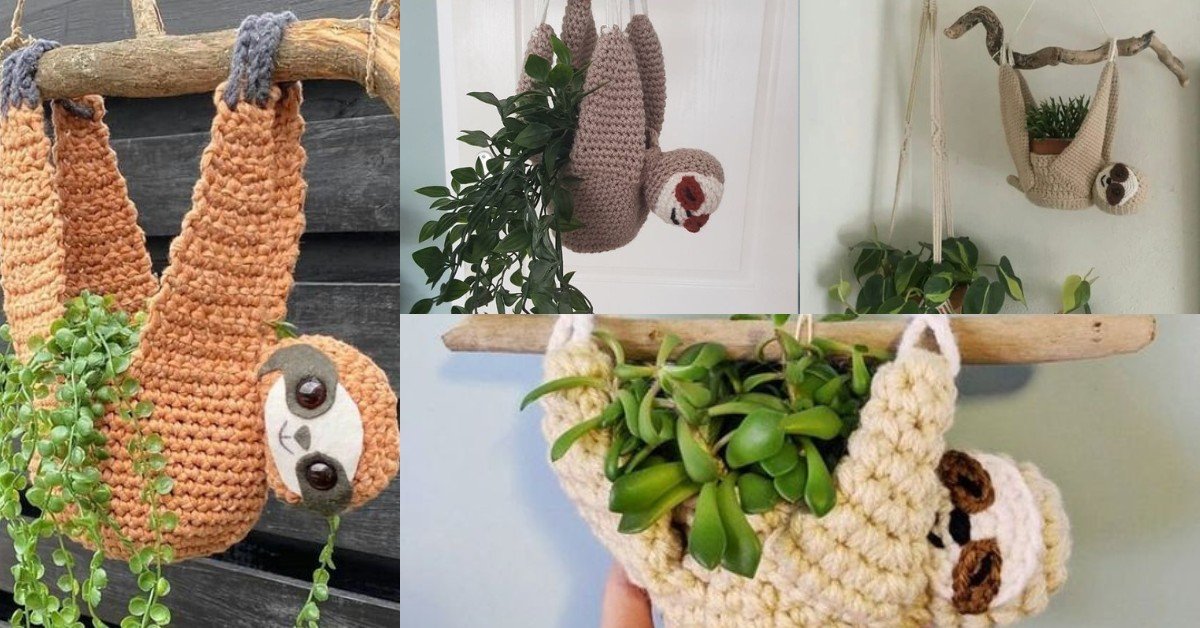
If you’ve ever wanted to add a touch of whimsy and greenery to your home decor, learning how to crochet a sloth planter is the perfect creative adventure. This fun and beginner-friendly crochet project combines the charm of a sloth with the practicality of a mini plant holder. Whether you’re an experienced crocheter or just getting started, this adorable DIY will brighten any room—and might just steal your heart.
The beauty of crocheting a sloth planter is that it doesn’t require a lot of yarn or complex stitches. Using just a few materials and basic crochet techniques, you can create a hanging planter shaped like a sleepy sloth. It’s ideal for holding succulents, air plants, or even small artificial plants. It’s also an excellent handmade gift idea!
This article will guide you through everything you need to know—from materials to stitching instructions—so you can confidently complete your own crochet sloth planter. Each step is written with simplicity and clarity, following SEO best practices to ensure you find what you need. Let’s dive into the process!
1. Gathering the Right Materials for Your Sloth Planter
Before you begin crocheting a sloth planter, you’ll need a few basic supplies. These materials are easy to find and are typically available at most craft or yarn stores.
First, choose the right yarn. Opt for a medium-weight cotton yarn to ensure that your planter is sturdy enough to hold a small plant. Neutral tones like beige or brown work best to resemble a real sloth, but feel free to personalize with colorful yarns for a playful look.
You’ll also need a crochet hook appropriate for the yarn weight. Most patterns for sloth planters recommend a 4.0mm (G-6) hook. This size provides just the right tension to create a firm fabric without being too tight or too loose.
Next, make sure you have fiberfill or polyfill stuffing to shape the sloth’s face and body, especially if you’re making a plush-style planter. You’ll also want some safety eyes, black yarn or embroidery thread for the facial features, and a yarn needle for assembling the parts.
Don’t forget to grab a small pot or container to fit inside the crochet planter. This will help the planter hold its shape and protect your crochet work from water if you plan to use a real plant.
Finally, prepare scissors and stitch markers. Stitch markers are especially helpful for tracking your rounds and ensuring that your sloth planter crochet pattern stays symmetrical and easy to follow.
With all your materials ready, you’re set to begin the fun part—crocheting!
2. Step-by-Step Instructions to Crochet the Sloth Body
Now that you have your supplies, it’s time to start the body of your crochet sloth planter. The body serves as the main container for your plant.
Begin by creating a magic ring and working in continuous rounds. Start with single crochet stitches, gradually increasing to form a circular base. This will become the bottom of your planter and determines its width.
After the base is wide enough for your pot, work even rounds (no increases) to build up the sides of the planter. This creates the cylindrical shape that will hold your plant securely. Make sure your stitches are tight and even for a polished look.
To give your sloth its signature charm, crochet two long arms separately. These arms will later wrap around the pot or hang down adorably. You can stuff them lightly to give them some dimension or leave them flat for a more minimalist style.
Create the face by making a small oval or circle in a contrasting color (like beige or white). Add safety eyes and embroider the nose and mouth to bring the sloth to life. The facial expression is what gives your planter personality—so take your time here.
Once all parts are crocheted, assemble the planter by sewing the arms and face onto the main body. Make sure everything is firmly attached, especially if the planter will hang or be moved around.
For a hanging sloth planter, crochet two chains and attach them to the sides of the body. This allows the sloth to dangle from a hook or curtain rod—a charming and functional detail.
3. Tips to Personalize and Style Your Crochet Sloth Planter
One of the best parts of learning how to crochet a sloth planter is the ability to customize it. Your sloth doesn’t have to look like everyone else’s—make it your own!
You can experiment with different yarn textures and colors. Try using variegated yarn for a fun twist, or fluffy yarn for a more plush appearance. Bright colors can give your sloth a cartoonish style, while muted tones create a more natural vibe.
Add accessories! A tiny crochet flower behind the ear, a mini scarf, or even a little hat can add character. These small details are perfect for gift-giving or seasonal decorating.
Play with facial expressions. Use different shapes for the eyes—wide eyes for a surprised look or sleepy eyes for a relaxed sloth. The face is the most expressive part of your project, so don’t hesitate to be creative.
Use the arms in different ways. Instead of having the arms simply dangle, you can wrap them around the pot or let them hold a tiny crochet leaf or heart.
Choose plants that complement the sloth. Succulents are a great option because they’re light and easy to care for. Air plants also work well and require no soil, which is great for a fiber planter.
Display your crochet sloth planter in creative spaces—like near a window, above a desk, or on a kitchen shelf. The playful design adds a cozy, handmade touch to any room.
4. Common Mistakes to Avoid and How to Fix Them
Even experienced crocheters make mistakes from time to time. Knowing what to watch for when learning how to crochet a sloth planter can save you from frustration.
One common issue is uneven tension, which can make the planter lopsided or flimsy. Keep your tension consistent by checking every few rows. If your stitches are too tight, go up a hook size.
Another frequent mistake is miscounting stitches, especially when working in rounds. Use stitch markers and count regularly to avoid losing your place or ending up with uneven sides.
Sometimes the planter body turns out too large or too small for the pot. Always check your gauge before starting and adjust your hook size if necessary. It’s better to make a test swatch than to redo the whole piece later.
If your sloth face doesn’t look quite right, don’t worry! You can remove and reposition safety eyes or use scrap yarn to redo the facial features until you’re satisfied.
Sewing the parts together can also be tricky. Use pins or stitch markers to position the arms and face before permanently attaching them. Take your time to ensure everything is symmetrical.
Lastly, remember that mistakes are part of the learning process. With every stitch, you’ll become more confident and skilled in your crochet sloth planter journey.
FAQ – How to Crochet a Sloth Planter
Q1: Is a sloth planter beginner-friendly?
Yes! This is a great project for beginners. It uses basic stitches like single crochet and simple increases/decreases. Assembling the parts may require a bit of patience, but it’s totally manageable with a bit of practice.
Q2: Can I use any type of yarn for my sloth planter?
Cotton yarn is ideal because it’s sturdy and holds its shape well. Acrylic can also be used but may not be as firm. Avoid stretchy yarns that may sag over time.
Q3: Will my planter be able to hold a real plant?
Yes, especially if you use a small container or plastic liner inside. However, be cautious with watering to avoid damaging the crochet fabric. Artificial plants are a safe alternative.
Q4: What size should the sloth planter be?
Most sloth planters are about 4 to 6 inches in diameter, perfect for succulents or small potted plants. You can scale the pattern up or down by adjusting your yarn and hook size.
Q5: Can I sell crochet sloth planters that I make?
Yes, as long as the pattern you use allows it. Many free and paid patterns permit handmade sales with credit to the designer. Always check the pattern’s terms of use.
Q6: How do I clean a crochet planter?
If it gets dusty, use a lint roller or gently hand-wash it with mild soap. Avoid machine washing unless the yarn label says it’s safe to do so.
PATTERN HERE
Now that you’ve learned how to crochet a sloth planter, you’re ready to bring this adorable creation to life. From gathering materials to stitching, assembling, and styling, you’ve got all the tools needed for a successful and satisfying project. Not only is it fun and relaxing, but it’s also a delightful way to add a personal touch to your home or gift list.
We hope this guide inspired your creativity and helped simplify the process. If you’ve made your own crochet sloth planter, let us know! Please leave a sincere comment below with your thoughts, suggestions, or questions—we’d love to hear from you and support your crochet journey.