
The Patchwork Twist twist is not just a modern take on classic quilting—it’s a true reinvention of textile artistry. At its core, this technique blends familiar patchwork traditions with a bold and unexpected turn: the incorporation of rotating or “twisting” fabric segments that create optical illusions and dynamic designs. Whether you’re a beginner or an experienced quilter, the Patchwork Twist twist offers a fresh, exciting way to explore your creativity through fabric.
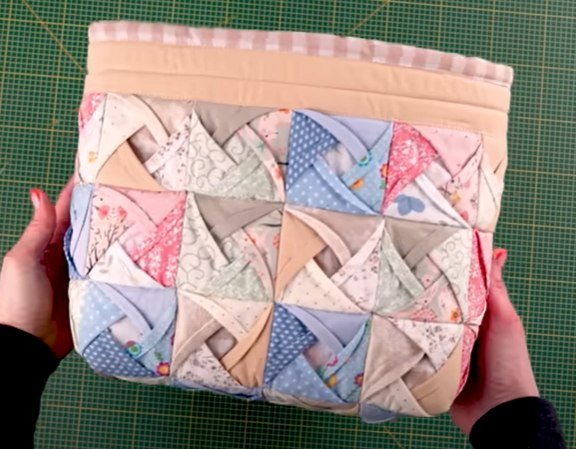
One of the most appealing aspects of the Patchwork Twist twist is its ability to transform simple blocks into mesmerizing, kaleidoscopic patterns. By rotating certain sections within a patchwork block or quilt layout, quilters can add movement and texture to their projects. This effect is often achieved with strategic color placement, contrast, and precise cutting techniques—all of which make this quilting style both visually striking and deeply satisfying.
In today’s world of digital sharing and handmade art, the Patchwork Twist twist has gained popularity not only for its aesthetic appeal but also for how it pushes creative boundaries. It invites crafters to experiment beyond traditional grid layouts and breathe new life into their fabric stashes. Below, we’ll explore how to get started with this technique, what tools you’ll need, and how to master the process step by step.
1. Understanding the Basics of Patchwork Twist twist
To start your Patchwork Twist twist journey, it’s important to understand what sets this method apart from traditional patchwork quilting.
Unlike standard patchwork, where pieces are joined in fixed rows and columns, the twist technique involves rotating or pivoting fabric squares or blocks within a layout. This creates spiral, windmill, or pinwheel-like effects.
The twist is often created by cutting a large block into smaller squares, rotating each piece a certain degree, and then sewing them back together in a deliberate new pattern. The visual movement this generates is what gives the Patchwork Twist twist its name.
Fabric selection plays a huge role in how well your twist stands out. High-contrast fabrics, bold colors, and directional prints can all help emphasize the twisting motion and create depth in the design.
Pre-cut squares (like charm packs or layer cakes) can make the process more accessible for beginners, helping ensure consistent block size and saving time on measuring and cutting.
Mastering the basics involves patience and planning. Laying out your design before sewing is key—this helps prevent misalignment and keeps the twist consistent throughout the project.
2. Essential Tools and Materials for Patchwork Twist twist
To effectively create a Patchwork Twist twist, you’ll need a few key tools beyond basic quilting supplies. The right materials will make a significant difference in your results.
A quality rotary cutter and a sharp blade are crucial for achieving the clean cuts required for precision twisting. A cutting mat and clear quilting ruler are equally important to maintain accuracy.
Investing in a design wall or even just a flat surface to arrange your blocks before sewing is highly recommended. This lets you visualize the twist effect and rearrange pieces as needed.
Fabric markers or chalk can help mark directional cuts or twists. These guidelines are especially useful if your quilt includes intricate designs or multiple twist zones.
Choose 100% cotton quilting fabric for the best results. It’s durable, easy to press, and holds its shape well after multiple washes.
Finally, don’t forget the value of high-quality thread and a reliable sewing machine. Twisting and realigning blocks means your seams must hold securely and accurately.
3. Step-by-Step: How to Make a Patchwork Twist twist
Ready to try your first Patchwork Twist twist? Follow this structured guide to bring your quilt to life with confidence and creativity.
Start by cutting your fabric into equal-sized squares—commonly 5” or 10”. These will serve as the base of your twisted pattern.
Arrange your squares in a standard layout (e.g., a 4×4 grid), and once satisfied, sew them together to create a large block.
Now, the twist begins. Cut the newly sewn block into smaller squares again—usually 4 or 9 equal segments.
Rotate each square clockwise or counterclockwise, depending on your desired twist direction. Play around with the layout to see different visual effects.
Sew the twisted segments back together, carefully aligning seams to preserve the twist pattern. Press all seams flat after joining.
Repeat the process across multiple large blocks, then join them to complete the full quilt top. Add batting, backing, and binding as you would in any quilt.
4. Design Variations and Creative Ideas with Patchwork Twist twist
The beauty of the Patchwork Twist twist lies in its versatility. With just a little imagination, you can create countless design possibilities.
Try incorporating different fabric textures into your twist blocks. Mixing linen, cotton, and batik adds tactile interest and makes the quilt even more eye-catching.
Color gradients or ombré effects can amplify the twist’s illusion of motion. Start with light tones and gradually shift to darker hues as you rotate the blocks.
Themed quilts—like seasonal, floral, or geometric patterns—look stunning with a twist effect. This adds an artistic flair to otherwise simple motifs.
You can also experiment with asymmetric layouts. Instead of twisting every block, twist only selected ones to create a focal point or dynamic flow.
Smaller items like cushion covers, table runners, or wall hangings are excellent ways to test out the Patchwork Twist twist on a smaller scale before committing to a full quilt.
Lastly, don’t be afraid to break the rules. Use your intuition, combine it with planning, and allow the twist to reflect your personal style and story.
Frequently Asked Questions (FAQ)
What is a Patchwork Twist twist in quilting?
A Patchwork Twist twist is a quilting method where fabric blocks are cut and rotated to create dynamic, spinning or swirling effects in the final quilt layout.
Is the Patchwork Twist twist technique suitable for beginners?
Yes! Beginners can start with pre-cut fabric and simple twist patterns. As they gain experience, they can move on to more complex designs.
Do I need special tools for Patchwork Twist twist quilting?
Basic quilting tools like a rotary cutter, ruler, cutting mat, and sewing machine are sufficient. A design wall and fabric markers can enhance accuracy.
Can I use scraps for Patchwork Twist twist quilts?
Absolutely! Fabric scraps add unique color combinations and textures. Just ensure they are cut into consistent block sizes.
How do I make the twist effect more visible?
Use high-contrast or bold prints. The more visual difference between fabrics, the more pronounced the twist will appear.
What are common mistakes to avoid?
Misaligning blocks after twisting is a frequent issue. Always lay out the blocks before sewing and double-check alignment and orientation.
The Patchwork Twist twist is more than just a quilting technique—it’s a doorway to creativity, movement, and artistic expression. With its rich potential for personalization and visual depth, it stands as a powerful tool for both novice and seasoned quilters alike. From choosing the right materials to exploring endless design variations, this method truly lets your creativity shine.
We hope this guide inspired you to give the Patchwork Twist twist a try in your next quilting project. Have questions, thoughts, or tips of your own? We’d love to hear your honest opinion and any suggestions you have to improve this article or share your patchwork experiences. Let’s keep the creative spirit alive—one twist at a time!