
If you’ve been searching for a cozy and rewarding sewing project, this Free Quilted Slippers Tutorial is exactly what you need. Whether you’re a beginner or an experienced quilter, creating your own quilted slippers is both fun and functional. With just a few basic supplies and your sewing machine, you can craft beautiful, warm slippers perfect for lounging at home or gifting to loved ones.
The beauty of this Free Quilted Slippers Tutorial lies in its simplicity. You don’t need advanced sewing skills or expensive materials. In fact, this project is ideal for using up fabric scraps and leftover batting from other quilting projects. It’s a sustainable and creative way to give your feet some handmade comfort.
In this article, you’ll find step-by-step guidance to help you make your own quilted slippers. From choosing the right fabric to assembling and finishing your project, everything is broken down to make the process stress-free and enjoyable. Let’s dive into the Free Quilted Slippers Tutorial and start sewing your own cozy footwear today!
1. Choosing the Right Materials for Quilted Slippers
Before starting your Free Quilted Slippers Tutorial, gathering the right materials is essential. The quality and type of fabric you select will determine how soft and durable your slippers turn out. Quilting cotton or flannel are great choices for both the outer and inner layers.
You will also need batting, which gives the slippers their softness and warmth. Cotton batting is easy to sew and breathable, while polyester batting adds more fluffiness and insulation. Make sure to pre-wash your fabric to prevent shrinking after sewing.
For the soles, consider using felt or pre-quilted fabric. If you want added grip, you can even repurpose the sole from an old pair of slippers or use non-slip grip fabric. This makes your quilted slippers safer to walk in, especially on smooth floors.
A good pair of fabric scissors, quilting pins, and a sewing machine will make your process smoother. You can also use a walking foot attachment on your sewing machine to sew through multiple layers with ease. Marking tools like chalk or washable pens help you trace your pattern pieces accurately.
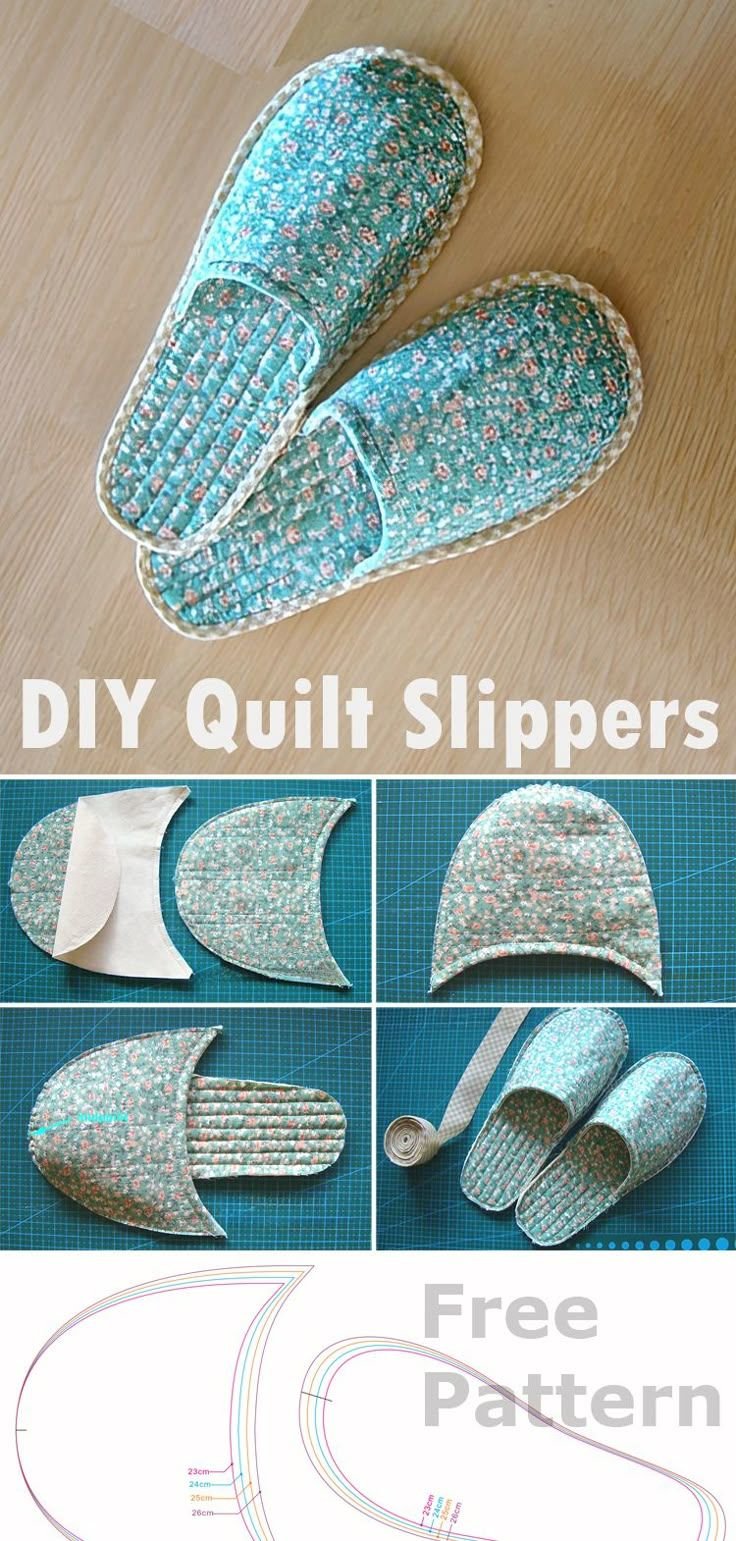
Finally, download a free quilted slippers pattern or draw your own using an outline of your foot. Make sure to cut the fabric with the grain running in the right direction for flexibility and comfort.
Having all your supplies organized ahead of time saves you time and avoids unnecessary interruptions. This is an important step in your Free Quilted Slippers Tutorial, so don’t skip it!
2. Cutting and Preparing Your Fabric Pieces
Once you’ve gathered your materials, the next step in the Free Quilted Slippers Tutorial is to cut and prepare your fabric pieces. Using your pattern, cut out two pieces each of the outer fabric, lining, and batting for each foot.
Layer each set by placing the outer fabric on top, batting in the middle, and lining on the bottom, wrong sides facing out. This quilt sandwich will form the top and bottom of each slipper. Use pins or clips to keep the layers aligned.
Now it’s time to quilt your fabric pieces. You can use straight-line quilting, diagonal grids, or even decorative free-motion quilting if you’re comfortable with it. Quilting adds texture and stability to the slippers, giving them that signature quilted look.
After quilting, trim the edges neatly and make sure all pieces match in size. At this stage, you can also add any embellishments like embroidery, lace, or appliqué for a personalized touch.
Don’t forget to mark the heel and toe positions using chalk or pins. This helps with assembling the slipper and ensuring it fits well. Remember, precision in cutting and marking leads to a better final result.
Proper preparation of fabric pieces is crucial in making this Free Quilted Slippers Tutorial successful. Take your time and enjoy the creative process of turning simple fabric into something beautiful and wearable.
3. Assembling the Quilted Slippers
With your quilted fabric pieces ready, it’s time to start assembling the slippers. This part of the Free Quilted Slippers Tutorial is where your project really comes to life. Begin by sewing the slipper top to the sides using a 1/4-inch seam allowance.
Match the center toe of the top piece to the center of the sole, then pin the sides evenly around. Slowly sew the edges together, adjusting as you go to ensure a smooth curve. If needed, clip the curves to prevent bunching.
Once the upper part is attached to the sole, repeat the process for the lining. The lining should be assembled in the same way, but make sure to leave a small opening at the back or side for turning the slipper right side out later.
Next, place the lining inside the outer slipper with right sides facing. Pin them together around the opening, aligning the seams. Carefully sew around the edge, then turn the slipper right side out through the opening you left.
Push out the corners and edges gently using a turning tool or the end of a pencil. Press the slipper with a warm iron to give it a neat finish. Then stitch the small opening closed either by hand or with your sewing machine.
Repeat the same steps for the second slipper, and just like that, you’re almost done with your Free Quilted Slippers Tutorial. You’re one step away from enjoying your new cozy footwear!
4. Finishing Touches and Tips for Customization
Now that your slippers are assembled, it’s time for the final details. This last part of the Free Quilted Slippers Tutorial helps you personalize and refine your project for the perfect fit and style.
Consider adding a binding around the opening of the slippers. This not only adds a pop of color but also reinforces the seams. You can use pre-made bias tape or make your own from coordinating fabric.
You may also want to add an extra layer of felt or foam inside the sole for added comfort. If you’re planning to wear these on hard floors, applying a layer of fabric glue mixed with sand or rubber dots on the bottom creates a non-slip grip.
Decorate your slippers with buttons, bows, or embroidered initials to make them unique. These small details can turn a simple slipper into a thoughtful handmade gift.
If your first pair turns out great, try making more in different sizes for your family. This Free Quilted Slippers Tutorial can be adapted for men, women, and children by adjusting the pattern.
Store your slippers in a clean, dry place and wash them gently by hand or in a delicate laundry bag to keep them looking fresh. Regular maintenance ensures your handmade slippers last longer and stay cozy.
Finishing touches are what set handmade projects apart. Embrace your creativity and enjoy customizing your quilted slippers using the ideas in this Free Quilted Slippers Tutorial.
FAQ: Frequently Asked Questions about Free Quilted Slippers Tutorial
Q1: Is this Free Quilted Slippers Tutorial suitable for beginners?
Yes! This tutorial is designed with beginners in mind. It breaks down each step into simple instructions, making it easy to follow even if you’re new to quilting or sewing.
Q2: What type of fabric works best for quilted slippers?
Cotton quilting fabric, flannel, or fleece work best. They are soft, breathable, and easy to sew. You can also repurpose fabric scraps for a patchwork look.
Q3: Can I wash my handmade quilted slippers?
Yes, quilted slippers can be gently washed by hand or in a washing machine using a laundry bag. Air dry them flat to preserve their shape and structure.
Q4: How do I make the soles less slippery?
You can apply non-slip fabric, use puffy paint dots, or sew on a rubberized sole to add grip and prevent slipping, especially on tile or hardwood floors.
Q5: Do I need a special sewing machine to make quilted slippers?
No special machine is needed. A basic sewing machine with a walking foot attachment (optional) is sufficient. Make sure your machine can handle multiple layers.
Q6: Can I sell the quilted slippers I make from this tutorial?
Yes, you can sell handmade slippers made using this tutorial. It’s a great small business idea or craft fair product. Just be sure to credit the pattern if required.
PATTERN HERE
Creating your own quilted slippers at home is both a fun and practical sewing project. This Free Quilted Slippers Tutorial walks you through the process step by step, from choosing materials to adding the finishing touches. You’ve learned how to prepare your fabric, quilt your pieces, assemble the slippers, and personalize them with style.
Whether you’re making a pair for yourself or as a thoughtful gift, quilted slippers are a cozy and rewarding project that showcases your creativity. Don’t forget to share your finished project, and most importantly—enjoy the process of handmade crafting!
If you found this Free Quilted Slippers Tutorial helpful, please leave a comment with your honest feedback and any suggestions for future tutorials. Your input helps us improve and continue providing valuable, creative content!