
Nothing spreads holiday cheer quite like a Charming Christmas Quilt in 2 sizes – FREE pattern. Whether you’re a seasoned quilter or just starting out, this project adds a festive touch to your home and makes a thoughtful handmade gift. With two convenient size options and a beginner-friendly approach, it’s the perfect way to celebrate the season through creativity and color.
This free pattern includes clear instructions for both lap-size and throw-size quilts, giving you the flexibility to craft the ideal piece for your space or recipient. Using traditional holiday colors and classic quilt blocks, the Charming Christmas Quilt in 2 sizes becomes a centerpiece of holiday décor. Even better, it’s designed to be accessible for all skill levels, making it a joyful experience from start to finish.
Throughout this article, you’ll discover detailed insights about fabric choices, layout tips, piecing guidance, and finishing steps, all centered around the Charming Christmas Quilt in 2 sizes – FREE pattern. Let’s explore how you can turn this festive design into a cherished keepsake.
1. Choosing Fabrics for the Charming Christmas Quilt
Selecting the right fabric is a crucial first step in making your Charming Christmas Quilt in 2 sizes – FREE pattern come to life. Color, texture, and theme all play a role in achieving that magical holiday look.
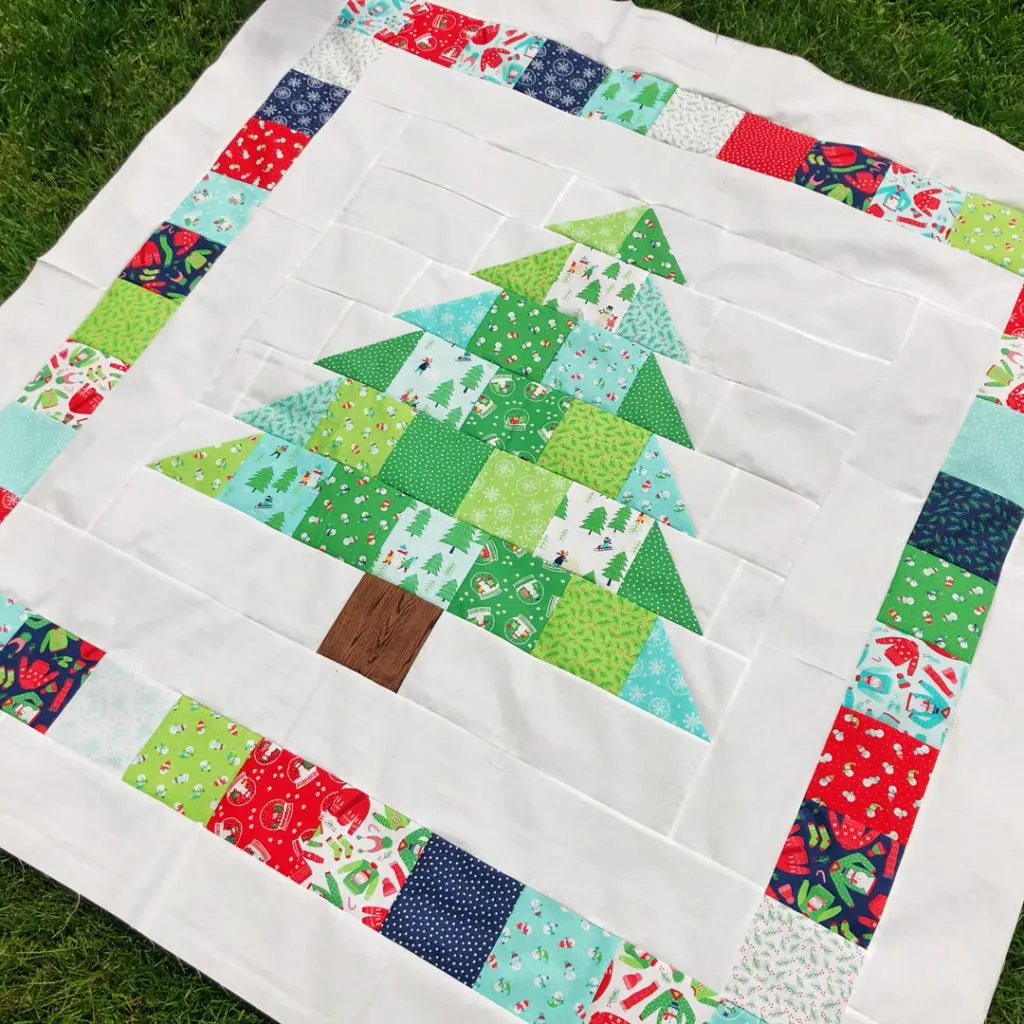
Begin with a color palette that captures the holiday spirit—think rich reds, snowy whites, evergreen tones, and sparkles of gold or silver. Traditional prints like holly leaves, candy canes, snowflakes, and ornaments complement the charm of the design.
Pre-cut charm packs (5″x5″) are especially helpful for this project. They not only save cutting time but also ensure cohesive colors and prints. Look for Christmas-themed charm packs in holiday collections for a quick start.
When choosing background and border fabrics, stick with subtle textures or solids. These help the charm squares stand out and give the quilt a balanced, polished appearance.
For a cozier finish, consider using flannel or brushed cotton. These add softness and warmth to your quilt—perfect for winter cuddling or seasonal display.
Don’t forget to pre-wash your fabrics if you’re mixing pre-cuts and yardage. This prevents shrinkage and color bleeding, which is particularly important with vibrant holiday reds and greens.
2. Quilt Size Options and Layout Planning
The Charming Christmas Quilt in 2 sizes – FREE pattern offers two layout choices: lap-size and throw-size. Each version provides a unique way to use your charm squares and adapt the quilt to your needs.
The lap-size quilt is ideal for draping over a chair, placing at the foot of the bed, or gifting to a loved one. It usually uses around 42 charm squares and measures approximately 36″ x 45″.
The throw-size quilt is more generous, typically requiring 84 charm squares and finishing at about 54″ x 63″. It’s great for snuggling on the couch during movie nights or adding a seasonal touch to the living room.
To plan your layout, begin by organizing your charm squares on a design wall or flat surface. Arrange by color or pattern to avoid clustering similar shades. Aim for balance and contrast in every row.
Consider alternating lighter and darker fabrics to create movement and visual interest. Placing strong reds and greens diagonally or forming a checkerboard effect enhances the festive feel.
Use sashing (fabric strips between blocks) if you want to separate and frame each square. This technique works especially well in the throw-size version for a more structured look.
Lastly, take a photo of your layout before sewing. This simple step helps you remember the design order and catch any needed adjustments before stitching begins.
3. Piecing the Quilt Top with Precision
Constructing your Charming Christmas Quilt in 2 sizes – FREE pattern begins with sewing the charm squares together in rows. Accuracy in piecing ensures a neat finish and smooth alignment.
Start by joining the charm squares into horizontal rows, using a consistent ¼” seam allowance. Press seams to one side or open, depending on your preference, to reduce bulk.
Match seams carefully when joining rows. Nesting the seams (pressing in opposite directions) helps lock them in place and results in clean intersections.
If you’re adding sashing, sew strips between squares in each row first. Then, attach longer sashing strips between the completed rows for uniform spacing.
After completing the quilt top, give it a good press on both sides. This helps flatten seams and prepare the top for layering.
Always check your quilt dimensions at this stage, especially if you made adjustments or customizations. Make sure the quilt lies flat without puckers or waves.
If desired, add a border using complementary fabric. Borders frame the quilt beautifully and can help increase its overall size while giving it a finished look.
4. Quilting and Finishing Touches
Now that the top of your Charming Christmas Quilt in 2 sizes – FREE pattern is complete, it’s time to quilt and bind it. This final stage transforms your patchwork into a usable and durable quilt.
Layer your quilt top, batting, and backing fabric. Use spray adhesive, pins, or basting stitches to secure the layers and prevent shifting during quilting.
Decide on a quilting method that suits your style. Straight-line quilting is easy for beginners and looks crisp, especially with holiday fabrics. You can also follow the seams for a classic “stitch in the ditch” look.
Free-motion quilting is another fun option if you’re comfortable with curves and loops. It adds texture and flair, echoing snowflakes or Christmas garlands.
Once quilted, trim any excess batting and backing to match the quilt top. Prepare your binding by folding 2.5″ strips in half and sewing them around the edges.
Attach the binding by machine or hand, depending on your skill and preference. Hand-finished binding gives a neat, traditional look, while machine-sewn binding is quicker and more secure for everyday use.
Finally, add a quilt label with your name, the date, and a holiday message. This detail makes the quilt feel personal and commemorates the festive season for years to come.
FAQ – Charming Christmas Quilt in 2 sizes – FREE pattern
Q: Is the Charming Christmas Quilt beginner-friendly?
A: Yes, the pattern is designed for quilters of all levels. With simple squares and clear instructions, it’s perfect for beginners and still enjoyable for experienced quilters.
Q: What is the difference between the two quilt sizes?
A: The lap-size version is smaller, great for chairs or children, while the throw-size offers more coverage, ideal for couches or as a holiday bed accent.
Q: Do I need a sewing machine to complete this quilt?
A: While a sewing machine speeds up the process and ensures straight seams, it is possible to piece and quilt by hand with patience and care.
Q: Can I use fabric scraps instead of charm packs?
A: Absolutely! Just cut your scraps into 5″x5″ squares to match the size of charm packs. This makes the project more budget-friendly and sustainable.
Q: How should I care for the finished quilt?
A: Wash your quilt on a gentle cycle with cold water, and tumble dry on low or air dry. Using a color catcher in the first wash helps prevent bleeding.
Q: Can I sell quilts made from this pattern?
A: If the pattern is marked for personal or commercial use, check the designer’s terms. Many free patterns allow selling finished quilts with proper credit.
PATTERN HERE
Creating a Charming Christmas Quilt in 2 sizes – FREE pattern is a delightful way to celebrate the season, whether you’re crafting for loved ones or decorating your own space. From fabric selection to the final stitch, every step offers an opportunity to infuse your project with warmth and holiday spirit.
We hope this guide has inspired you to start your own Charming Christmas Quilt. If you give this pattern a try, please share your honest thoughts and any suggestions for improvements. Your feedback helps us continue to create meaningful, helpful content for fellow crafters. Happy quilting!