
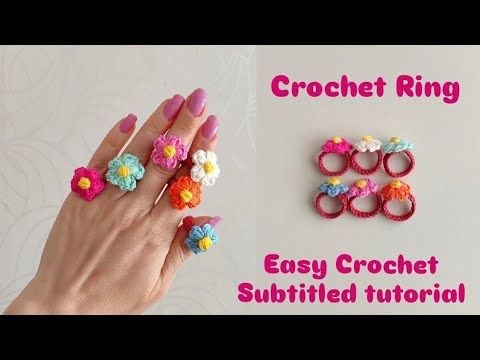
If you’re looking for a super cute and easy to make crochet ring, you’ve just found the perfect tutorial. These little accessories are not only fun and quick to create, but they’re also a great way to use leftover yarn and express your personal style through crochê. Whether you’re a beginner or a seasoned crocheter, these crochet rings are the kind of project that will bring instant satisfaction.
What makes these rings special is their simplicity combined with endless creative possibilities. From delicate floral designs to bold, colorful patterns, the super cute and easy to make crochet ring is a project that can be customized to match any mood or occasion. Plus, they’re lightweight, wearable, and make fantastic handmade gifts or items to sell at craft fairs.
This article will guide you step-by-step through the creation of your own crochet ring, while also providing tips, tricks, and ideas for customization. You’ll find inspiration to make your rings truly unique and easy enough that even beginners will be able to follow along. Let’s dive into the world of crochê with this delightful project!
1. What You Need to Get Started
Before you begin making your super cute and easy to make crochet ring, gather your materials. This project doesn’t require many supplies, and most crocheters will already have what they need at home.
Start with choosing a lightweight yarn, such as cotton or acrylic. These fibers are soft, durable, and perfect for small accessories like rings. You can also use embroidery thread if you want a more delicate result.
Next, select a small crochet hook, usually between 1.5mm and 3mm. The smaller hook helps create tighter stitches, making the ring more structured and stable when worn.
You’ll also need a pair of scissors and a yarn needle for weaving in ends and sewing pieces together if needed. For embellishments, consider beads, small buttons, or even a touch of embroidery for extra charm.
Optional items include metal ring bases, which can be wrapped with crochet stitches for added strength and support. These are especially helpful if you want your ring to hold its shape for longer periods of use.
Don’t forget to prepare a comfortable workspace with good lighting. Since you’ll be working with small stitches and delicate materials, having a clear view of your work is essential.
Lastly, bring your creativity! There’s no wrong way to design a crochet ring, and the joy of this project lies in its flexibility and the opportunity to create something that feels truly your own.
2. Step-by-Step: Making Your Crochet Ring
Creating your super cute and easy to make crochet ring is as fun as it is simple. Follow these basic steps, and you’ll have your first ring ready in no time.
Start by making a magic ring or chain 4 and join into a loop with a slip stitch. This will be the base of your crochet ring. If you’re a beginner, the chained loop method may feel easier at first.
Work single crochet stitches into the ring base. For a basic band, 6 to 8 stitches is enough. Continue in rounds or rows depending on the shape you’re going for. Keep your tension even to ensure a snug fit.
Once the band is the desired width or circumference, try it on your finger before fastening off. You want it snug but comfortable. Add or reduce stitches as needed to adjust the size.
For decorative elements, crochet a small flower or heart separately and sew it onto the band. These small motifs add character and charm, turning your simple ring into a statement piece.
Secure all ends using a yarn needle and hide them neatly inside the band or underneath embellishments. This will help the ring look polished and professionally made.
Finally, block your ring slightly by stretching it gently or spraying with a bit of water to shape it perfectly. Let it dry flat. Now your super cute and easy to make crochet ring is ready to wear or gift!
3. Creative Variations and Customization Ideas
The beauty of the crochet ring lies in its versatility. Once you’ve mastered the basic technique, try exploring new variations to make each ring uniquely yours.
Try using variegated yarn or self-striping thread for a colorful effect without changing colors manually. These yarns give each ring a unique pattern naturally.
Add embellishments like tiny beads or sequins by threading them onto the yarn before you begin crocheting. They’ll be worked into the stitches as you go, adding sparkle and texture.
For themed designs, crochet mini motifs like stars, butterflies, or even fruit shapes to attach to your ring base. These designs are perfect for seasonal crafts or gifting.
Use different stitch types like puff stitches, picots, or cluster stitches to create texture and volume. A simple change in stitch can make your ring stand out.
Personalize your crochet ring by adding initials or tiny symbols using surface embroidery or tapestry crochet techniques. This is great for friendship rings or matching couple accessories.
Experiment with metallic threads or glitter yarns to create rings suitable for special occasions like parties or weddings. These materials give a delicate and luxurious appearance.
4. Why Crochet Rings Are Great for Beginners and Experts
The super cute and easy to make crochet ring isn’t just adorable—it’s also a fantastic project for learning or practicing crochet skills at any level.
For beginners, it introduces essential skills like magic ring, single crochet, increasing, and finishing. These are the building blocks of more complex projects.
It’s also a low-pressure project. Since the rings are so small, mistakes are easy to fix and don’t take much time or yarn to redo. That makes it ideal for learning through trial and error.
Because it’s a quick make, it provides instant gratification. You can finish several in a single sitting, which boosts confidence and encourages creativity.
For experienced crocheters, it’s a great way to use up scrap yarn or unwind between large, time-consuming projects. Plus, it allows for exploration of design ideas on a small scale.
Crochet rings are also highly portable, making them great for crocheting on the go—while commuting, traveling, or waiting in line. All you need is a hook, yarn, and a few minutes.
Finally, they’re wonderful for gifting or selling. Their low cost and fast creation time mean you can build a stockpile for markets, gifts, or charity donations in very little time.
FAQ – Frequently Asked Questions
What size yarn is best for a crochet ring?
Lightweight yarn like size 3 cotton or embroidery thread is ideal. It creates a slim and delicate look without becoming bulky on your fingers.
How do I make sure my crochet ring fits?
Try the ring on before fastening off the final row. You can also measure your finger and adjust the stitch count to match the circumference.
Can I sell crochet rings I make?
Yes! Handmade crochet rings are great for selling at craft fairs or online. Just ensure your designs are original or based on free-to-use patterns.
Are crochet rings durable?
Yes, especially if made with sturdy yarn and tight stitches. Avoid overly loose tension, and consider sewing your ring onto a metal base for extra support.
Do I need a pattern to make a crochet ring?
Not at all! The basic structure is simple enough to freestyle. However, you can follow patterns if you prefer guidance or want to try complex designs.
Can I wash my crochet ring?
Yes, but handwashing is best. Use mild soap and cool water, gently press out the water, and lay flat to dry to preserve the shape and color.
We hope this guide has inspired you to try making your own super cute and easy to make crochet ring. With just a few materials and a little creativity, you can produce accessories that are personal, stylish, and incredibly fun to make. Whether you keep them for yourself, gift them, or sell them, these rings are proof that sometimes the smallest projects can bring the biggest joy.
Have you tried this tutorial or created your own version? Leave a comment with your honest opinion and let us know what you think! We’d love to hear your suggestions, see your creations, and continue crafting together through the art of crochê.
If you’re looking for a super cute and easy to make crochet ring, you’ve just found the perfect tutorial. These little accessories are not only fun and quick to create, but they’re also a great way to use leftover yarn and express your personal style through crochê. Whether you’re a beginner or a seasoned crocheter, these crochet rings are the kind of project that will bring instant satisfaction.
What makes these rings special is their simplicity combined with endless creative possibilities. From delicate floral designs to bold, colorful patterns, the super cute and easy to make crochet ring is a project that can be customized to match any mood or occasion. Plus, they’re lightweight, wearable, and make fantastic handmade gifts or items to sell at craft fairs.
This article will guide you step-by-step through the creation of your own crochet ring, while also providing tips, tricks, and ideas for customization. You’ll find inspiration to make your rings truly unique and easy enough that even beginners will be able to follow along. Let’s dive into the world of crochê with this delightful project!
1. What You Need to Get Started
Before you begin making your super cute and easy to make crochet ring, gather your materials. This project doesn’t require many supplies, and most crocheters will already have what they need at home.
Start with choosing a lightweight yarn, such as cotton or acrylic. These fibers are soft, durable, and perfect for small accessories like rings. You can also use embroidery thread if you want a more delicate result.
Next, select a small crochet hook, usually between 1.5mm and 3mm. The smaller hook helps create tighter stitches, making the ring more structured and stable when worn.
You’ll also need a pair of scissors and a yarn needle for weaving in ends and sewing pieces together if needed. For embellishments, consider beads, small buttons, or even a touch of embroidery for extra charm.
Optional items include metal ring bases, which can be wrapped with crochet stitches for added strength and support. These are especially helpful if you want your ring to hold its shape for longer periods of use.
Don’t forget to prepare a comfortable workspace with good lighting. Since you’ll be working with small stitches and delicate materials, having a clear view of your work is essential.
Lastly, bring your creativity! There’s no wrong way to design a crochet ring, and the joy of this project lies in its flexibility and the opportunity to create something that feels truly your own.
2. Step-by-Step: Making Your Crochet Ring
Creating your super cute and easy to make crochet ring is as fun as it is simple. Follow these basic steps, and you’ll have your first ring ready in no time.
Start by making a magic ring or chain 4 and join into a loop with a slip stitch. This will be the base of your crochet ring. If you’re a beginner, the chained loop method may feel easier at first.
Work single crochet stitches into the ring base. For a basic band, 6 to 8 stitches is enough. Continue in rounds or rows depending on the shape you’re going for. Keep your tension even to ensure a snug fit.
Once the band is the desired width or circumference, try it on your finger before fastening off. You want it snug but comfortable. Add or reduce stitches as needed to adjust the size.
For decorative elements, crochet a small flower or heart separately and sew it onto the band. These small motifs add character and charm, turning your simple ring into a statement piece.
Secure all ends using a yarn needle and hide them neatly inside the band or underneath embellishments. This will help the ring look polished and professionally made.
Finally, block your ring slightly by stretching it gently or spraying with a bit of water to shape it perfectly. Let it dry flat. Now your super cute and easy to make crochet ring is ready to wear or gift!
3. Creative Variations and Customization Ideas
The beauty of the crochet ring lies in its versatility. Once you’ve mastered the basic technique, try exploring new variations to make each ring uniquely yours.
Try using variegated yarn or self-striping thread for a colorful effect without changing colors manually. These yarns give each ring a unique pattern naturally.
Add embellishments like tiny beads or sequins by threading them onto the yarn before you begin crocheting. They’ll be worked into the stitches as you go, adding sparkle and texture.
For themed designs, crochet mini motifs like stars, butterflies, or even fruit shapes to attach to your ring base. These designs are perfect for seasonal crafts or gifting.
Use different stitch types like puff stitches, picots, or cluster stitches to create texture and volume. A simple change in stitch can make your ring stand out.
Personalize your crochet ring by adding initials or tiny symbols using surface embroidery or tapestry crochet techniques. This is great for friendship rings or matching couple accessories.
Experiment with metallic threads or glitter yarns to create rings suitable for special occasions like parties or weddings. These materials give a delicate and luxurious appearance.
4. Why Crochet Rings Are Great for Beginners and Experts
The super cute and easy to make crochet ring isn’t just adorable—it’s also a fantastic project for learning or practicing crochet skills at any level.
For beginners, it introduces essential skills like magic ring, single crochet, increasing, and finishing. These are the building blocks of more complex projects.
It’s also a low-pressure project. Since the rings are so small, mistakes are easy to fix and don’t take much time or yarn to redo. That makes it ideal for learning through trial and error.
Because it’s a quick make, it provides instant gratification. You can finish several in a single sitting, which boosts confidence and encourages creativity.
For experienced crocheters, it’s a great way to use up scrap yarn or unwind between large, time-consuming projects. Plus, it allows for exploration of design ideas on a small scale.
Crochet rings are also highly portable, making them great for crocheting on the go—while commuting, traveling, or waiting in line. All you need is a hook, yarn, and a few minutes.
Finally, they’re wonderful for gifting or selling. Their low cost and fast creation time mean you can build a stockpile for markets, gifts, or charity donations in very little time.
FAQ – Frequently Asked Questions
What size yarn is best for a crochet ring?
Lightweight yarn like size 3 cotton or embroidery thread is ideal. It creates a slim and delicate look without becoming bulky on your fingers.
How do I make sure my crochet ring fits?
Try the ring on before fastening off the final row. You can also measure your finger and adjust the stitch count to match the circumference.
Can I sell crochet rings I make?
Yes! Handmade crochet rings are great for selling at craft fairs or online. Just ensure your designs are original or based on free-to-use patterns.
Are crochet rings durable?
Yes, especially if made with sturdy yarn and tight stitches. Avoid overly loose tension, and consider sewing your ring onto a metal base for extra support.
Do I need a pattern to make a crochet ring?
Not at all! The basic structure is simple enough to freestyle. However, you can follow patterns if you prefer guidance or want to try complex designs.
Can I wash my crochet ring?
Yes, but handwashing is best. Use mild soap and cool water, gently press out the water, and lay flat to dry to preserve the shape and color.
Conclusion
We hope this guide has inspired you to try making your own super cute and easy to make crochet ring. With just a few materials and a little creativity, you can produce accessories that are personal, stylish, and incredibly fun to make. Whether you keep them for yourself, gift them, or sell them, these rings are proof that sometimes the smallest projects can bring the biggest joy.
Have you tried this tutorial or created your own version? Leave a comment with your honest opinion and let us know what you think! We’d love to hear your suggestions, see your creations, and continue crafting together through the art of crochê.