
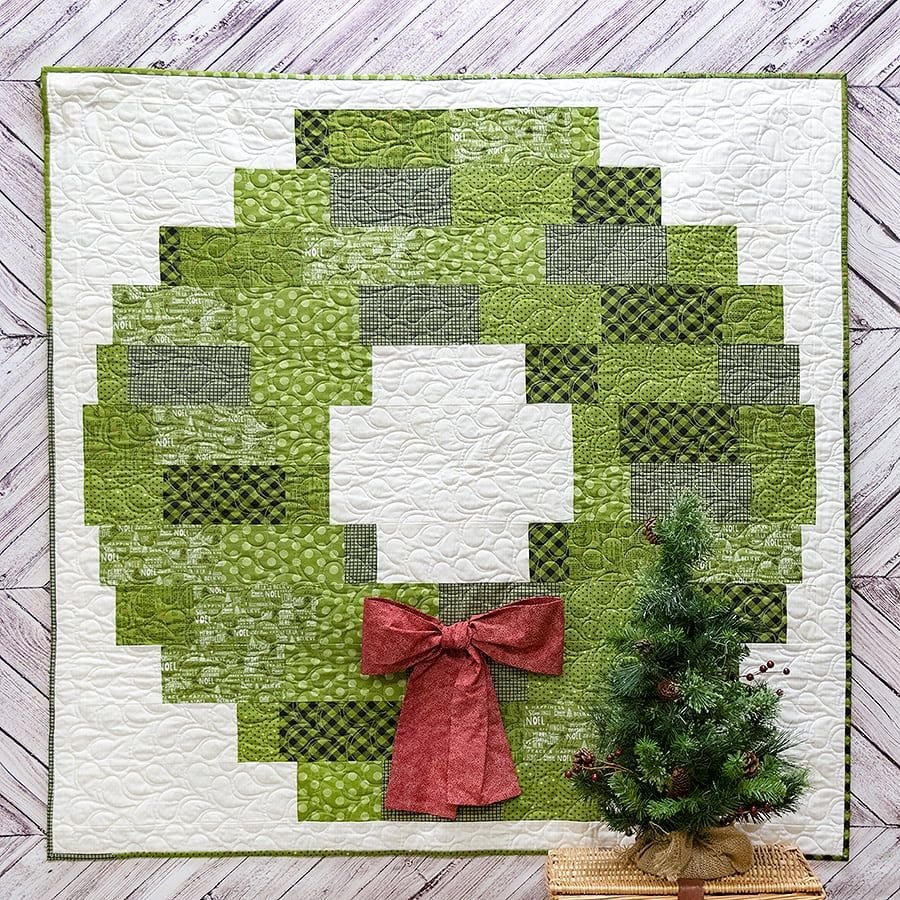
The Half Yard Wreath Wallhanging Pattern is a delightful and easy-to-follow quilting design that can add a personal and festive touch to any wall in your home. This pattern is not only ideal for the holiday season but can be customized with colors and prints to suit any occasion or interior style. Designed to use just a half yard of fabric, it’s an affordable and quick project that’s perfect for quilters of all skill levels.
Whether you are a beginner looking for a simple yet beautiful project or an experienced quilter searching for a quick creative fix, the Half Yard Wreath Wallhanging Pattern is a satisfying choice. It combines simplicity with charm, giving your walls a handcrafted, heartwarming appeal. Best of all, it helps you use up those fabric scraps and leftover batting that every quilter accumulates over time.
This pattern is not just about sewing—it’s about creating a cozy, handcrafted environment that reflects your style and personality. With careful attention to detail and fabric selection, your Half Yard Wreath Wallhanging Pattern can become a cherished part of your seasonal or year-round decor.
1. What Makes the Half Yard Wreath Wallhanging Pattern Special?
The main feature that sets the Half Yard Wreath Wallhanging Pattern apart is its efficiency and versatility. It uses only a half yard of fabric, making it both cost-effective and eco-friendly. You don’t need to run to the store for supplies—you likely already have what you need.
Another unique element is its adaptability. You can change up the colors, textures, or embellishments to suit various seasons or rooms. A red-and-green wreath works well for Christmas, while pastels are perfect for spring or Easter.
This pattern is also beginner-friendly. The step-by-step construction involves simple techniques like cutting strips, sewing basic seams, and attaching a backing. Even novice quilters can complete the project within a day or a weekend.
For seasoned quilters, it offers a fun and fast project to break up more complex tasks. It’s also an ideal gift project—personalized wallhangings are thoughtful, handmade presents that show care and effort.
The finished product is lightweight and easy to hang. You don’t need a heavy frame or specialized tools—just a rod or even decorative string can do the job.
Most importantly, the Half Yard Wreath Wallhanging Pattern helps foster creativity. You can add buttons, bows, or embroidered accents to give each wreath a distinct personality.
2. Materials and Tools Needed for the Half Yard Wreath Wallhanging Pattern
Before diving into this delightful project, gather your materials. The star of the show, of course, is the half yard of fabric. Choose something with color contrast for the wreath design to stand out on your wall.
You’ll also need basic quilting tools: a rotary cutter, a cutting mat, quilting ruler, and fabric scissors. A sewing machine is essential for straight, clean seams, but hand stitching works if you prefer a more rustic finish.
Batting gives the wallhanging structure. Even a small leftover piece will work. If you want to make the wreath puffier, opt for a thicker batting layer.
Backing fabric is necessary to finish the back of your project. Use a solid color or coordinating print. A piece of 18” x 18” is usually enough.
Thread should match or complement your fabric. Decorative stitching adds an extra pop, so feel free to experiment with variegated or metallic threads.
Optional materials include ribbons, felt, buttons, and embroidery floss. These extras let you customize your Half Yard Wreath Wallhanging Pattern and add a playful or elegant flair depending on the mood you want to create.
3. Step-by-Step Guide to Creating Your Wallhanging
Start by cutting your half yard of fabric into strips. These will form the base of your wreath. You can vary the width of the strips to create a more organic and lifelike appearance.
Sew the strips together end-to-end, then fold and shape them into a circular form. This forms the basic wreath shape. Use pins or basting glue to hold everything in place.
Layer the wreath on top of your batting and backing. Make sure everything is centered and smooth. You can use a basting spray or safety pins to keep the layers from shifting.
Stitch around the wreath shape using your preferred method. A straight stitch works fine, but a zigzag or decorative stitch adds a nice touch. Quilting around the edges helps define the shape and adds texture.
Once the main stitching is done, trim the excess batting and backing. Add a binding around the edges if desired, or simply finish with a turned-under hem.
Finally, attach a hanging sleeve or loops on the back. Now your Half Yard Wreath Wallhanging Pattern is ready to grace your wall or be gifted to someone special.
4. Creative Variations and Design Tips
You can take the basic Half Yard Wreath Wallhanging Pattern and make it truly your own. Try using batik fabrics for a vibrant, textured look or flannel for a soft, cozy feel.
Use felt leaves or flowers for embellishments. These can be hand-cut and sewn or glued onto the wreath for a 3D effect. Layering different shapes adds depth and interest.
Add hand-stitched details using embroidery floss. Words like “Welcome,” “Joy,” or “Home” stitched across the center give the piece a personalized message.
Change up the base fabric to match different seasons. Orange and brown tones work for fall; icy blues and silvers fit winter themes. This allows you to create several wallhangings throughout the year.
Try a minimalist style by using a solid fabric with subtle quilting lines. This gives a modern twist to a traditionally rustic project and can fit into more contemporary homes.
Lastly, involve kids in the design process. Let them choose fabric colors or add their own embellishments. It turns your Half Yard Wreath Wallhanging Pattern into a family-friendly craft that builds memories as well as decor.
Frequently Asked Questions (FAQ)
What is the finished size of the Half Yard Wreath Wallhanging Pattern?
The finished size can vary based on your design, but typically it’s around 16” x 16” or 18” x 18”. Adjust dimensions as needed for your space.
Can I complete this project without a sewing machine?
Yes, though a sewing machine speeds up the process, hand stitching is absolutely possible. It may take a bit longer but adds a charming, handcrafted touch.
Is this project suitable for children or beginners?
Definitely. With adult supervision for cutting, children can participate in decorating and assembly. Beginners will find the pattern simple and satisfying.
Can I sell finished wallhangings made from this pattern?
Yes, as long as you’re using your own materials and not redistributing the pattern itself. Handmade wreath wallhangings make great craft fair or Etsy shop items.
What kind of fabric works best for this pattern?
Cotton quilting fabric is ideal, but you can experiment with linen, flannel, or even upcycled fabric for a unique texture and look.
How do I hang the finished piece on a wall?
Sew a rod pocket or loops on the back to insert a wooden dowel or curtain rod. You can also use adhesive wall hooks or a magnetic hanger if you prefer not to sew loops.
PDF HERE
The Half Yard Wreath Wallhanging Pattern is a beautiful, cost-effective, and customizable project that brings joy to any space. Whether you’re crafting for the holidays, decorating your home year-round, or making heartfelt gifts, this pattern offers endless creative possibilities. From selecting fabrics to adding finishing touches, every step allows you to express your style and love for handmade art.
We hope this guide has inspired you to create your own version of the Half Yard Wreath Wallhanging Pattern. If you’ve tried this pattern or plan to, please share your honest thoughts, suggestions, or favorite customization ideas in the comments. Your feedback helps the creative community grow!