
How to Crochet a Classic Granny Square CROCHE PATTERN is one of the most timeless and beloved techniques in the crochet world. This simple yet beautiful design has been used for generations to create everything from blankets and scarves to bags and clothing. Whether you are a beginner eager to learn your first project or an experienced crafter looking to revisit a classic, the granny square is a pattern that never goes out of style.
What makes the classic granny square crochet pattern so special is its versatility. You can choose vibrant colors for a playful look, soft pastels for a delicate touch, or earthy tones for a cozy and rustic style. The stitch pattern is repetitive and relaxing, making it the perfect project for winding down after a long day. With just a hook, some yarn, and a little patience, you can create endless variations of this iconic square.
In this guide, we’ll walk you through how to crochet a classic granny square, breaking it down into easy steps so you can confidently follow along. You’ll learn the basic stitches, how to start from the center, and how to expand your square with each round. By the end of this tutorial, you’ll not only have a beautiful square in your hands but also the skills to create many more for future projects.
Understanding the Basics of a Granny Square
The granny square crochet pattern starts with just a few simple stitches, usually made in the round. This means you will be working in a circular motion, gradually expanding outwards to form the square shape. It’s a technique that might look complex at first, but once you understand the rhythm, it becomes second nature.
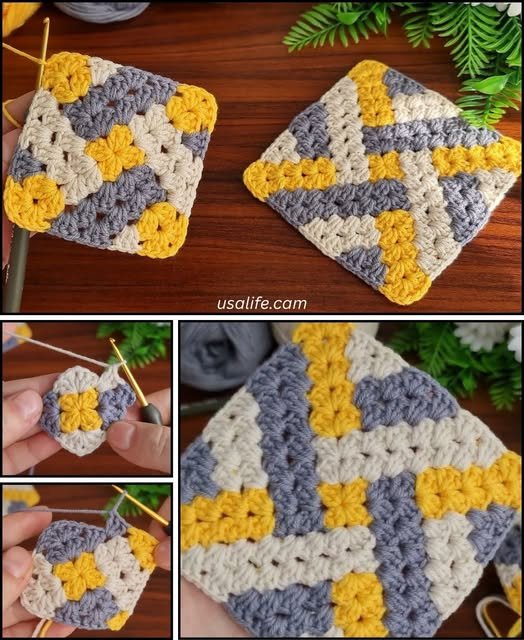
A classic granny square is built from small clusters of stitches. These clusters are usually groups of three double crochets, separated by chain spaces. This repetition creates the signature open, lacy look that makes the granny square so recognizable. The beauty lies in its simplicity—by repeating the same steps, you can build the design as large as you want.
For beginners, learning how to crochet a classic granny square is an excellent way to practice basic stitches like the chain, slip stitch, and double crochet. These are foundational skills that will serve you in countless other crochet projects. Once you’ve mastered them, the granny square becomes a creative playground for experimenting with colors, yarn types, and sizes.
Many crafters love granny squares because they are portable. You can carry a small ball of yarn and a hook in your bag, working on a square whenever you have a few spare minutes. Later, you can join multiple squares to make larger items like blankets, garments, or accessories. This makes the pattern not just a craft, but a lifestyle hobby that fits into daily life.
It’s also worth noting that granny squares are eco-friendly. You can use leftover yarn scraps from other projects to create unique, colorful squares. This not only reduces waste but also gives each square its own personality and charm.
Finally, understanding the basic structure of a granny square will give you confidence to customize it. Once you know the rules, you can break them—adding different stitch combinations, altering the size of the clusters, or even changing the shape entirely for a creative twist.
Step-by-Step: How to Crochet a Classic Granny Square
To begin your classic granny square crochet pattern, you will need yarn in your chosen colors and a crochet hook that matches the yarn weight. Most beginners prefer medium-weight yarn and a hook size of 5mm or 5.5mm, as it’s comfortable to hold and easy to see the stitches.
Start with a slip knot and chain four stitches. Join the last chain to the first with a slip stitch to form a small ring. This ring will be the center of your square, and all stitches will be worked around it in the first round.
Next, chain three to count as your first double crochet. Work two more double crochets into the ring to complete your first cluster. Then chain two to create a corner space. Repeat this pattern—three double crochets, chain two—three more times around the ring. You should now have four clusters separated by chain-two spaces.
To join the round, insert your hook into the top of the beginning chain-three and make a slip stitch. This completes your first round. You can change yarn color here if desired, or continue with the same color for a solid look.
For the second round, slip stitch over to the next corner space. Chain three to count as the first double crochet, then work two more double crochets into the same space. Chain two for the corner, and add three more double crochets into the same corner space. This forms your first corner cluster set.
Continue working three double crochets, chain two, three double crochets into each corner space around the square. When you reach the end, join with a slip stitch to the starting chain-three. You can already see the square taking shape.
The following rounds are simply repeats of this process. In each new round, corners are always worked as three double crochets, chain two, three double crochets. Between the corners, you will work three double crochets into each space from the previous round.
Tips for Perfect Granny Squares
When working the classic granny square crochet pattern, maintaining even tension is key. Uneven tension can make the square warp or curl at the edges. If your stitches feel too tight, try loosening your grip slightly or using a larger hook.
Changing colors between rounds can create beautiful effects. For a clean color change, finish the last stitch of the round with the new color and continue working as usual. This avoids carrying yarn across the back, keeping your work neat.
Blocking your finished squares can improve their appearance. Lightly dampen the square, shape it with your hands, and pin it to a blocking mat until dry. This will help even out stitches and ensure all squares are the same size for joining.
If you are making multiple granny squares for a project, it’s a good idea to weave in ends as you go. This saves you from having to deal with dozens of yarn tails at the end.
Using a consistent yarn weight and hook size for all squares in a project ensures they fit together well. Mixing different yarn thicknesses can cause uneven sizing and make joining difficult.
Lastly, remember that crochet is meant to be enjoyable. Don’t stress over small imperfections—these often add charm and character to handmade items.
Creative Ways to Use Granny Squares
The most popular project for classic granny square crochet patterns is, of course, the blanket. Whether you choose a uniform color scheme or a patchwork of different hues, granny square blankets are warm, beautiful, and full of personality.
Granny squares can also be turned into wearable items like cardigans, vests, and ponchos. By sewing or crocheting squares together in creative arrangements, you can make garments that are truly unique.
For smaller projects, try making cushion covers, table runners, or tote bags from granny squares. These items are quick to make and make great handmade gifts.
You can also use granny squares to practice new stitch patterns. Replace the standard double crochet clusters with shell stitches, popcorn stitches, or puff stitches to add texture.
Another fun idea is to create seasonal granny squares. Use red, green, and white for Christmas; pastel shades for spring; or warm oranges and browns for autumn.
Lastly, granny squares can be a great way to connect with others. Join crochet groups or community projects where each participant contributes squares to a larger piece, such as a charity blanket.
FAQ – How to Crochet a Classic Granny Square CROCHE PATTERN
Q: Is a granny square suitable for beginners?
Yes! The granny square is one of the best patterns for beginners because it uses basic stitches and a simple repeat structure.
Q: How long does it take to make a granny square?
It depends on size and skill level, but a small square can be completed in 20–40 minutes.
Q: Can I use any type of yarn for granny squares?
You can use almost any yarn, but medium-weight acrylic or cotton yarn is the easiest to work with for beginners.
Q: How do I join multiple granny squares?
You can sew them together with a tapestry needle or crochet them together using slip stitches or single crochet.
Q: Do granny squares need blocking?
Blocking is not essential but helps improve shape and uniformity, especially if making a large project.
Q: Can I make a granny square in one solid color?
Absolutely! A solid color creates a more uniform, classic look.
PATTERN HERE
Learning how to crochet a classic granny square CROCHE PATTERN is a rewarding skill that opens the door to countless creative projects. With just a few stitches and a simple pattern repeat, you can make something beautiful, practical, and full of charm. Whether you keep it traditional or experiment with colors and textures, the granny square remains a timeless crochet treasure.
I hope this guide has inspired you to pick up your hook and start creating your own granny squares. Share your thoughts, experiences, and suggestions—I’d love to hear your honest opinion and ideas for future crochet projects.