
The Quilted Hexagon Pouch Tutorial Quilt Pattern is a delightful project for sewing enthusiasts who love blending creativity with practicality. This small yet charming pouch is perfect for carrying everyday essentials while showcasing the beauty of quilted hexagons. By following a structured pattern, crafters of all skill levels can enjoy the process of making something both functional and beautiful. The hexagon shape adds a unique touch that distinguishes this pouch from ordinary quilted accessories.
Creating a quilted hexagon pouch is more than just about stitching fabric together—it’s about crafting a piece of art that reflects personal style. With simple materials and a step-by-step guide, anyone can transform fabric scraps into a practical item with character. Whether used to hold cosmetics, sewing tools, or small personal items, this pouch brings a handmade charm to everyday life. The process combines quilting techniques with patchwork, allowing makers to practice precision and patience.
What makes the Quilted Hexagon Pouch Tutorial Quilt Pattern even more appealing is its versatility. It can be made with colorful cotton fabrics, traditional prints, or even modern minimalistic tones. Each hexagon piece adds depth and texture, giving the pouch an eye-catching design. For beginners, this is a great way to learn quilting basics, while experienced quilters can explore creative variations. The result is a stylish, practical pouch that makes a thoughtful handmade gift or a personal keepsake.
Materials and Preparation for the Quilted Hexagon Pouch
To begin a quilted hexagon pouch, you need to gather the right materials. Having everything ready ensures a smooth and enjoyable quilting process. Common supplies include quilting cotton, batting, lining fabric, thread, and a zipper. Choosing fabrics with contrasting colors or patterns makes the hexagon shapes stand out more vividly.
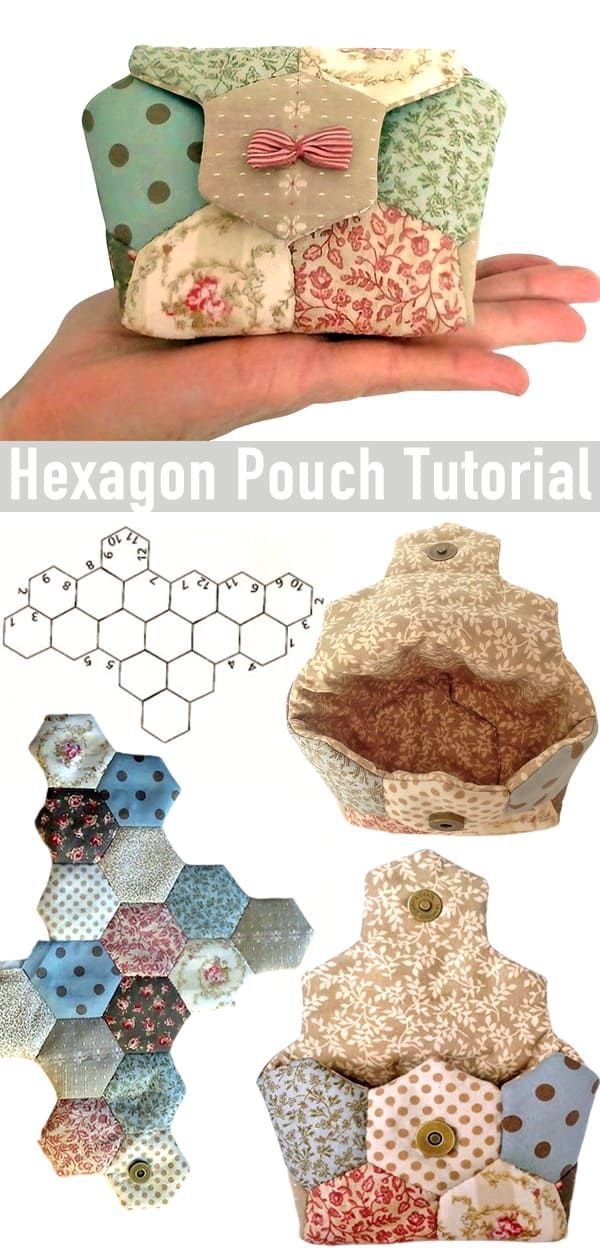
The Quilted Hexagon Pouch Tutorial Quilt Pattern usually starts with cutting hexagons from fabric scraps. Using a hexagon template ensures consistency in size, which is crucial for assembling them neatly. Paper templates are often used for English Paper Piecing (EPP), a technique that helps achieve crisp and precise edges. This preparation step may take some time, but it lays the foundation for a polished final pouch.
Another essential material is batting, which gives the pouch its quilted texture and structure. Thin batting works best, as it allows for flexibility while maintaining shape. Once layered between the fabric pieces, the pouch gains durability and a cozy quilted feel. Selecting the right batting ensures the pouch is not too bulky but still sturdy enough to hold items.
Zippers are also an important consideration. A good-quality zipper enhances the pouch’s usability and longevity. It should match or complement the fabric color, adding a neat finishing touch. Installing the zipper might feel intimidating for beginners, but following the Quilted Hexagon Pouch Tutorial Quilt Pattern carefully makes the process much easier.
In addition to fabrics and zippers, you’ll need basic sewing tools. These include scissors, rotary cutters, sewing needles, pins, and a sewing machine. While much of the hexagon work can be done by hand, a machine helps with sturdier seams and attaching the zipper. Hand-stitching hexagons offers a mindful, relaxing pace, making the process enjoyable.
Finally, ironing tools should not be overlooked. Pressing seams after stitching ensures a flat, professional look. Every step in the Quilted Hexagon Pouch Tutorial Quilt Pattern benefits from proper pressing, as it enhances alignment and overall finish. Preparation may seem detailed, but it transforms the quilting journey into a rewarding experience.
Step-by-Step Process for Sewing the Quilted Hexagon Pouch
The first step in the Quilted Hexagon Pouch Tutorial Quilt Pattern is preparing the hexagons. Cut fabric pieces slightly larger than your paper templates and baste them around the templates. This technique ensures all hexagons are uniform, making it easier to join them later. Patience here results in clean, even shapes that form the foundation of your pouch.
Next, arrange the hexagons into a pleasing pattern. This stage allows for creativity, as you can experiment with color placement and symmetry. Whether you prefer a random assortment or a carefully coordinated design, the arrangement defines the personality of your pouch. Lay them out before stitching to visualize the final outcome.
After arranging, begin stitching the hexagons together. Using a whipstitch or ladder stitch is common in EPP. Work slowly to align the edges precisely. This is where the pouch begins to take shape, as rows of hexagons come together to form panels. The neatness of this stage directly affects the overall appearance of the pouch.
Once the hexagon panels are complete, layer them with batting and a backing fabric. Quilting stitches can now be added either by hand or machine. Simple straight lines or decorative stitching patterns can highlight the hexagon shapes beautifully. This step not only strengthens the pouch but also enhances its visual appeal.
The next stage is attaching the lining and zipper. Place the zipper carefully between the outer fabric and the lining, securing it with pins before sewing. A zipper foot on the sewing machine makes this easier and ensures a neat finish. Following the Quilted Hexagon Pouch Tutorial Quilt Pattern, beginners can achieve professional-looking results even on their first try.
Finally, sew the pouch sides together and finish the seams neatly. Trim excess fabric and turn the pouch right side out. With the zipper installed and seams reinforced, your pouch is ready for use. This final step is always rewarding, as it reveals the transformation from flat fabric pieces into a functional quilted accessory.
Creative Ideas and Variations for Your Quilted Hexagon Pouch
One exciting aspect of the Quilted Hexagon Pouch Tutorial Quilt Pattern is its adaptability. You can personalize it in countless ways, starting with fabric choices. Bright prints create a cheerful look, while muted tones give a more sophisticated appearance. Seasonal fabrics can also make the pouch perfect for holiday-themed gifts.
Another variation is experimenting with pouch size. By adjusting the number of hexagons, you can create small coin purses, medium-sized makeup bags, or even larger travel pouches. The modular nature of hexagons makes resizing the project simple without changing the core technique. This flexibility encourages creativity and practical customization.
Adding embellishments is another fun way to personalize your pouch. Embroidery, decorative buttons, or fabric appliqués can enhance its design. A row of hand-stitched details along the zipper can add charm and uniqueness. Each detail transforms the pouch into a one-of-a-kind creation.
Consider also experimenting with quilting patterns. Instead of straight stitches, try free-motion quilting or geometric stitching that echoes the hexagon shapes. These designs not only strengthen the pouch but also create a striking visual texture. Quilting is where you can truly make your pouch stand out.
For those who enjoy eco-friendly projects, the pouch can be made entirely from fabric scraps. This sustainable approach reduces waste and gives new life to leftover materials. Combining different scraps creates a patchwork-style pouch with character and charm. It’s a practical and environmentally conscious project.
Finally, these pouches make excellent handmade gifts. Adding a personal touch with fabric that reflects the recipient’s taste makes it meaningful. Handmade pouches convey care, creativity, and thoughtfulness, making them treasured keepsakes. With so many customization options, no two quilted hexagon pouches ever need to look the same.
Tips for Success with the Quilted Hexagon Pouch Tutorial Quilt Pattern
One important tip for success is patience. The Quilted Hexagon Pouch Tutorial Quilt Pattern involves multiple small steps, and rushing can lead to uneven seams or misaligned hexagons. Taking time to baste and press fabrics properly ensures a polished finish.
Accuracy is equally essential. Measuring and cutting fabric with precision helps hexagons fit together neatly. Using a rotary cutter and quilting ruler keeps edges sharp. Consistency in preparation translates to smoother assembly later.
Practicing stitching techniques also makes a difference. Whether using whipstitch for hand-sewn hexagons or a machine stitch for zippers, steady and even sewing improves durability. Beginners may find it helpful to practice on fabric scraps before starting the pouch.
Another useful tip is pressing seams frequently. Ironing at every stage—from basting to joining hexagons—creates crisp lines and a more professional appearance. Quilters often say pressing is just as important as stitching, and this project is no exception.
Choosing quality materials also impacts results. High-quality fabric, batting, and zippers ensure the pouch lasts longer and looks more refined. Investing in good supplies pays off in durability and satisfaction.
Lastly, embrace creativity. While the tutorial provides guidance, adding personal flair makes the pouch uniquely yours. Experimenting with colors, textures, and design choices keeps quilting fresh and enjoyable. Each pouch becomes a reflection of the maker’s imagination.
FAQ About the Quilted Hexagon Pouch Tutorial Quilt Pattern
What is the best fabric for making a quilted hexagon pouch?
Cotton quilting fabric is the most recommended material, as it is durable, easy to sew, and available in endless prints and colors.
Do I need a sewing machine to complete the pouch?
Not necessarily. While a sewing machine helps with sturdier seams and zipper installation, the hexagons can be hand-stitched using English Paper Piecing techniques.
How difficult is this project for beginners?
The Quilted Hexagon Pouch Tutorial Quilt Pattern is beginner-friendly. The steps are straightforward, and even those new to quilting can follow along with patience.
Can I resize the pouch?
Yes, simply add or reduce the number of hexagons to make larger or smaller versions. The pattern is flexible and easy to adapt.
How long does it take to make one pouch?
On average, it may take a few hours to a day, depending on experience and the complexity of your design. Hand-stitching hexagons takes longer but offers a relaxing pace.
What is the best way to care for a quilted hexagon pouch?
Hand-washing with mild detergent is recommended. Avoid harsh scrubbing, and let the pouch air-dry to maintain its shape and color.
PATTERN HERE
The Quilted Hexagon Pouch Tutorial Quilt Pattern offers a creative way to blend quilting techniques with functional design. From preparing materials to stitching hexagons, every step allows for personal expression. This project is suitable for beginners and experienced quilters alike, with endless opportunities for customization.
By following the tutorial carefully, you can create a stylish, practical pouch that reflects your personality. It can be a personal accessory, a thoughtful handmade gift, or a sustainable way to use fabric scraps.
We hope this article inspired you to try making your own quilted hexagon pouch. Share your honest opinion and suggestions—we’d love to hear your thoughts on this project and how you plan to personalize your pouch!