
How to Crochet a Peacock Coaster CROCHE PATTERN is a delightful project for anyone looking to add a touch of elegance and color to their home décor. Creating a peacock-themed coaster combines creativity, fun, and practicality, making it a perfect addition to your crochet collection. Whether you are a beginner or an experienced crocheter, this pattern offers an enjoyable challenge and a satisfying result. With vibrant colors and intricate design, these coasters not only protect surfaces but also serve as charming decorative pieces.
The beauty of this Peacock Coaster Crochet Pattern lies in its versatility. You can use it for cups, mugs, or even small plant pots, and it will instantly brighten up your table setting. Crocheting these coasters also provides a great way to practice different stitches and techniques while exploring your artistic side. With just a few materials and some patience, you can create a set of coasters that are both functional and eye-catching.
Learning how to crochet a peacock coaster also encourages mindfulness and focus. Crocheting requires concentration, repetition, and precision, which can be therapeutic and relaxing. Following a structured crochet pattern ensures that even beginners can achieve a professional-looking result. Once you complete one coaster, you may find yourself inspired to create an entire collection in different colors, turning this simple project into a creative journey.
Materials Needed for the Peacock Coaster Crochet Pattern
To begin how to crochet a peacock coaster, you first need to gather the right materials. Selecting the appropriate yarn and hook size is essential to achieving the perfect texture and size for your coaster. Cotton yarn is highly recommended as it provides durability and absorbency while maintaining vibrant colors.
You will need a crochet hook that matches the weight of your yarn. For most cotton yarns, a size G or H hook works best, but always check the yarn label for recommendations. A pair of scissors, a yarn needle for weaving in ends, and stitch markers can also be helpful for beginners to keep track of rounds and stitches.
Choosing colors for your peacock design is where creativity shines. Typically, shades of blue, green, and gold mimic the natural peacock feather pattern, but feel free to experiment with brighter or pastel tones to match your décor. Color selection greatly influences the visual appeal of your final coaster.
Understanding basic crochet stitches is important before starting the pattern. This project typically uses chain stitches, single crochets, double crochets, and slip stitches. Each stitch contributes to the overall design, creating the textured and layered effect reminiscent of peacock feathers.
Preparation of your workspace will make crocheting more enjoyable. Find a comfortable chair and a well-lit area to work in. Keeping all your materials organized in a basket or box helps prevent frustration and makes the process smooth and enjoyable.
Finally, patience is key. While crochet patterns might seem complex at first, following step-by-step instructions and practicing each stitch ensures that your peacock coaster comes out beautifully. Take your time and enjoy the process.
Step-by-Step Instructions to Crochet the Peacock Coaster
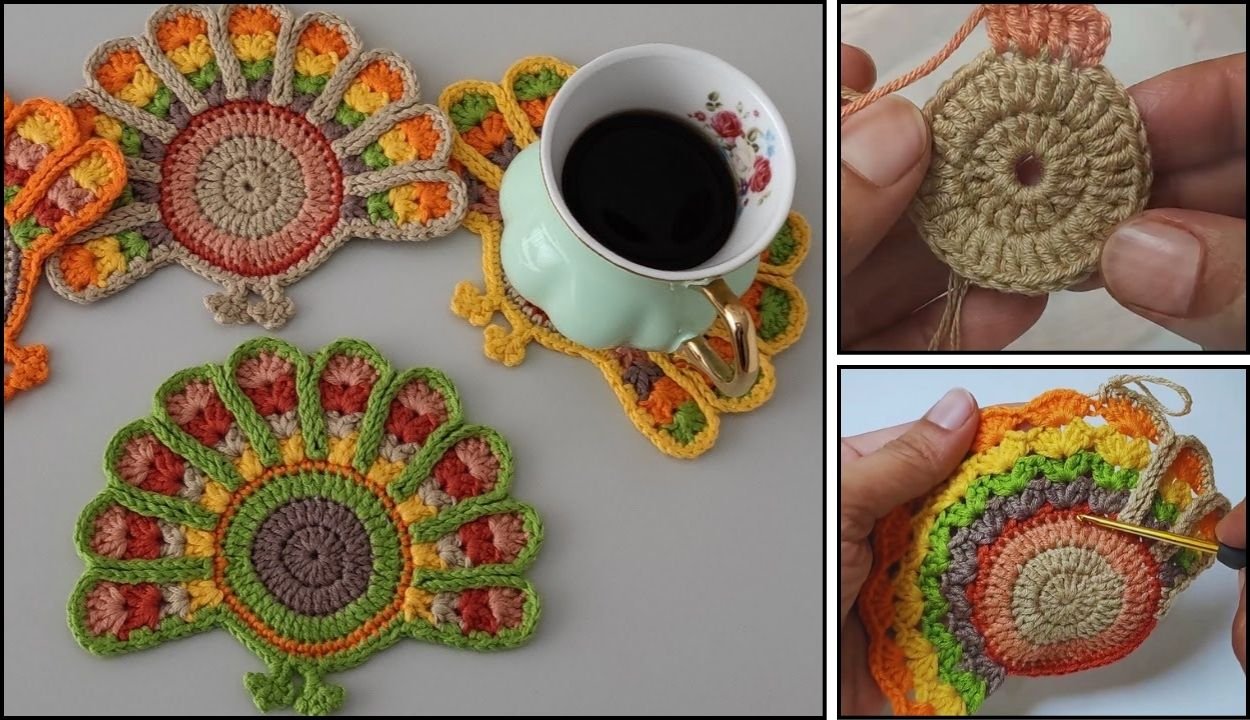
Starting the base of your peacock coaster involves creating a magic ring or chain circle, depending on your preference. This forms the center from which the entire design radiates. Working in rounds ensures a smooth and circular shape that is perfect for coasters.
After creating the base, begin the first round of stitches according to the pattern. Each round builds upon the last, gradually forming the intricate layers that mimic the peacock’s feathers. Precision in stitch count ensures that the coaster remains symmetrical and visually appealing.
Adding color changes is an essential part of this pattern. Switching yarns at the right time creates the beautiful feather effect. It is important to carry yarn neatly along the back of your work or cut and weave in ends to maintain a clean finish.
As the coaster grows, you will introduce different stitch types. Double crochets and treble crochets often make the “feathers” more prominent, giving texture and depth. Pay attention to tension to ensure all layers are consistent in size.
Finishing the outer edges of your coaster involves careful attention to detail. A decorative border not only strengthens the coaster but also enhances its aesthetic appeal. Common choices include picot edges, scallops, or a simple round of single crochets.
Once the coaster is complete, weave in all loose ends carefully. Blocking your coaster can also help flatten and shape it perfectly. Your completed Peacock Coaster Crochet Pattern is now ready to use or gift, showcasing your crochet skills beautifully.
Tips for Customizing Your Peacock Coaster
Personalizing your coaster makes the project even more enjoyable. You can vary colors, stitch types, and borders to create a unique set that reflects your style. Experimenting with metallic or variegated yarn can also add elegance and flair.
Changing the size of the coaster is simple. Using thicker yarn or a larger hook results in a bigger coaster, while thinner yarn and smaller hooks produce a delicate, compact design. Custom sizing ensures that your coasters fit any cup, mug, or glass.
Adding embellishments is another way to customize your design. Small beads, sequins, or embroidered details can mimic the shimmer of a peacock’s feathers. These tiny touches enhance visual interest without overwhelming the overall design.
Stacking multiple coasters with slight variations in color creates a gradient effect, resembling the natural color transitions in peacock feathers. This technique is visually striking and perfect for table décor during parties or special occasions.
Gift sets are an excellent idea for those who enjoy sharing their handmade creations. Package a set of coasters with matching placemats or napkins to create a thoughtful, coordinated gift for friends and family.
Finally, keep a crochet journal or pattern notebook. Documenting your modifications and preferred color combinations makes it easier to reproduce your designs in the future. This is particularly helpful for creating a cohesive collection.
Common Mistakes to Avoid When Crocheting a Peacock Coaster
One common mistake is inconsistent tension, which can lead to uneven shapes or wavy edges. Maintaining a steady hand and relaxed grip ensures smooth rounds and a professional finish. Practicing stitches before starting the coaster helps improve consistency.
Another mistake is incorrect stitch count. Carefully following the crochet pattern instructions is crucial, as missing or adding stitches can distort the shape. Using stitch markers can help keep track of rounds and increases.
Color changes can also be tricky for beginners. Failing to weave in ends neatly can create a messy back side. Take your time to manage yarn transitions cleanly for a polished look.
Skipping blocking is another frequent oversight. Blocking helps even out stitches and rounds, giving the coaster a crisp and neat appearance. It also enhances durability and prevents curling at the edges.
Using the wrong type of yarn may result in a coaster that lacks absorbency or durability. Stick to cotton yarn or blends specifically suitable for household items to ensure functionality and longevity.
Finally, rushing through the project can compromise quality. Crocheting is an art form that requires patience. Taking breaks and working slowly results in a beautiful, high-quality Peacock Coaster Crochet Pattern.
FAQ: How to Crochet a Peacock Coaster
Q: What level of experience is required for this pattern?
A: This pattern is suitable for beginners with basic crochet knowledge, but intermediate and advanced crocheters will find it enjoyable as well.
Q: What type of yarn is best?
A: Cotton yarn is recommended for durability, absorbency, and vibrant color retention.
Q: How long does it take to complete one coaster?
A: Depending on your experience and speed, it usually takes 2–3 hours per coaster.
Q: Can I use different colors?
A: Yes, the pattern is flexible. You can use any color combination to suit your style or décor.
Q: How do I maintain my coasters?
A: Hand wash in cold water and air dry to preserve the shape and color. Avoid harsh detergents.
Q: Can I scale the coaster to different sizes?
A: Yes, adjusting yarn weight and hook size allows you to make smaller or larger versions.
PATTERN HERE
In this guide on How to Crochet a Peacock Coaster CROCHE PATTERN, you learned how to gather materials, follow step-by-step instructions, customize your design, and avoid common mistakes. These coasters are not only functional but also a beautiful artistic expression. By following this pattern, you can create vibrant, elegant coasters that enhance your home décor or make thoughtful gifts. Take your time, enjoy the process, and don’t hesitate to experiment with colors and textures. Please leave your sincere opinions and suggestions on this pattern so that we can continue improving and sharing creative crochet ideas with everyone.