
If you’re looking for a project that’s both fun and creative, the Lip Crochet Pattern is the perfect choice. This pattern allows crafters to express their artistic side by designing bold, playful lips that can be used as appliqués, patches, keychains, or even part of clothing embellishments. Whether you’re new to crochet or an experienced maker, this project offers endless opportunities to explore textures, colors, and stitches while creating something truly eye-catching.
The beauty of the Lip Crochet Pattern lies in its versatility. You can customize the size, shape, and tone of your lips depending on your style or project goals. Some crafters use bright reds for a classic lipstick look, while others experiment with pinks, purples, and even glitter yarns for a more whimsical design. It’s a creative and modern crochet idea that adds personality and charm to any handmade piece.
In addition to being a delightful project, working on a Lip Crochet Pattern is an excellent way to practice shaping and stitch precision. It helps you understand how increases, decreases, and curves come together to form realistic shapes. For crochet enthusiasts who love detail-oriented designs, this pattern is an engaging challenge that results in a beautiful and expressive piece of art.
1. Understanding the Lip Crochet Pattern
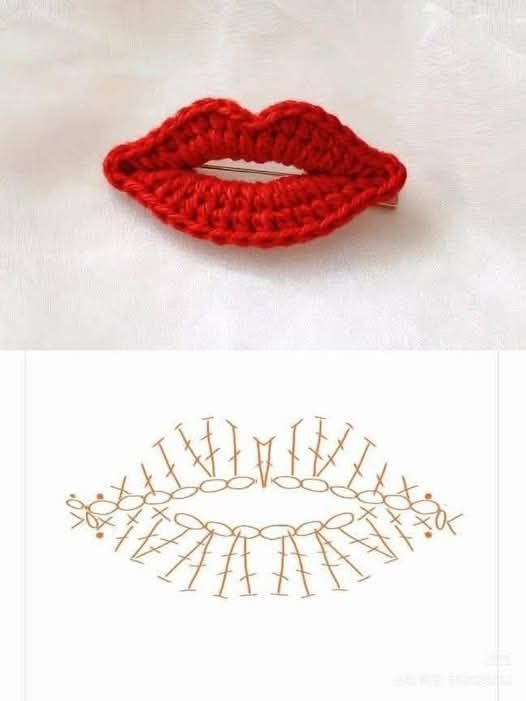
Before diving into the stitches, it’s important to understand what makes the Lip Crochet Pattern unique. Unlike square or round motifs, the lip design requires careful attention to proportion and symmetry. The upper and lower lips must be shaped differently to create that recognizable pout effect, which gives this project its signature appeal.
Many crocheters start by creating the bottom lip first, as it’s generally fuller and easier to shape. Using basic stitches such as single crochet (sc), half double crochet (hdc), and double crochet (dc), you can gradually build the curve. The top lip is then formed separately or continued from the base, depending on your chosen pattern. The key is to maintain even tension to avoid distorting the final shape.
Choosing the right yarn and hook size is another crucial aspect of the Lip Crochet Pattern. Medium-weight cotton yarns work beautifully, giving your project structure and definition. For smaller projects like keychains, thinner yarns or crochet thread can be used for a more delicate finish.
One of the reasons this pattern is gaining popularity is because it allows for so much personalization. From realistic lips in deep reds and burgundies to playful rainbow-colored designs, there’s no limit to what you can create. You can even add a touch of gloss using metallic threads or sequins to make your lips sparkle.
The Lip Crochet Pattern can also be a great teaching tool for beginners. It combines several fundamental crochet techniques—like shaping, joining, and color changing—into one compact project. For experienced crafters, it’s a satisfying mini project that can be completed in under an hour.
Finally, understanding the pattern’s anatomy helps when modifying it for other uses. Once you master the shape, you can attach your crocheted lips to hats, bags, or sweaters for a trendy handmade statement piece.
2. How to Make a Lip Crochet Pattern Step by Step
To start your Lip Crochet Pattern, gather your materials: yarn in your chosen colors, a suitable crochet hook, scissors, and a yarn needle for weaving ends. Begin with a foundation chain that will determine the width of your lips.
Next, crochet along the chain to form the bottom lip. Gradually increase your stitches to build fullness in the center, then decrease toward the ends. This gives the lip a curved, realistic outline. Each row should build on the previous one to maintain symmetry and shape.
For the upper lip, either continue from the bottom lip or start a new piece to attach later. The upper lip usually requires fewer increases but more defined curves to achieve that subtle dip at the center. Paying attention to stitch placement is essential here to maintain a balanced form.
Once both lips are completed, you can join them together by slip stitching along the edges or sewing them using a yarn needle. Make sure the edges align properly for a seamless look.
Adding details is where your creativity can shine. You can embroider highlights to mimic gloss, or use white yarn to create a reflection line. Some crocheters even stuff the lips lightly with fiberfill to give them a 3D effect.
After finishing your Lip Crochet Pattern, secure all loose ends and block your work if needed. This ensures the lips hold their shape and remain smooth, giving your finished piece a professional look.
3. Creative Ways to Use the Lip Crochet Pattern
One of the best parts of creating a Lip Crochet Pattern is the variety of ways it can be used. These lips can become charming appliqués on denim jackets, tote bags, or even pillows. They’re perfect for customizing gifts and adding a handmade touch to everyday items.
For smaller designs, you can turn them into keychains, brooches, or earrings. Simply attach a jump ring or earring hook to the top and you have an adorable crochet accessory. It’s an easy way to showcase your creativity in your daily life.
Another popular idea is using the Lip Crochet Pattern for Valentine’s Day or romantic gifts. Pair it with a heart motif, or stitch several lips together into a banner for a fun decoration. The symbolism of lips makes it a playful and charming project for any love-themed event.
Home décor enthusiasts can also use the lip motif as part of crochet art. Frame your finished lips or sew them onto a decorative pillow cover for a bold pop of color. With the right yarn tones, these designs can complement both modern and vintage interiors.
Crafters who sell handmade items can benefit from adding lip designs to their product lineup. The Lip Crochet Pattern is trendy and unique, appealing to customers looking for quirky and fun accessories. Its compact size and quick completion time make it ideal for market sales or online shops.
Lastly, don’t hesitate to experiment. Try different yarn textures, gradient colors, or embellishments. The beauty of crochet lies in its flexibility—each project can reflect your personal touch.
4. Tips and Tricks for a Perfect Lip Crochet Pattern
Achieving the perfect Lip Crochet Pattern requires patience and precision. The first tip is to use stitch markers to help maintain symmetry between the two sides. This ensures that both the left and right curves of the lips match perfectly.
Always check your tension while working. Uneven tension can make one side of the lip tighter than the other, distorting the overall shape. Consistent stitch size will keep your work neat and polished.
If you want your lips to appear plumper, consider using double layers or lightly stuffing them. This creates a soft, rounded look that adds dimension and realism to your design. Just make sure to close the seams securely.
When changing yarn colors for details—like creating an ombre or two-tone lip—do it at the beginning of a row or round for cleaner transitions. This avoids visible color breaks that might disrupt the smooth appearance.
Blocking your crochet lips after completion is another helpful step. It helps flatten uneven stitches and enhances the definition of the lip shape. Gently pin your project on a foam board and mist it with water until dry.
Lastly, remember to have fun with your work. The Lip Crochet Pattern is all about creativity and expression. Don’t be afraid to experiment with unconventional colors or textures. The more you personalize your project, the more special it becomes.
FAQ – Lip Crochet Pattern
1. What yarn is best for a Lip Crochet Pattern?
Cotton yarn is highly recommended because it offers structure and a clean stitch definition. Acrylic yarns can also work, especially for playful or decorative projects.
2. Can beginners make a Lip Crochet Pattern?
Yes! It’s an excellent project for beginners since it uses basic stitches like single and double crochet. The shaping might take practice, but it’s a great way to learn new techniques.
3. How can I make my crocheted lips look glossy?
You can use metallic or satin-finish yarns, or embroider a thin white line on the top for a highlight effect. Sequins or beads also add a nice sparkle.
4. What can I do with my finished Lip Crochet Pattern?
They make great appliqués, brooches, keychains, or wall art. You can also use them for gift decorations or themed crochet collections.
5. How do I keep my crochet lips from curling?
Blocking your finished piece and maintaining even tension throughout your work helps prevent curling or distortion.
6. Can I resize the Lip Crochet Pattern?
Absolutely! Simply adjust your yarn thickness or hook size to make smaller or larger lips without altering the basic pattern structure.
The Lip Crochet Pattern is a playful, expressive, and versatile project that brings creativity to life. It allows you to explore shapes, textures, and colors while crafting something truly unique. From fashion accessories to home décor, these crocheted lips can brighten any space or outfit. Whether you’re a beginner or an advanced crocheter, this design offers endless opportunities for customization and fun.