
The Sweet Swirl Beanie Crochet Pattern is one of those irresistible designs that instantly catches the eye and warms the heart. This crochet project beautifully combines texture, color, and creativity, making it ideal for crocheters of all levels. Whether you are a beginner wanting to try a fun project or an experienced crafter looking for a stylish winter accessory, this beanie pattern delivers both charm and comfort. With its swirling design and cozy fit, the Sweet Swirl Beanie adds a delightful twist to your handmade collection.
What makes the Sweet Swirl Beanie Crochet Pattern truly special is its versatility. You can play with multiple yarn shades to create a unique swirl effect, or stick to a monochrome palette for a more classic look. The design works perfectly for gifts, craft fairs, or simply as a personal fashion statement during the colder months. Its stretchy structure ensures a snug fit, while the spiral texture gives it a modern and sophisticated touch that suits any style.
Crocheting this beanie is not only rewarding but also meditative. The repetitive swirling stitches create a rhythm that relaxes your mind while keeping your hands busy. Even beginners find the Sweet Swirl Beanie Crochet Pattern enjoyable once they understand the basic stitch transitions. It’s a great opportunity to practice working in the round, managing color changes, and maintaining consistent tension throughout the piece. In the following sections, we’ll explore materials, techniques, and tips to help you create this stunning project with ease.
1. Materials and Tools You’ll Need
Before you begin your Sweet Swirl Beanie Crochet Pattern, make sure you have the right materials and tools prepared. The quality of your yarn and hook size directly affect the final look and feel of your project, so attention to detail matters.
First, choose a medium-weight yarn or worsted-weight category (category 4). Acrylic or wool blends work beautifully for beanies because they provide both warmth and stretch. If you prefer a lighter or more breathable version, cotton blends are also a great option. The swirl pattern stands out best when you use two contrasting colors or gradient yarns.
Second, pick a crochet hook that complements your yarn choice. Usually, a 5mm or 5.5mm (H or I size) hook is ideal. You can adjust the hook size depending on whether you want a tighter or looser fabric. Always crochet a small swatch first to check your gauge—it will help ensure your beanie fits perfectly.
You’ll also need some essential accessories: a yarn needle for weaving in ends, a pair of scissors, and stitch markers. The stitch markers are especially helpful for marking the beginning of each round in your swirl design. They prevent confusion as you progress through the circular pattern.
When choosing colors for your Sweet Swirl Beanie, think about contrast and movement. A light and dark pairing creates a bold swirl, while similar tones offer a subtle gradient effect. Experimentation is key—this is your chance to make a design that truly reflects your style.
Finally, make sure your work area is comfortable and well-lit. Crocheting in good lighting helps you maintain consistent stitches and catch any mistakes early on. With all your tools ready, you’re set to begin crafting your own cozy swirl masterpiece.
2. Step-by-Step Process of the Sweet Swirl Beanie
The Sweet Swirl Beanie Crochet Pattern follows a circular construction, starting at the crown and working downward toward the brim. Understanding the order of steps makes your project smoother and more enjoyable.
To begin, create a magic ring or adjustable loop. This allows you to pull the center tight and eliminate any hole at the top of your beanie. Chain a few stitches to build height and start your first round with double crochets. The swirl pattern starts to take form as you alternate colors or adjust stitch placements in each round.
The beauty of this pattern lies in how the stitches spiral naturally around the crown. Each round slightly shifts the stitches, giving the illusion of continuous movement. You’ll continue to increase evenly in each round until your crown reaches the desired diameter for your head size.
Once the crown is complete, stop increasing and maintain your stitch count for several rounds. This creates the body of the beanie, where the swirl design becomes most visible. Keep your tension consistent, and if you’re alternating colors, change them smoothly at the beginning of each round for a clean transition.
After you’ve reached the length you prefer, it’s time to work on the brim. You can use a simple ribbed effect by alternating front and back post double crochets or finish with a single crochet round for a clean edge. The brim not only completes the design but also helps the hat stay comfortably in place.
Lastly, fasten off and weave in your yarn ends neatly. Try on your Sweet Swirl Beanie and admire your handiwork. Every swirl represents your creativity and patience coming together in a warm, wearable piece of art.
3. Tips for Perfecting the Swirl Design
Achieving that signature swirl effect requires attention to detail and a few smart techniques. Even small adjustments can dramatically improve the final look of your Sweet Swirl Beanie Crochet Pattern.
One of the best tips is to use stitch markers strategically. Place them at key points where the swirl shifts or where color changes occur. This helps you stay on track and avoid losing count during your rounds.
Another important element is tension control. Keep your stitches even throughout the project. Too tight, and your beanie may shrink or feel stiff; too loose, and it might lose structure. Practicing with a small sample before starting the full beanie can help you find your ideal rhythm.
If you’re working with multiple colors, remember to carry your yarn neatly along the inside of the hat. Avoid long floats that can catch or create bulk. You can also crochet over the unused strand to save time and reduce finishing work later.
Don’t be afraid to experiment with yarn textures. A slightly fuzzy yarn gives a soft, cloud-like effect, while smooth yarns make the swirl pattern more defined. Mixing textures can add an interesting depth to your design.
Blocking your finished beanie lightly with steam or a damp cloth can enhance its shape and drape. It’s a simple step that gives your Sweet Swirl Beanie a professional finish and helps the swirls stand out beautifully.
Finally, enjoy the process. Every swirl tells a story of time and creativity, and perfection comes with practice. The more you make, the more your skills and style will shine.
4. Creative Variations and Styling Ideas
One of the most enjoyable aspects of the Sweet Swirl Beanie Crochet Pattern is how adaptable it is. You can personalize it in endless ways to suit different occasions, outfits, or moods.
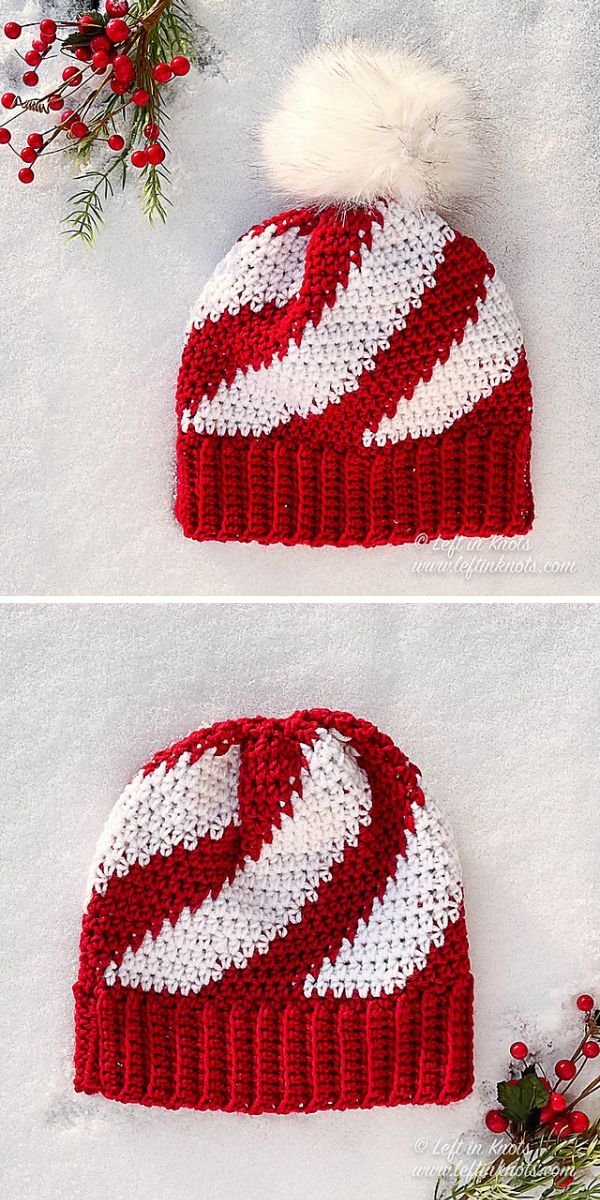
Try changing color schemes based on the season. Bright pastels work beautifully for spring, while earthy tones give a cozy autumn vibe. For winter, consider classic holiday colors like red, white, and green to create a festive version of your beanie.
You can also add embellishments like pom-poms or decorative buttons. A fluffy pom-pom on top adds a playful touch and enhances the swirl effect, drawing the eye upward. If you prefer a minimalist style, skip the decorations and let the pattern itself make the statement.
Adjusting the length of your beanie gives it a completely different look. A shorter, fitted version looks sleek and sporty, while a slouchy version feels relaxed and trendy. You can easily extend the rounds before the brim to achieve your desired length.
Consider making matching sets with your swirl pattern. A coordinating scarf or pair of mittens using the same stitch technique creates a stylish, unified look. It’s also a wonderful gift idea for loved ones who appreciate handmade items.
If you’re selling your creations or gifting them, personalize tags or packaging with the beanie. Handmade care instructions or a small thank-you note can add charm and value to your work. Every handmade item carries a bit of your heart and artistry.
Lastly, remember that creativity has no limits. Each Sweet Swirl Beanie can be as unique as the person wearing it. Experiment freely and let your crochet hook lead the way.
FAQ – Sweet Swirl Beanie Crochet Pattern
1. Is the Sweet Swirl Beanie Crochet Pattern suitable for beginners?
Yes, it’s a beginner-friendly pattern, especially if you already know basic stitches like single and double crochet. The swirl effect may look complex, but it’s built from simple techniques repeated in a sequence.
2. How long does it take to complete the Sweet Swirl Beanie?
On average, it takes about 4–6 hours, depending on your skill level and yarn type. Beginners may take longer, but experienced crocheters can finish it in a single day.
3. Can I use only one color for this pattern?
Absolutely! A single-color version still looks stunning. The swirl texture remains visible even without contrasting colors, giving a more subtle and elegant appearance.
4. What type of yarn is best for this pattern?
Medium-weight (worsted) yarns are ideal. Acrylic yarns are popular for their durability and warmth, while wool blends add extra coziness and elasticity.
5. How can I make the beanie larger or smaller?
You can adjust the number of increasing rounds at the crown for size changes. Adding more rounds increases the diameter, while fewer rounds make it smaller. Always measure your work to fit your head size.
6. Can I wash the Sweet Swirl Beanie in a machine?
That depends on your yarn. Acrylic yarns are usually machine washable, but wool blends require gentle hand washing. Always check your yarn label for care instructions.
PATTERN HERE
The Sweet Swirl Beanie Crochet Pattern is more than just a winter accessory—it’s a creative journey that combines texture, color, and craftsmanship. From selecting the perfect yarn to shaping each swirl, every step allows you to express your individuality and love for crochet. Whether you make it as a gift, a personal project, or part of your handmade collection, this beanie will surely bring warmth and style to any outfit.
If you’ve enjoyed learning this pattern, share your experience! Leave a sincere opinion about your crochet journey and feel free to add suggestions or ideas for future projects. Your feedback helps inspire more creative designs and keeps the crochet community growing with every stitch.