
The Crochet Angel Ornament Pattern is one of the most charming and meaningful projects for crochet enthusiasts. Whether you are creating decorations for Christmas, handmade gifts for loved ones, baby shower keepsakes, or elegant home décor, this delicate angel ornament is a timeless design that never goes out of style.
With simple stitches and a little patience, even adventurous beginners can create a beautiful crochet angel that will be treasured for years. Throughout this guide, you will learn how to understand the construction of the ornament, organize your materials, crochet each section, and assemble everything into a polished final piece.
Handmade crochet ornaments continue to grow in popularity because they combine creativity, relaxation, and personalization. A Crochet Angel Ornament Pattern allows you to transform a few basic crochet stitches into an elegant decorative item full of symbolism. Unlike mass-produced decorations, every handmade angel carries its own unique character.
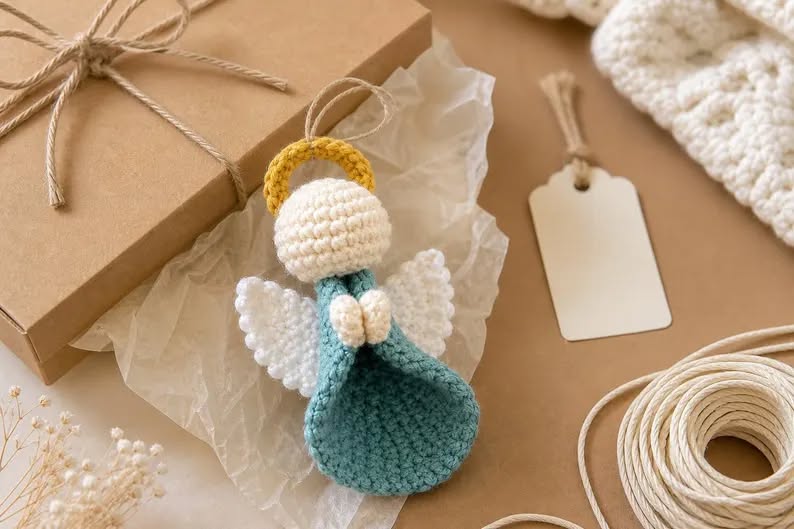
Small variations in tension, yarn texture, or color make each ornament one of a kind. This project also provides an excellent opportunity to practice shaping techniques while creating something meaningful that can become part of family traditions.Another reason the Crochet Angel Ornament Pattern remains so popular is its versatility. You can customize the angel using different yarn colors, metallic accents, embroidered details, ribbons, beads, or wooden rings for hanging. Some crocheters prefer a classic white angel, while others enjoy experimenting with pastel colors, natural cotton yarn, or festive holiday palettes. No matter your style, this project adapts beautifully to your creativity while helping you improve your crochet skills one stitch at a time.
1. Materials and Preparing Your Crochet Angel Ornament Pattern
Choosing quality materials is the first step toward creating a beautiful Crochet Angel Ornament Pattern. Cotton yarn is often preferred because it creates excellent stitch definition while maintaining the ornament’s shape. Soft acrylic yarn may also be used if you prefer a lighter texture with gentle flexibility.
A crochet hook that matches your yarn weight will produce the best results. Most ornaments benefit from slightly tighter stitches, helping the stuffing remain hidden and giving the finished angel a smooth appearance. A hook one size smaller than normally recommended often works very well.
Prepare a small amount of polyester fiberfill for stuffing the angel’s head. Only a little stuffing is required, as the goal is to achieve a neat round shape without stretching the stitches too much.
Additional supplies include a yarn needle for sewing the pieces together, small embroidery scissors for trimming yarn ends, stitch markers, and optional safety pins to temporarily position the wings before permanent assembly.
Before beginning the project, organize every material within easy reach. Having everything prepared allows you to focus on maintaining even stitch tension throughout the pattern without unnecessary interruptions.
Finally, take a few moments to review the crochet abbreviations used in your pattern. Understanding terms such as magic ring, single crochet, increase, decrease, chain, and slip stitch will make the project much easier from beginning to end.
2. Step-by-Step Crochet Angel Ornament Pattern Instructions
Begin your Crochet Angel Ornament Pattern by making a magic ring and crocheting the first round of single crochet stitches. Continue increasing evenly until the head reaches the desired diameter. Work several rounds without increases before beginning gradual decreases to form a smooth sphere. Lightly stuff the head before closing the opening.
For the body, crochet from the neck downward using continuous rounds. Increase gradually to create a flowing bell-shaped gown. Consistent stitch tension helps produce a smooth, elegant silhouette. The dress should naturally widen toward the bottom while remaining symmetrical.
The wings are typically worked separately. Start each wing with a small chain, then use combinations of single crochet, half double crochet, and double crochet stitches to create a rounded feather-like appearance. Make two identical wings for balance.
The small hands can be formed using tiny crochet ovals or simple rounded shapes worked in a few quick rounds. Sew them together in front of the body to give the angel a peaceful praying pose, one of the most recognizable features of many classic angel ornaments.
To create the halo, crochet a small ring using yellow, gold, or metallic yarn. Alternatively, a small metal or wooden ring wrapped with yarn also creates a beautiful decorative effect while maintaining the handmade appearance.
Complete the ornament by carefully sewing all components together. Position the wings evenly on the back, attach the halo above the head, weave in every loose yarn end securely, and add a hanging loop so your finished angel can be displayed beautifully.
3. Helpful Crochet Tips for a Professional Finish
Maintaining consistent tension throughout your Crochet Angel Ornament Pattern greatly improves the finished appearance. Even stitches create cleaner shaping and help every component fit together naturally during assembly.
Using stitch markers is especially helpful when working in continuous rounds. They allow you to identify the beginning of each round, reducing counting mistakes and helping maintain symmetrical shaping.
Stuff the head gradually instead of filling it all at once. Small amounts of fiberfill distributed evenly create a smooth round shape without visible lumps or overstretched stitches.
When sewing the wings onto the body, pin them in place first before making permanent stitches. This simple step allows you to check alignment from different angles and make adjustments if necessary.
Always leave slightly longer yarn tails when finishing each piece. Longer tails provide stronger sewing seams while eliminating the need to attach extra yarn during assembly.
After completing the ornament, gently shape the dress and wings using your hands. Small adjustments before displaying the angel can significantly improve its overall presentation and give it a polished handcrafted appearance.
4. Creative Ways to Personalize Your Crochet Angel Ornament Pattern
One of the greatest advantages of a Crochet Angel Ornament Pattern is the freedom to personalize every detail. Experiment with different color palettes to match seasonal decorations, nursery themes, weddings, baptisms, or holiday celebrations.
Add embroidered facial features using fine black thread and tiny pink stitches for soft rosy cheeks. Keeping facial details simple often creates the sweetest and most elegant result.
Decorative ribbons tied around the neck or attached as hanging loops introduce additional texture while complementing the softness of the crochet stitches. Satin, lace, or rustic twine all create unique styles.
Tiny pearl beads, miniature buttons, or delicate sequins may be added sparingly to enhance the ornament without overwhelming its handmade charm. Less is often more when decorating small crochet projects.
If you plan to make multiple ornaments, consider creating a collection with different dress colors while keeping the wings white. This approach produces a coordinated yet distinctive set perfect for gifting or decorating an entire Christmas tree.
Many crocheters also enjoy turning this project into thoughtful handmade gifts. Personalized angels featuring initials, meaningful colors, or commemorative dates become treasured keepsakes for birthdays, baby showers, weddings, holidays, and special family celebrations.
Frequently Asked Questions
Is the Crochet Angel Ornament Pattern suitable for beginners?
Yes. Beginners who are comfortable with basic stitches like chain, single crochet, increases, and decreases can successfully complete this project by working carefully and following each step.
What yarn works best for a Crochet Angel Ornament Pattern?
Cotton yarn is usually the preferred choice because it offers excellent stitch definition, durability, and structure. Acrylic yarn is also suitable if you prefer a softer appearance.
How long does it take to crochet one angel ornament?
Most crocheters can complete a single ornament within two to five hours, depending on their experience, the amount of detailing, and the complexity of the chosen design.
Can I wash the finished crochet angel?
Yes. Hand washing with mild detergent is generally recommended. Gently reshape the ornament while damp and allow it to air dry completely before storing or displaying.
Can I sell finished crochet angel ornaments?
In many cases, handmade finished items may be sold, provided you respect any licensing or copyright terms associated with the specific pattern you are using. Always verify the designer’s usage policy.
What is the best stuffing for the angel’s head?
Polyester fiberfill is the most popular option because it is lightweight, washable, and maintains its shape over time.
Can I make the ornament larger?
Absolutely. Using thicker yarn and a larger crochet hook will naturally increase the size of the finished ornament while maintaining the same overall construction method.
How should I store crochet angel ornaments?
Store them in a clean, dry container away from direct sunlight and excessive moisture. Wrapping each ornament individually in tissue paper helps preserve its shape and prevents dust buildup.