
The Quilt Chicken-Print Pot Holder Pattern is a charming sewing project that combines practical kitchen use with the warm, handmade appearance of traditional quilting. Inspired by the chicken-shaped fabric piece shown in the photo, this project features a rounded chicken body, colorful tail feathers, a decorative wing, a small beak, and a cheerful comb.
The combination of floral, gingham, and dotted fabrics gives the finished piece a cozy farmhouse character that works beautifully in a country-style kitchen.This Quilt Chicken-Print Pot Holder Pattern is also a wonderful project for using small fabric scraps. You can combine several coordinating cotton fabrics to create the body, tail, wing, and decorative details.
The project can be made in soft floral prints, traditional checks, tiny polka dots, or seasonal fabrics. Because the chicken shape is built from simple curved and appliqué pieces, it can be adapted to different sizes according to your needs.The project shown in the image has an approximate finished size of around 16 to 17 inches tall, depending on seam allowances and how the pattern is enlarged or reduced.
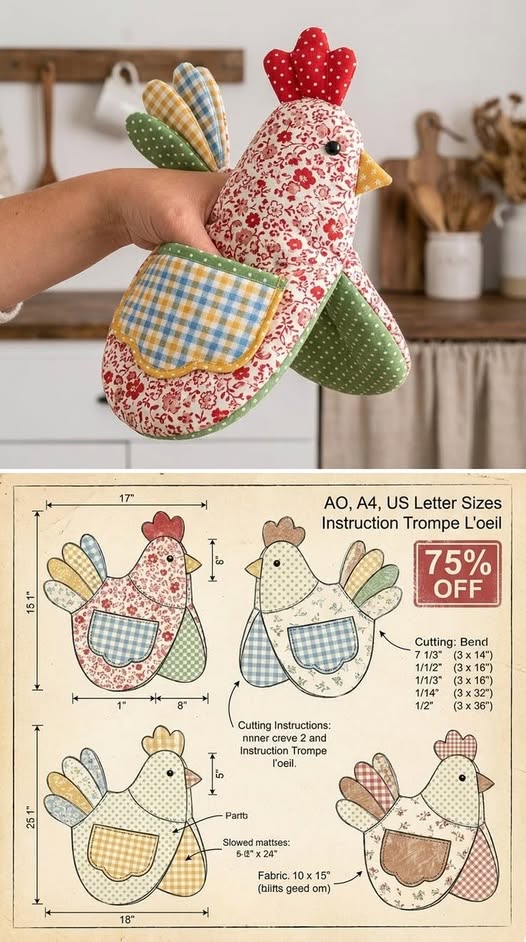
The main idea is to create a chicken silhouette from fabric, add a protective padded interior, and decorate the front with a colorful pocket-like wing. When properly constructed with suitable heat-resistant batting and materials, the finished piece can become both a useful kitchen accessory and an attractive piece of handmade décor.
1. Materials and Fabric Preparation for the Quilt Chicken-Print Pot Holder Pattern
To begin your Quilt Chicken-Print Pot Holder Pattern, gather several pieces of 100% cotton fabric in coordinating colors. For the chicken body, a floral print similar to the one in the photograph works especially well. Choose one or two additional fabrics for the tail feathers, wing, comb, beak, and edging. Small scraps are ideal because most of the decorative components are relatively compact.
You will also need a suitable layer of heat-resistant quilt batting or another batting specifically intended for potholders. Ordinary craft batting may not provide enough protection from heat, so choose a material designed for kitchen projects and follow the manufacturer’s handling recommendations. A layer of cotton fabric should be placed between the decorative outer fabric and the batting to create a practical padded construction.
Before cutting, wash and press your cotton fabrics if appropriate for the fabric type. Prewashing helps reduce the possibility of significant shrinkage after the project is completed. Pressing the fabric makes the pieces easier to cut accurately, especially around the curved chicken body and small tail feathers. Neat preparation at this stage makes the later sewing process much smoother.
For the main chicken body, choose a fabric that will provide enough contrast with the other pieces. A cream background with red floral details, as shown in the inspiration image, creates a traditional appearance. You could also use a solid cream fabric with colorful flowers, a small gingham print, or a neutral fabric with tiny leaves.
For the tail, select three or four fabrics that coordinate without being identical. Green, blue, yellow, and cream combinations can create the layered appearance seen in the photograph. Small checks and dots are particularly attractive because they add visual texture without overwhelming the floral chicken body.
You should also prepare basic sewing supplies, including fabric scissors or a rotary cutter, a ruler, pins or clips, a sewing machine, matching thread, an iron, and a hand-sewing needle. A washable fabric marker can be useful for transferring the chicken outline and placement markings. If you want to make several potholders, creating a reusable template from sturdy paper or template plastic will save time.
2. Creating the Chicken Shape and Decorative Quilt Pieces
The most important part of the Quilt Chicken-Print Pot Holder Pattern is the chicken body. Begin by drawing or transferring a rounded chicken silhouette onto paper. The body should have a fuller lower section, a gently curved back, a slightly raised neck, and a small head. The silhouette should resemble the proportions of the chicken in the photograph while remaining simple enough to sew around.
For a project approximately 16 to 17 inches tall, you can create a paper template that is about 16 inches high and approximately 8 to 10 inches wide at the fullest part of the body. These dimensions are flexible rather than mandatory. The exact finished size will depend on seam allowances, batting thickness, and how you enlarge the template.
Cut two mirrored fabric body pieces using your template. One piece will form the front and the other will form the back. If you want the floral design to appear prominently on both sides, make both pieces from the same fabric. Alternatively, the back can be made from a coordinating solid or small-print fabric for a different visual effect.
Next, prepare the tail feathers. The inspiration image shows several elongated oval or leaf-shaped pieces arranged in a fan. Create three to five feather templates, with each feather slightly different in size if desired. Cut two fabric pieces for each feather or construct each feather as a folded appliqué element, depending on the finish you prefer.
For a neat quilted appearance, place each tail feather right sides together with a matching backing piece, sew around the edges while leaving a small opening, turn it right side out, and press carefully. Another simple option is to layer the feather fabric over batting and backing, stitch around the perimeter, and trim the edges neatly. This approach gives the tail more structure.
The chicken comb is made from a small scalloped shape placed above the head. Use red fabric for a traditional look, or choose pink, burgundy, orange, or another color that complements the body. The beak can be a small triangle of yellow or golden fabric. These tiny details are important because they immediately establish the chicken character.
For the eye, a small embroidered French knot, a carefully secured fabric circle, or another appropriate textile embellishment can be used. If the potholder will be used around children, pets, or food preparation areas, avoid small detachable embellishments that could become loose. Secure every decorative element firmly and keep the finished project appropriate for its intended use.
The large wing or pocket is one of the most recognizable features of this Quilt Chicken-Print Pot Holder Pattern. In the photograph, the wing is made from a contrasting green dotted fabric and overlaps the lower side of the chicken. You can create a rounded pocket shape using a curved top edge and gently scalloped lower edge, then add a contrasting binding around the perimeter.
3. Step-by-Step Assembly of the Quilt Chicken-Print Pot Holder Pattern
Start the assembly by arranging the tail feathers behind the upper back section of the front chicken body. Place the largest feather toward the outside of the fan and the smaller pieces progressively toward the center. Pin or clip them securely so that they remain in the desired position. The lower portions of the feathers will eventually be covered by the chicken body.
Stitch the tail feathers in place using a straight stitch close to the edge or with a decorative quilting stitch. If your fabric layers are thick, use a suitable needle and take your time around the curves. The goal is to keep the feathers secure while allowing their upper sections to remain visible above the body.
After attaching the tail, position the comb at the top of the chicken’s head. The comb can be constructed as a small padded piece or as a simple appliqué. Secure it before assembling the main body so that the stitching is hidden inside the final seam whenever possible.
Place the beak at the front of the head and secure it temporarily. Check the position against the original photo: the beak extends slightly outward from the head and points toward the right side. This small detail helps define the chicken’s profile and gives the finished quilt chicken pot holder a playful appearance.
Now prepare the wing. If you want the wing to function as a small decorative pocket, sew the top edge neatly and finish the remaining edges with binding or a narrow turned hem. Place the wing on the front body and pin it carefully. Stitch along the curved outer edge while leaving the upper portion open if you want the piece to remain functional as a pocket.
Layer the front and back body pieces with the appropriate heat-resistant batting between them. Make sure the tail, comb, and beak are positioned correctly before sewing around the body. Clip around curves rather than placing pins too close together, and leave an opening at the bottom or another inconspicuous location for turning.
Sew around the chicken silhouette using a consistent seam allowance. Curves should be sewn slowly to maintain a smooth outline. When you reach the tight areas around the head and neck, use shorter stitches and gently pivot the fabric where necessary. Avoid rushing these sections because smooth curves are one of the features that make the final chicken shape look polished.
Carefully trim excess seam allowance around the curved sections without cutting through the stitching. Small notches or clipped curves can help the seam turn smoothly. Turn the chicken right side out through the opening and gently push out the rounded edges using a blunt turning tool. Press the piece thoroughly before closing the opening.
Once the main body has been turned and pressed, close the opening with a neat ladder stitch or another suitable hand stitch. You can then quilt through the layers using straight lines, gentle curves, or free-motion stitching. Quilting helps keep the batting in position and gives the project the traditional handcrafted character associated with the Quilt Chicken-Print Pot Holder Pattern.
4. Finishing, Quilting Details, and Personalizing Your Chicken Pot Holder
The final stage is where your Quilt Chicken-Print Pot Holder Pattern really becomes unique. Add stitching around the wing, body, or tail to emphasize the different shapes. A simple outline stitch can be enough to create a professional finish. You do not need complicated quilting designs to make this project attractive.
Consider using contrasting thread to highlight selected details. Cream thread blends beautifully with a floral body, while green thread can emphasize a green wing. Red thread around the comb or decorative floral motifs can create visual continuity. If you prefer a subtle finish, select thread that closely matches each fabric.
The pocket-style wing can also be decorated with additional quilting lines. For example, parallel curved lines can follow the shape of the wing, creating texture while keeping the design simple. If the wing is intended to hold anything, remember that it should not be treated as a substitute for proper heat protection.
A hanging loop can be added near the top of the chicken if you want to display the finished piece on a kitchen hook. Make the loop from a sturdy strip of cotton fabric and sew it securely into the construction. A loop also makes the quilted chicken potholder convenient to store when it is not being used.
When using the finished project as a potholder, always test the completed layers carefully and use appropriate heat-resistant materials. Fabric crafts vary considerably in insulation depending on the batting, number of layers, and construction. Never assume that a decorative fabric item is automatically safe for handling very hot cookware. For particularly high temperatures, use a commercially rated heat-protective product.
One of the best things about this Quilt Chicken-Print Pot Holder Pattern is how easily it can be personalized. Change the body fabric to match your kitchen, make the tail from seasonal colors, or use scraps from previous quilting projects. For spring, pastel fabrics can create a fresh appearance. For autumn, try mustard, rust, brown, and olive tones.
You can also make several chickens in different color combinations. A coordinated collection could include a floral chicken, a gingham chicken, a country-style chicken, and a seasonal version. This is a practical way to use leftover quilting fabrics while creating handmade kitchen decorations that have a consistent theme.
The project is also suitable for improving several useful sewing techniques. You can practice working with curves, appliqué, fabric layering, binding, decorative quilting, and hand finishing. Beginners can keep the design simple, while more experienced quilters can add intricate stitching, pieced wings, embroidered details, or additional quilting patterns.
FAQ: Quilt Chicken-Print Pot Holder Pattern
What is a Quilt Chicken-Print Pot Holder Pattern?
A Quilt Chicken-Print Pot Holder Pattern is a sewing project that creates a chicken-shaped quilted kitchen accessory. The design generally includes a rounded chicken body, decorative tail feathers, a comb, beak, eye, and wing. The project shown in the photo uses several coordinating cotton prints to create a colorful country-style appearance.
How large should the chicken potholder be?
The chicken shown in the inspiration image is approximately 16 to 17 inches tall, but the size can be adjusted. For a smaller kitchen accessory, reduce the template proportionally. For a larger decorative piece, enlarge the template before cutting. Remember that changing the size also changes the amount of fabric and batting required.
What fabric is best for this quilted chicken project?
Cotton quilting fabric is an excellent choice for the decorative outer layers because it is easy to cut, sew, press, and quilt. Floral prints, gingham, small checks, and polka dots work particularly well. Choose fabrics that coordinate in color while providing enough contrast to make the individual chicken parts visible.
What batting should be used for a potholder?
Use batting specifically intended for heat-resistant kitchen projects and follow its manufacturer’s instructions. The number and type of layers influence the amount of protection provided. Ordinary decorative batting should not automatically be assumed to be suitable for handling hot cookware.
Can beginners make this Quilt Chicken-Print Pot Holder Pattern?
Yes. The project involves several beginner-friendly techniques, although the curved chicken silhouette and small decorative pieces require patience. Start by making a simple paper template and practice sewing around curves on scrap fabric. Taking your time with pressing and trimming will make the final result much cleaner.
Can I change the colors and fabrics?
Absolutely. Fabric selection is one of the most enjoyable parts of this project. You can use traditional farmhouse colors, bright modern prints, pastel fabrics, Christmas fabrics, autumn colors, or scraps from previous quilt projects. Keeping one fabric relatively neutral can help the colorful tail and wing stand out.
How do I make the tail feathers look layered?
Arrange the feathers in a fan shape, with their lower ends overlapping behind the body. Use different fabrics for each feather and vary their widths slightly. Secure the feathers before attaching the main body so that only the upper sections remain visible.
How is the wing attached?
The wing can be finished separately with a narrow hem or binding and then stitched onto the front of the chicken. If you want a pocket-style wing, leave the appropriate edge open rather than stitching around the entire perimeter. Reinforce the stitching at stress points for greater durability.
Can this pattern be used as kitchen decoration instead of a potholder?
Yes. The chicken design works beautifully as decorative kitchen art even when you do not intend to use it for handling hot objects. It can be displayed on a wall, door, cabinet, or decorative hook. For purely decorative versions, you can use additional embellishments that may not be appropriate for a frequently handled kitchen potholder.
How can I make the finished chicken look more professional?
Accurate cutting, careful pressing, smooth curves, consistent stitching, and properly finished edges make the biggest difference. Choose coordinating fabrics and avoid overcrowding the design with too many colors. A final pressing and a careful inspection of the seams can significantly improve the finished appearance.
Conclusion
The Quilt Chicken-Print Pot Holder Pattern is a delightful way to combine quilting, appliqué, and practical sewing techniques in one creative project. From selecting coordinating fabrics to creating the rounded chicken body, layered tail feathers, decorative comb, beak, and pocket-style wing, every step offers an opportunity to add your own personality.