
The Crochet Jesus keychain Pattern is a meaningful and charming small crochet project inspired by the familiar figure of Jesus, transformed into a handmade amigurumi-style accessory.
This project combines simple crochet techniques with a few carefully placed details to create a tiny character that can be attached to a key ring, bag, backpack, or decorative hook.
The finished design features a small body, dark hair, a beard, a light-colored robe, and a red sash that gives the figure its recognizable appearance.
Because the project is small, it can also be an excellent way to practice shaping, color changes, embroidery, and joining crochet pieces without committing to a large project.
The Crochet Jesus keychain Pattern can be adapted to different yarn colors and thicknesses, allowing each crocheter to create a personalized version.
The instructions below explain the construction step by step while keeping the project beginner-friendly and practical for handmade crafting.
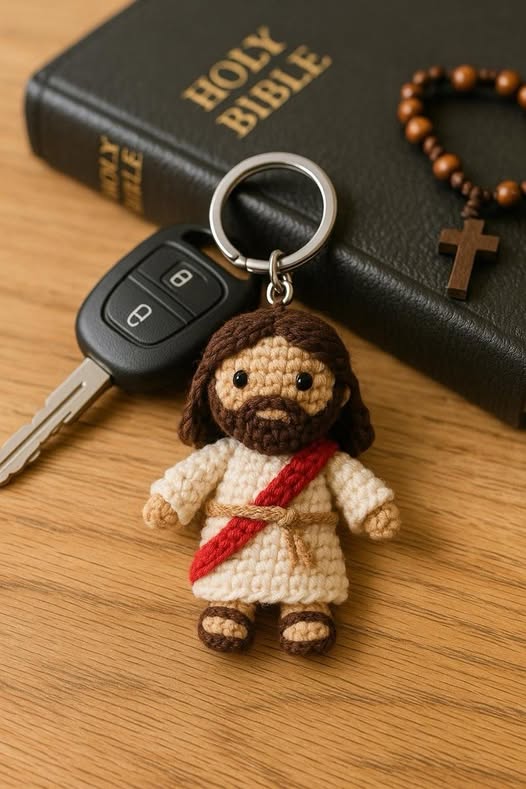
A handmade religious-themed crochet figure can be especially meaningful when created as a personal keepsake or thoughtful handmade gift.
The appeal of this Crochet Jesus keychain comes from its combination of symbolism and craftsmanship, making it different from an ordinary decorative keychain.
The small scale makes the project portable, so you can work on it during short crafting sessions and gradually complete each component.
Although the reference design shows a compact figure with a cheerful expression, you can change the facial details, hair style, robe colors, or proportions according to your preferences.
For the best result, it is helpful to work with a tight crochet tension so the stuffing remains inside the amigurumi pieces.
With a little patience and careful assembly, even crocheters who are relatively new to small amigurumi projects can create a polished Crochet Jesus keychain Pattern.
Before beginning, gather your yarn, crochet hook, stuffing, safety eyes or embroidery thread, a yarn needle, scissors, and a sturdy keychain ring.
A small amount of cream or off-white yarn works well for the robe, while brown yarn can be used for the hair, beard, sandals, and selected facial details.
Red yarn creates the diagonal sash shown in the design, while a beige or tan shade can be useful for the skin and hands.
The exact finished size will depend on your yarn weight, hook size, and crochet tension, so consider the measurements as approximate rather than fixed.
For a keychain, a compact and firmly crocheted body is preferable because it will experience more handling than a decorative amigurumi that stays on a shelf.
Once your supplies are ready, follow the sections below to build the Crochet Jesus keychain Pattern from the head down to the final accessories.
1. Materials, Crochet Abbreviations, and Starting the Head
For this Crochet Jesus keychain Pattern, use a small amount of worsted-weight or cotton yarn in cream, beige, brown, and red.
A crochet hook around 2.5 mm to 3.0 mm is a useful starting point for a compact keychain, although you should choose the hook that gives you a firm fabric with your yarn.
You will also need a small amount of polyester fiberfill, a yarn needle, scissors, black embroidery thread or small safety eyes, and a metal keychain ring.
The ring should be attached securely because the finished piece may be pulled repeatedly when used with keys or a bag.
Cotton yarn is particularly convenient for this project because it produces defined stitches and holds its shape well.
If you prefer a softer appearance, an acrylic yarn can also work, provided your stitches remain tight enough for the stuffing not to show.
The main crochet abbreviations used in this pattern are ch for chain, sc for single crochet, inc for increase, and dec for decrease.
The pattern uses continuous rounds for the head and body, which means you do not need to join each round with a slip stitch unless specifically instructed.
A stitch marker can help you identify the beginning of every round and prevent accidentally losing your place.
For beginners, it is useful to count stitches after every round, especially during the shaping of the head.
When the instructions say to repeat a sequence, perform the sequence around the entire round unless another instruction is given.
Keeping your tension consistent is one of the easiest ways to make the final Crochet Jesus keychain look neat and symmetrical.
Begin the head with the skin-tone yarn using a magic ring.
Round 1: make 6 sc into the magic ring.
Round 2: work 2 sc in each stitch around for a total of 12 stitches.
Round 3: repeat 1 sc, inc around for 18 stitches.
Round 4: repeat 2 sc, inc around for 24 stitches.
Rounds 5 through 8: work 24 sc in each round to create the rounded center of the head.
At this stage, lightly add stuffing while you continue crocheting rather than waiting until the very end.
The stuffing should make the head firm but not overly hard, because excessive filling can stretch the stitches and distort the shape.
Rounds 9 and 10 can remain at 24 sc, giving the face enough height for the eyes and beard.
Round 11: repeat 2 sc, dec around for 18 stitches.
Round 12: repeat 1 sc, dec around for 12 stitches, then add a little more stuffing if necessary.
Round 13: work 6 dec around and close the opening carefully, leaving a yarn tail for securing the piece.
For the face, position two small black safety eyes between the middle rounds of the head, leaving several stitches between them.
If the keychain is intended for a young child, embroidered eyes are a safer alternative to small detachable components.
Use brown yarn to create the beard, either by embroidering short stitches across the lower face or by crocheting a small beard-shaped applique and sewing it in place.
For the hair, attach short strands of brown yarn around the sides and back of the head or embroider the hair directly onto the surface.
The image inspiration shows longer brown hair framing the face, so slightly longer strands can help recreate that appearance.
Keep the facial details simple because the small scale of a Crochet Jesus keychain Pattern means even a few stitches can create a strong visual expression.
2. Crocheting the Body, Robe, Arms, and Sash
The body begins directly below the head and is designed to create a small robe-like shape.
Using cream or off-white yarn, make a magic ring and crochet 6 sc into it.
Round 2: increase in every stitch for 12 stitches.
Round 3: repeat 1 sc, inc around for 18 stitches.
Rounds 4 through 7: work 18 sc around, creating the central torso.
This compact construction gives the Crochet Jesus keychain a slightly rounded body while keeping it light enough for a keyring.
Continue shaping the robe by widening the lower section slightly.
Round 8: repeat 2 sc, inc around for approximately 24 stitches.
Rounds 9 and 10: work 24 sc around.
Round 11 can be worked in a slightly different cream shade if you want a subtle handmade detail, although keeping the robe one color also looks attractive.
Begin adding stuffing gradually through the opening at the top or bottom, depending on how you prefer to assemble the figure.
Avoid filling the robe too tightly because a little flexibility helps the small figure hang naturally from the key ring.
To finish the body, work a decrease round by repeating 2 sc, dec around, followed by another round of decreases if necessary.
Close the remaining opening and weave the yarn tail securely through the stitches.
The lower robe can be left rounded, or you can add a few stitches to create a slightly wider hem.
For a more defined robe, gently shape the sides with your fingers while the stuffing is still adjustable.
The finished body should be proportionally smaller than the head, creating the cute stylized appearance commonly associated with small amigurumi figures.
This proportion is one of the defining visual characteristics of the Crochet Jesus keychain Pattern.
Next, make two small arms using the cream or off-white yarn.
For each arm, begin with a magic ring containing 5 sc, then work 5 or 6 sc around for several rounds.
At the end, add a tiny amount of stuffing and flatten the opening slightly before sewing it closed.
For the hands, you can use beige yarn for one or two rounds at the bottom of each arm, creating a simple transition between the robe sleeve and hand.
Sew the arms onto both sides of the body using small, secure stitches.
Position them slightly downward so the figure maintains a natural hanging pose when attached to a key ring.
The red sash is an important decorative feature of the design and can be created without complicated crochet shaping.
Using red yarn, make a long chain approximately the length needed to travel diagonally from one shoulder toward the opposite side of the waist.
Work a row of sc back along the chain, then fasten off and weave in the ends.
Place the finished strip diagonally across the front of the robe and sew it carefully into position.
You can also embroider the sash directly onto the robe using red yarn if you prefer a flatter finish.
This simple color detail gives the Crochet Jesus keychain Pattern its distinctive appearance without making the construction unnecessarily complicated.
3. Adding Hair, Beard, Sandals, and Facial Details
The hair is one of the most recognizable features of this small crochet figure.
Use medium or dark brown yarn and attach strands around the top, sides, and back of the head.
For short hair, individual stitches can be embroidered directly onto the crocheted surface.
For a longer style, cut several short yarn pieces, fold each piece in half, and pull the folded loop through selected stitches before passing the loose ends through the loop.
Trim the strands carefully so they have a balanced length.
The goal is to frame the face while keeping the eyes and beard clearly visible.
The beard can be made using the same brown yarn as the hair.
For a simple version, embroider small horizontal and diagonal stitches across the lower portion of the face.
Add a slightly fuller section around the chin to create a rounded beard shape.
If you want a more textured appearance, use small loops of yarn rather than flat embroidery stitches.
Because the head is small, avoid adding too much bulk, as an oversized beard can cover the facial expression.
A carefully shaped beard helps the Crochet Jesus keychain resemble the inspiration while maintaining the proportions of a miniature amigurumi.
The facial expression can be kept simple and friendly.
Small black embroidered eyes can be made using several passes of embroidery thread through the same stitch area.
A tiny horizontal stitch can represent the nose, while a small curved stitch can suggest a subtle smile.
You can also use brown embroidery thread to add a very small eyebrow detail above each eye.
Work slowly when embroidering the face because repositioning the details is easier before the stitches are tightly secured.
The face does not need many details to communicate character, which is part of the charm of a Crochet Jesus keychain Pattern.
For the sandals, use brown yarn and crochet two tiny oval-shaped pieces.
A simple method is to chain 4, work sc around the chain, add an increase at each end, and continue for another round until the sole reaches the desired size.
Make two small straps from chains or embroidered yarn and sew them across the top of each foot.
The sandals can then be attached to the lower body with a few secure stitches.
Keep the feet small so they do not overpower the robe.
This detail adds definition to the lower portion of the Crochet Jesus keychain while remaining relatively easy to create.
Attach the head to the body using a yarn needle and several passes of strong yarn through both pieces.
Do not rely on a single stitch, particularly because a keychain receives movement and pulling that a stationary amigurumi does not.
Once the head is firmly attached, check that the face is centered above the sash.
Turn the figure from different angles and gently adjust the arms, hair, and robe if necessary.
This is also the ideal time to secure any loose yarn tails inside the figure.
A clean finishing process can make a simple Crochet Jesus keychain Pattern look much more professionally made.
4. Attaching the Key Ring and Finishing the Crochet Jesus Keychain
The final stage is connecting the crochet figure to the metal key ring.
For a durable attachment, create a small loop at the top of the head using strong yarn or a reinforced crocheted chain.
Pass the yarn through several stitches rather than attaching it to only one stitch.
Make multiple secure knots on the inside or back of the head and hide the remaining yarn ends.
Then connect the loop to the key ring using a small metal connector ring or another suitable attachment component.
The attachment point should sit directly above the head so the figure hangs upright naturally.
Before considering the project finished, gently pull the key ring to test the connection.
If the loop moves excessively or the stitches begin to stretch, reinforce the attachment with additional yarn.
A keychain is handled frequently, so durability is just as important as appearance.
Check the arms, head, sash, sandals, and hair for loose pieces and secure anything that needs reinforcement.
If the item is intended for a child, remember that small components can present a choking hazard, so embroidered details and age-appropriate construction are preferable.
These finishing checks help ensure your Crochet Jesus keychain Pattern remains attractive and functional.
One advantage of this project is how easily it can be personalized.
You can use different shades of brown for the hair and beard, experiment with cream or ivory robes, or create a darker or lighter red sash.
You could also make several versions with slightly different facial expressions and hairstyles.
For a festive handmade collection, small figures can be displayed together as decorative ornaments rather than used as keychains.
You can even adjust the size by changing yarn weight and hook size, although remember that larger or smaller yarn will change the final proportions.
Personalization makes each Crochet Jesus keychain feel like an individual handmade creation rather than a mass-produced accessory.
When giving the finished keychain as a handmade gift, consider adding a simple handmade card explaining that the piece was crocheted by hand.
This can make the project feel more personal without requiring expensive packaging.
A small fabric pouch can also protect the crochet figure when it is not being used.
For cleaning, gently spot-clean the piece when necessary and allow it to dry completely before storing it.
Avoid rough handling or pulling directly on the hair, sash, or limbs.
With basic care, a thoughtfully constructed Crochet Jesus keychain Pattern can remain a charming handmade keepsake for a long time.
If you are new to amigurumi, do not worry if your first attempt does not look exactly like the reference image.
Small crochet projects often require a little practice because even a one-stitch difference can noticeably affect the shape.
If the head appears too large, try a smaller hook or fewer increase rounds next time.
If the body looks too narrow, add an extra increase round before beginning the straight rounds.
The most important part is learning how your yarn, hook, tension, and stuffing work together.
Once you understand those elements, creating another Crochet Jesus keychain Pattern becomes much easier and more enjoyable.
FAQ: Crochet Jesus Keychain Pattern
Can a beginner make this Crochet Jesus keychain Pattern?
Yes. The project primarily uses basic single crochet, increases, decreases, simple chains, sewing, and embroidery.
Beginners may find the small pieces slightly challenging at first, but the compact size makes the project manageable.
Working slowly and counting every round can make the process much easier.
What yarn is best for a Crochet Jesus keychain?
Cotton yarn is an excellent option because it provides defined stitches and a firm structure.
A lightweight or medium cotton yarn can produce a compact amigurumi-style result when paired with an appropriately sized crochet hook.
The most important factor is maintaining a tight enough tension that the stuffing does not show through the stitches.
What crochet hook size should I use?
A hook between approximately 2.5 mm and 3.0 mm is a practical starting point for many yarns used in small keychains.
However, your personal tension matters more than following one exact hook size.
If your stitches are loose, try a smaller hook; if they are extremely tight and difficult to work, consider going slightly larger.
How do I make the Jesus figure smaller?
To create a smaller Crochet Jesus keychain, use thinner yarn with a smaller hook.
You can also reduce the number of straight rounds in the head and body, but make changes carefully so the proportions remain balanced.
Changing yarn weight is generally the simplest way to scale the entire project consistently.
How can I make the keychain more durable?
Reinforce the head-to-body connection and the loop attaching the figure to the key ring.
Use several stitches rather than depending on one attachment point.
You should also secure all yarn tails properly and inspect the finished piece before regular use.
Can I embroider the eyes instead of using safety eyes?
Absolutely. Embroidered eyes are a useful alternative, especially when the finished item may be handled by young children.
Use black embroidery thread and make several small passes through the same area to create neat, compact eyes.
This also allows you to customize the expression more easily.
Can I change the colors of the robe and sash?
Yes. The color palette is completely customizable.
Although the reference design uses a light robe with a red sash and brown hair, you can adapt the colors according to your preference.
Using different shades can also help you create a collection of personalized handmade figures.
How do I keep the head from becoming lumpy?
Use consistent tension and add stuffing gradually rather than placing a large amount into the head at once.
After every few rounds, gently distribute the stuffing with your fingers.
Avoid overfilling because excessive stuffing can stretch the crochet fabric and make the head appear uneven.
Can this Crochet Jesus keychain be used as a bag charm?
Yes. A properly reinforced Crochet Jesus keychain can also be used as a decorative bag charm, backpack accessory, or handmade ornament.
Make sure the attachment loop is strong enough for the intended use and inspect it periodically for signs of wear.
How should I wash the finished crochet figure?
For most handmade crochet keychains, gentle spot cleaning is preferable.
Use a small amount of mild soap and water, avoid aggressive scrubbing, and allow the piece to air dry completely.
Always consider the care requirements of the specific yarn you used before washing the entire piece.
Can I make several Crochet Jesus keychains as handmade gifts?
Certainly. Once you understand the basic construction, making multiple figures becomes easier because the same sequence can be repeated.
You can personalize each one with different robe shades, hair details, or facial expressions while maintaining the same basic structure.
Conclusion
The Crochet Jesus keychain Pattern is a creative way to combine crochet skills, miniature amigurumi construction, and meaningful handmade design in one small project.
In this tutorial, we covered the materials and basic abbreviations, created the rounded head and body, crocheted the robe and arms, added the red sash, and finished the character with hair, beard, facial details, sandals, and a reinforced keychain attachment.
The pattern can be adapted to different yarn weights, colors, facial expressions, and proportions, making it suitable for crocheters who enjoy adding their own creative touches.
The most important techniques to practice are maintaining consistent tension, counting stitches, shaping with increases and decreases, adding stuffing gradually, and securing every component carefully.
With patience, your Crochet Jesus keychain can become a charming handmade accessory, keepsake, or thoughtful gift created with your own hands.
If you try this pattern, please leave your honest opinion, share what worked best for you, and let me know what changes or suggestions you would like to see in a future crochet pattern.