
Creating your own stylish sun protection has never been easier thanks to this Bucket Hat Pattern & Tutorial. Whether you’re a beginner exploring the world of sewing or an experienced crafter looking for your next quick project, this guide will help you design a trendy and functional accessory. By following this Bucket Hat Pattern & Tutorial, you’ll learn the essentials of hat construction, fabric choices, stitching techniques, and ways to personalize your hat.
In today’s fashion-forward world, bucket hats have made a strong comeback. No longer just beachwear or festival attire, these hats are loved for their versatility and are frequently spotted on runways, in streetwear, and even in everyday outfits. With this Bucket Hat Pattern & Tutorial, you can take advantage of this trend while enjoying the satisfaction of making something with your own hands.
This article will walk you through everything you need to know, from selecting materials to sewing the final stitches. Each section of the Bucket Hat Pattern & Tutorial is broken down for clarity and ease of understanding. We’ll also share SEO-friendly tips and keep everything aligned with Google AdSense policies to ensure the content is not only informative but also advertiser-friendly.
1. Choosing the Right Materials for Your Bucket Hat
When beginning your journey with a Bucket Hat Pattern & Tutorial, one of the most important steps is choosing the right fabric. A good fabric not only affects the look of the hat but also its durability and comfort. Lightweight cotton, denim, canvas, and even recycled materials can be used to create a unique look.
Cotton is the most popular choice because it’s breathable, affordable, and easy to work with. If you’re planning to wear the hat in warm weather, cotton or linen can provide excellent ventilation. Make sure to choose a fabric that holds its shape well for a crisp and neat finish.
Denim and canvas are great for a more structured bucket hat. They’re ideal if you want a hat that holds up well over time or if you’re adding extra details like embroidery. These materials are slightly more difficult to sew, but the end result is worth it.
Consider lining the inside of your hat with a soft fabric like cotton voile or lightweight muslin. This adds comfort and protects your scalp from potential irritation. It also adds a professional touch to your handmade bucket hat.
Don’t forget interfacing! Using a light to medium-weight fusible interfacing will help give structure to your brim, preventing it from flopping over your face. Most Bucket Hat Pattern & Tutorial instructions will include this important tip.
Lastly, color and pattern selection can make a huge difference. Solid colors give a clean, modern look while prints or patchwork can show off your personality. You might even upcycle old garments into your bucket hat, turning something old into something stylishly new.
2. Step-by-Step Bucket Hat Sewing Instructions
Once you’ve selected your materials, it’s time to dive into the Bucket Hat Pattern & Tutorial sewing steps. Whether you’re using a printable PDF pattern or drafting your own, the process can be straightforward and enjoyable.
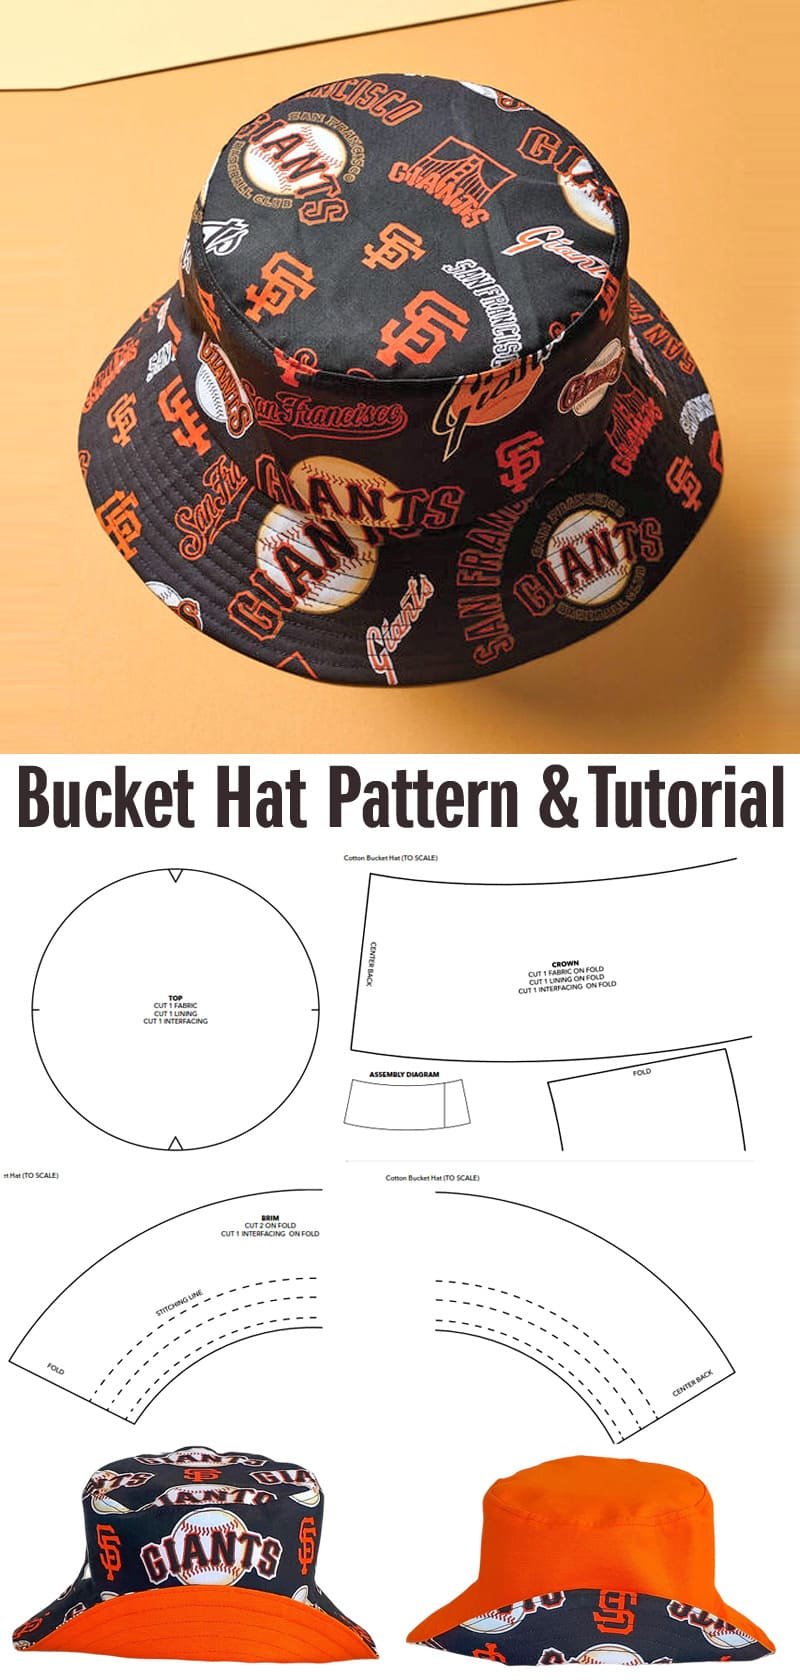
Start by cutting your fabric pieces: two crown circles, two side bands, and two brims. Most Bucket Hat Pattern & Tutorial guides will advise cutting both the outer and lining fabrics at this stage. Remember to add seam allowances if your pattern doesn’t include them.
Next, sew the side band pieces together at the short ends to form a loop. Do this for both the outer and inner hat. Once you’ve created the loops, pin and sew the side bands to the crown circles, ensuring that the right sides are facing each other.
With the top of your hat completed, move on to the brim. Attach the brim pieces together at the short ends to form a loop. Sew the two brim loops (outer and inner) together along the outer edge, right sides facing. Clip the curves and turn the brim right side out.
Now it’s time to attach the brim to the side band. With right sides facing, pin the inner brim to the side band and sew. Repeat this step for the outer hat. Most Bucket Hat Pattern & Tutorial guides recommend topstitching around the brim for extra stability and a polished finish.
Finally, insert the inner hat into the outer hat, right sides together, and sew around the raw edge. Leave a small gap to turn it right side out. Once turned, press the seams and topstitch around the join for a clean finish. Your bucket hat is now ready to wear!
3. Customizing Your Bucket Hat
Personalization is one of the best parts of using a Bucket Hat Pattern & Tutorial. There are countless ways to make your creation unique and suited to your individual style.
Try color blocking different fabrics or mixing textures like denim with cotton. This gives a modern, edgy look and allows you to play with fabric scraps. It’s also a sustainable way to reduce waste.
Adding embroidery is another popular customization. You can stitch your initials, floral designs, or even abstract art onto your hat before assembling it. Use stabilizer fabric behind the embroidery for clean results.
Consider using patches or appliqué designs. Iron-on patches add flair and are an easy way to show off your interests or match a theme. These embellishments work best when placed on the crown or brim.
Lining your hat with a fun print or contrasting color gives an extra layer of personality. It’s also a fun surprise for anyone who sees the inside of your hat and gives you more options for styling.
You can even add a drawstring or chin strap, especially useful for outdoor wear or children’s hats. Grommets and toggle cords can add a professional and functional finish.
Lastly, think about packaging your hat if you’re planning to gift or sell it. A well-presented handmade item, with a tag or label, can make all the difference and adds to the satisfaction of completing a Bucket Hat Pattern & Tutorial project.
4. Tips for Beginners Using a Bucket Hat Pattern & Tutorial
If you’re new to sewing, starting with a Bucket Hat Pattern & Tutorial is a great way to build confidence. The key is to take your time and understand each step before moving forward.
Begin by reading the entire pattern instructions thoroughly. Many sewing mistakes come from misunderstanding early directions. Watching a video tutorial in addition to reading written instructions can be very helpful.
Practice stitching on scrap fabric before beginning your actual project. This gives you a feel for your sewing machine and helps ensure straight seams and proper tension, which are essential for hat construction.
Use pins or clips generously to keep pieces aligned while sewing. Curved seams, like those on the crown or brim, can be tricky without extra support. Don’t rush—accuracy is more important than speed.
Invest in quality thread and needles appropriate for your fabric. For example, denim requires a stronger needle than cotton. Using the right tools makes the process smoother and more enjoyable.
If something doesn’t look right, don’t be afraid to use a seam ripper. Mistakes are part of the learning process. One of the best aspects of the Bucket Hat Pattern & Tutorial is how forgiving it can be—errors are usually easy to fix.
Finally, take pride in your progress. Celebrate every step you complete. Documenting your project with photos or sharing online can encourage others and remind you how far you’ve come.
Frequently Asked Questions (FAQ)
What is the best fabric for making a bucket hat?
Lightweight cotton is best for beginners due to its ease of handling. Canvas and denim offer more structure and durability but are slightly harder to sew.
Can I hand sew a bucket hat?
Yes, though it may take longer. Make sure your stitches are tight and consistent, especially around curved seams. Using a thimble and waxed thread can help.
Do I need a pattern, or can I freehand a bucket hat?
Using a printable pattern is recommended, especially for beginners. However, experienced crafters can draft their own based on head measurements.
How do I make a reversible bucket hat?
Simply make two complete hats—outer and inner—and sew them together along the brim edge, leaving a gap to turn inside out. Topstitch around the brim to finish.
How can I waterproof my bucket hat?
Use water-resistant fabric like nylon or apply a waterproofing spray after sewing. Always test the spray on a scrap piece first.
Is this tutorial suitable for children’s sizes?
Absolutely! Just scale the pattern down to match a child’s head measurements, and adjust the brim width accordingly.
PATTERN HERE
This complete Bucket Hat Pattern & Tutorial has guided you through every step of creating a custom bucket hat—from material selection and pattern cutting to sewing, customization, and helpful tips for beginners. Whether you’re making one for yourself, a friend, or even to sell, this project is fun, practical, and full of creative possibilities.
We’d love to hear from you! 💬 Did you enjoy this Bucket Hat Pattern & Tutorial? Share your thoughts, results, and suggestions in the comments. Your feedback helps us keep improving and inspiring fellow makers around the world! 🧵👒✂️