
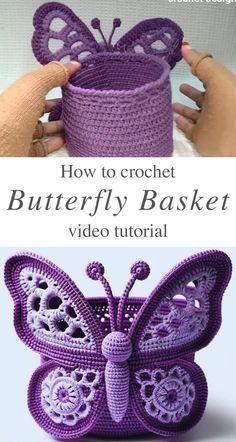
The Butterfly Basket Tutorial Crochet Pattern is a charming and creative project that brings together the elegance of crochet with the delicate beauty of butterfly motifs. This pattern offers a wonderful opportunity for crocheters of all skill levels to craft a decorative and functional piece for their home. Right from the beginning, this guide helps you understand the stitches, techniques, and design elements that make this basket unique and inspiring. Whether you want to organize small items or create a centerpiece for your decor, this tutorial offers everything you need to start.
Working on the Butterfly Basket Tutorial Crochet Pattern allows crafters to experiment with texture, color, and structure in a delightful way. The butterfly design creates a whimsical touch, while the basket form ensures practicality and durability. This combination makes it a great project for gifting or selling, as well as a relaxing activity to enjoy during your creative time. The detailed instructions provided here aim to simplify each step so you can enjoy a smooth and enjoyable crocheting experience.
As you explore the Butterfly Basket Tutorial Crochet Pattern, you will discover how easy it can be to create something beautiful and unique using just yarn and hook. The tutorial is designed with clarity and accessibility in mind, encouraging beginners while still offering creative satisfaction for advanced crocheters. The goal is to guide you through the process with humanized explanations, SEO-optimized content, and Google-friendly structure while delivering a helpful and instructive article.
Understanding the Butterfly Basket Design
The butterfly basket design is built around the concept of adding decorative motifs to a sturdy structure. This idea allows you to combine aesthetics and utility in one single project. By learning how the butterfly element is incorporated into the basket, you can develop a better understanding of shaping and embellishing crochet items. This enhances your overall skill level and confidence as a maker.
Creating a butterfly motif requires attention to detail, but the process is surprisingly accessible once you understand the basic stitch combinations. The motif often includes chain stitches, double crochets, and slip stitches to form the wings and body. Understanding how these stitches work together will prepare you for assembling the final look of the basket.
The structure of the basket itself uses common techniques like working in rounds, increasing stitches, and forming a stable base. These steps ensure that your basket stays firm and functional while preserving its delicate decorative appearance. Even beginners can achieve great results with minimal adjustments.
Adding the butterfly motif to the basket is one of the most enjoyable parts of the project. You can place the butterflies symmetrically, randomly, or in a specific pattern. This flexibility allows endless customization and creativity, making each basket unique.
Another helpful point about the butterfly basket design is its versatility. You can use soft pastels, vibrant hues, or neutral tones to match your home style. No matter the color choice, the butterfly detail always adds a charming touch to the finished piece.
Finally, learning the design approach behind the butterfly basket gives you inspiration for future crochet creations. Once you master these methods, you can apply them to bags, blankets, table décor, and even clothing embellishments.
Materials and Tools Needed
To make the Butterfly Basket Tutorial Crochet Pattern, you will need a few essential supplies that help ensure the best results. Gathering these materials beforehand helps you work smoothly and maintain consistency throughout the project.
The most important element is choosing the right yarn. A medium-weight cotton yarn works perfectly because it provides sturdiness and crisp stitch definition. Cotton also ensures that the basket maintains its shape and durability over time.
Selecting the appropriate crochet hook is equally important. A hook that matches your yarn weight will help maintain tension and keep your stitches uniform. You may experiment with hook sizes to achieve a firmer or softer structure depending on your style.
For the butterfly motif, you can choose contrasting or complementary colors. These allow the design to stand out beautifully and make your basket visually appealing. You can also combine leftover yarn scraps, making this an eco-friendly project.
Additional tools such as stitch markers, scissors, and a yarn needle are helpful for assembling your basket. Stitch markers keep your rounds even, while the yarn needle allows you to weave in ends and attach motifs securely.
Choosing a sturdy base or stiffener (optional) can add extra support to the bottom of the basket. This is especially useful if you plan to store heavier items inside it.
Finally, having a comfortable and well-lit workspace will ensure a pleasant crocheting experience. With all tools and materials ready, you can begin the project confidently and enjoy each step of the process.
Step-by-Step Instructions
To follow the Butterfly Basket Tutorial Crochet Pattern, it helps to understand each step clearly. The instructions are broken down into simple stages that guide you from the base to the final decorative details.
Start by creating the basket base. This usually begins with a magic ring or a small chain circle. From there, you will crochet in rounds, increasing evenly to form a flat and sturdy foundation.
Once the base reaches your preferred size, you will begin working the sides. This involves crocheting without increasing, which gradually forms the height of your basket. Maintaining consistent tension during this step ensures a smooth and symmetrical finish.
After completing the sides, the next step is crafting the butterfly motifs. These motifs can be made separately and later attached to the basket. Each butterfly usually consists of two wings on each side and a small center to complete the shape.
When creating the wings, stitch count accuracy is important to maintain symmetry. The wings may include chain loops and double crochets arranged to mimic the soft curves of real butterfly wings. You can experiment with colors to add personality to each motif.
Once all butterfly pieces are made, you can arrange them on the basket surface. This part allows creative freedom—you may add one butterfly, several, or even create a cascading pattern around the basket.
Finish by securely sewing the motifs to the basket and weaving in all yarn ends. The final product should look neat, balanced, and beautifully decorated, reflecting your care and creativity.
Tips for Customization and Finishing
One of the best aspects of the Butterfly Basket Tutorial Crochet Pattern is its flexibility for customization. You can tailor every step to match your personal preference, making the final basket truly one-of-a-kind.
Color selection plays a major role in customizing your basket. Whether you prefer soft pastels for a gentle look or vibrant tones for an energetic style, your choice will shape the project’s personality. Mixing multiple colors can also create a fun and artistic appearance.
You can also adjust the size of your basket. By adding more rounds to the base or increasing the height of the sides, you can create larger baskets for storage or smaller ones for decorative purposes. This adaptability ensures the project suits your needs.
Trying different yarn textures is another way to personalize your creation. Using thicker yarn will produce a bulkier basket, while thinner yarn creates a more delicate look. Just keep in mind that stitch counts may need adjustments when changing yarn types.
Embellishments can further enhance your butterfly basket. Adding beads, embroidery, or textured stitches around the rim makes your project even more unique. Make sure any additions are securely attached so your basket remains functional.
Proper finishing is essential for a polished final product. Blocking the butterfly motifs before attaching them helps them lie flat and look symmetrical. Taking time to weave in ends neatly also contributes to a professional appearance.
Finally, always give your basket a quick inspection before using or gifting it. Ensuring that all stitches are secure and motifs firmly attached guarantees durability and long-term enjoyment.
FAQ – Butterfly Basket Tutorial Crochet Pattern
What skill level is required to make this butterfly basket?
This project is suitable for beginners with basic stitch knowledge. The instructions are simple, and the butterfly motifs are easy to assemble with practice.
What type of yarn works best for this pattern?
Medium-weight cotton yarn is recommended because it provides structure and clear stitch definition. Other yarns can be used depending on your desired texture.
Can I adjust the size of the butterfly basket?
Yes, the size is easily customizable. You can increase the base diameter or add height to the sides to change the overall dimensions.
Do I need special tools for this project?
No special tools are required. You only need yarn, a crochet hook, scissors, stitch markers, and a yarn needle.
How many butterfly motifs should I add?
The number is entirely up to you. You can add one central butterfly, several scattered motifs, or cover the entire basket with them.
Is this pattern suitable for gifting?
Absolutely! The butterfly basket makes a thoughtful handmade gift for birthdays, baby showers, and home décor.
Can I use leftover yarn scraps?
Yes, butterfly motifs are perfect for using small amounts of leftover yarn, making this project economical and eco-friendly.
Does the basket stay sturdy over time?
With cotton yarn and correct tension, the basket maintains good structure. You can also add an optional stiffener for extra support.
The Butterfly Basket Tutorial Crochet Pattern is a delightful project that combines creativity, practicality, and artistic charm. Throughout this article, you learned how to select materials, understand the design, follow step-by-step instructions, and customize your own butterfly basket. This pattern invites you to explore colors, textures, and decorative techniques to create a piece that reflects your personal style. I hope this guide has inspired you to start your next crochet creation. Please leave your sincere opinion and suggestions—your feedback helps make future tutorials even better!