
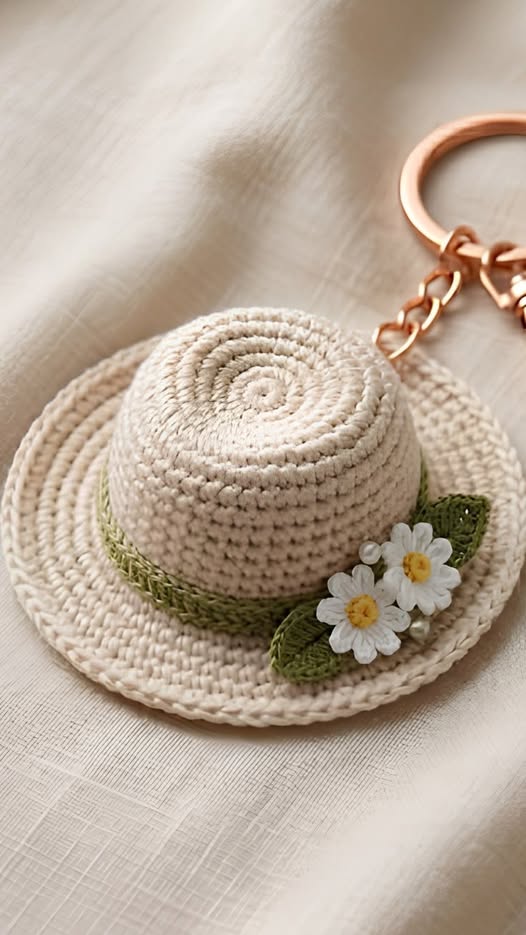
The Crochet Chapel Key Fob Pattern is a charming miniature crochet project inspired by the delicate shape of a little chapel-style sun hat, complete with a rounded crown, wide brim, green band, leaves, and tiny white flowers. This sweet design is perfect for turning a handmade crochet piece into a practical key accessory, bag charm, gift embellishment, or decorative zipper pull.
The finished piece has a soft, handmade appearance while remaining small enough to make with relatively little yarn.This Crochet Chapel Key Fob Pattern is especially appealing to crocheters who enjoy miniature accessories and detailed amigurumi-inspired projects. The design shown in the reference features neutral cream yarn, a slightly raised rounded crown, a flat circular brim, and botanical details that give the finished key fob a natural cottage-style look.
Although the project is small, the combination of simple crochet stitches and decorative elements makes it visually interesting and rewarding to create.The pattern can be adapted easily depending on your preferred yarn, hook size, and desired finished dimensions. In this tutorial, you will learn how to crochet the main hat shape, shape the crown and brim, create the green decorative band, add small leaves and flowers, and finally attach the hardware to transform the miniature hat into a useful key fob. The instructions use standard US crochet terminology and are designed to be approachable for confident beginners and experienced crocheters alike.
1. Materials, Yarn Choices, and Crochet Preparation
To make this Crochet Chapel Key Fob Pattern, begin with a small amount of worsted-weight, cotton, or cotton-blend yarn. Cream, ivory, or natural beige works beautifully for the miniature hat because it closely recreates the soft neutral appearance of the pictured design. You will also need a small amount of green yarn for the band and leaves and white and yellow yarn for the miniature flowers.
Choose a crochet hook that produces a firm fabric rather than a loose one. For many cotton yarns, a hook around 2.5 mm to 3.0 mm works well for a small key fob. The exact hook size is less important than maintaining consistent tension because a tightly crocheted fabric helps the tiny hat hold its shape and prevents the stuffing from showing through.
You will also need a small amount of fiberfill stuffing, a yarn needle, embroidery scissors, stitch markers, and a metal key ring or swivel key-fob clasp. If you want the finished Crochet Chapel Key Fob to remain very lightweight, use only a small amount of stuffing. Too much stuffing can make the miniature crown excessively rounded and may distort the brim.
For the crochet abbreviations, use MR for magic ring, ch for chain, sc for single crochet, sl st for slip stitch, inc for two single crochets worked into the same stitch, and dec for a single crochet decrease. When working in continuous rounds, a stitch marker can help you identify the beginning of each round.
Before beginning the pattern, remember that miniature crochet depends heavily on tension. If your stitches are loose, the finished hat may become larger than expected. If your stitches are extremely tight, the crown may become smaller and harder to shape. Make a few practice stitches if necessary so your fabric feels firm but comfortable to work.
The project can also be customized creatively. A cream hat with green details creates a soft botanical look, while pastel pink, lavender, dusty blue, or warm brown can give the Crochet Chapel Key Fob Pattern a completely different personality. The basic structure remains the same, allowing you to make several versions for gifts, craft fairs, seasonal accessories, or personal use.
2. Step-by-Step Crochet Chapel Key Fob Pattern
Start the main crown with the cream yarn by making a magic ring. Work 6 single crochet stitches into the ring and gently pull the starting tail to close the center. This creates the small circular foundation visible at the top of the miniature hat. Do not tighten the center so aggressively that the stitches become difficult to work into.
For Round 2, work 2 sc in each stitch around, giving you 12 stitches. For Round 3, repeat the sequence of 1 sc, inc around for a total of 18 stitches. Continue increasing evenly in this manner so the circle expands gradually. Keeping the increases distributed evenly is important because it creates the smooth spiral effect seen on the crown.
For Round 4, work 2 sc, inc around, creating 24 stitches. For Round 5, work 3 sc, inc around for 30 stitches. Continue with one or two additional increase rounds if your yarn and tension require a slightly wider crown. The objective is not simply to follow a number but to create a small circular crown with a gentle dome rather than a completely flat disk.
Once the crown reaches the desired width, stop increasing and work several rounds of sc around. These even rounds create the rounded sides of the miniature hat. For a crown approximately 2 inches wide, around 6 to 9 even rounds may be enough, depending on your yarn thickness and hook. Try shaping the piece gently with your fingers as you crochet to maintain the soft dome shown in the reference.
When the crown has the desired height, begin decreasing slightly toward the lower edge. A useful sequence is 3 sc, dec around, followed by one or two rounds of regular sc. This gives the lower portion of the crown a subtle inward curve. Add a small amount of fiberfill before the opening becomes too small, using only enough to support the shape.
Now create the brim by attaching cream yarn around the lower edge of the crown. Work a round of single crochet evenly around the opening, then begin increasing gradually. A sample round can use 3 sc, inc repeated around, followed by another round using 4 sc, inc. Continue until the brim reaches a pleasing miniature-hat proportion. The brim should expand outward while remaining relatively flat.
To encourage the brim to lie flat, alternate increase placement rather than stacking every increase directly above the previous one. If the brim starts curling upward, add a few strategically placed increases. If it becomes wavy, reduce the number of increases in the next round. Finish with one or two rounds of regular sc to create a neat outer edge, then fasten off and weave in the yarn tail.
3. Adding the Green Band, Leaves, and Miniature Flowers
The green decorative band is one of the details that makes this Crochet Chapel Key Fob Pattern especially attractive. Using green yarn, create a narrow strip of chains approximately long enough to wrap around the base of the crown. Depending on your yarn thickness, begin with around 25 to 30 chains and adjust the length as necessary.
Work single crochet back across the chain to create a narrow band. You can make one or two rows depending on the thickness you want. Wrap the finished strip around the crown and secure it with small, discreet stitches. Keep the band snug but not so tight that it pulls the cream crown inward.
For the leaves, use green yarn and create a small chain of approximately 7 to 9 stitches. Work slip stitches or single crochet along the chain, adding an extra stitch or two at the tip to create a pointed leaf shape. Turn and work along the opposite side of the foundation chain if you want a fuller, symmetrical leaf.
A second leaf can be made in the same way, but vary its angle slightly when attaching it to the hat. The reference design has the leaves positioned naturally beside the flowers, creating a small botanical cluster. Secure the leaves with a yarn needle, making sure the stitches remain hidden behind the decorative elements whenever possible.
For each tiny white flower, begin with a small center using yellow yarn. You can make a magic ring with a few single crochet stitches or create a tiny yellow circle using several stitches worked into a chain ring. Fasten off and attach white yarn around the center to form the petals. Because the flowers are very small, five simple petals are usually enough to create a recognizable daisy.
To make the petals, a practical miniature technique is to work ch 2, 2 dc, ch 2, sl st into the center area and repeat around for approximately five petals. If double crochet creates flowers that are too large for your project, substitute half double crochet or single crochet. Place the completed flowers on the green leaves and stitch them securely in position. The combination of white crochet flowers, yellow centers, and green leaves gives the finished key fob its delicate handmade character.
4. Finishing, Shaping, and Attaching the Key Ring
Before attaching the hardware, inspect your Crochet Chapel Key Fob Pattern from every angle. The crown should sit naturally above the brim, while the brim should remain relatively flat. Gently shape the crochet with your fingers, adjusting the stuffing inside the crown if necessary. This small finishing step can make a significant difference in the appearance of the completed miniature.
Next, decide where you want the key ring or clasp to sit. A practical location is near the back of the crown, where the attachment point is less noticeable from the front. Use strong matching yarn to create a small loop through the top or upper side of the crown. Work several passes through the crochet fabric so the loop is reinforced.
Attach the metal ring to the yarn loop before closing it completely. If you are using a swivel clasp, make the loop slightly longer so the clasp can move freely. Avoid attaching the hardware to only one crochet stitch because repeated pulling can eventually weaken the fabric. A reinforced section distributes the tension across several stitches.
Once the hardware is secured, check the decorative elements again. Gently tug the flowers and leaves to make sure they are firmly attached. For a key fob that will be used regularly, secure the ends carefully and weave them through several nearby stitches. Trim the excess yarn only after the ends are safely hidden.
Your finished Crochet Chapel Key Fob can now be used as a keychain, purse charm, backpack decoration, zipper accessory, or handmade gift. Its miniature size makes it particularly suitable for craft projects where a small decorative element is needed. You can also create several hats in different colors and coordinate the flowers with the recipient’s favorite shades.
The final result should have the recognizable silhouette of a tiny crocheted chapel-style hat: a rounded cream crown, a broad circular brim, a green botanical band, and small daisy-like flowers. The Crochet Chapel Key Fob Pattern demonstrates how a few basic stitches can be combined with thoughtful shaping and embellishment to create a highly detailed miniature accessory. With practice, you can modify the proportions, colors, and decorations to develop your own variations.
Crochet Pattern at a Glance
For convenience, the basic structure of the Crochet Chapel Key Fob Pattern can be summarized as follows: begin with a cream magic ring, increase to form the circular crown, work even rounds to establish height, decrease slightly to shape the lower crown, and then expand outward for the brim. Finish the brim with a clean single crochet edge.
The decorative section consists of a narrow green crochet band, two or more small green leaves, and miniature white flowers with yellow centers. These pieces are sewn onto the front or side of the hat after the main crochet structure is completed. This approach allows you to adjust their positions before making the final stitches.
For a more structured appearance, use cotton yarn and firm tension. Cotton is particularly helpful for small accessories because it tends to show stitch definition clearly and holds its shape well. If you prefer a softer appearance, a cotton blend or smooth acrylic yarn can also work.
Common Crochet Questions
How big should a Crochet Chapel Key Fob be?
The finished size depends on your yarn, hook, and tension, but a miniature hat around 2.5 to 4 inches across the brim works well as a key fob. You can reduce or enlarge the number of increase rounds to change the size.
Can I use a different yarn weight?
Yes. A thinner yarn creates a smaller and more delicate key fob, while thicker yarn creates a larger accessory. Adjust the crochet hook accordingly and keep the stitches firm enough to maintain the shape.
Why is my brim curling?
A curling brim usually means that there are not enough increases. Add another increase round or distribute a few additional increases evenly around the next round. If the brim becomes wavy, you have likely added too many increases.
How do I make the crown more rounded?
Use several rounds of single crochet without increases after completing the circular top. Lightly stuffing the crown also helps create the raised, rounded shape seen in the reference design.
Can I make the flowers larger?
Absolutely. Larger flowers can be created by using taller stitches such as double crochet or by adding additional petals. For a small key fob, however, keeping the flowers compact usually produces a more balanced result.
How do I keep the key ring securely attached?
Reinforce the attachment loop by passing strong yarn through several crochet stitches rather than relying on one stitch. Make several secure passes with a yarn needle and weave the ends into the interior of the project.
Is this pattern suitable for beginners?
The basic crochet construction is beginner-friendly if you already know how to make single crochet, increases, decreases, chains, and slip stitches. The flowers and leaves require a little more patience because they are miniature decorative elements.
Can I sell finished key fobs made from this pattern?
A crocheter can generally create handmade items based on their own work, but individual designers may have specific rules when a pattern is based on someone else’s original design. If you are creating your own version from this tutorial, keep your product descriptions accurate and avoid presenting another person’s photographs or written pattern as your own.
What colors work best for this project?
Neutral cream or beige creates the soft natural appearance shown in the reference. Green works beautifully for the band and leaves, while white and yellow make classic daisy flowers. Pastel colors can also create a lovely spring-inspired version.
Can this design be used as a bag charm instead of a key fob?
Yes. Simply use a lobster clasp, swivel clasp, or decorative bag charm attachment instead of a traditional key ring. The same reinforced loop can be used to connect the crochet piece to a bag or backpack.
Conclusion
The Crochet Chapel Key Fob Pattern is a delightful miniature project that combines simple crochet construction with beautiful handmade details. From the circular cream crown and carefully shaped brim to the green band, leaves, and tiny white flowers, every part contributes to the charming character of the finished accessory. The project also provides plenty of opportunities to experiment with yarn colors, proportions, flower styles, and hardware.
In this tutorial, you learned how to create the main hat shape with a magic ring, single crochet, increases, and decreases, then expand the lower section to form the brim. You also learned how to make the decorative green band, miniature leaves, and small flowers before reinforcing the finished piece with a key ring or clasp.
The beauty of a Crochet Chapel Key Fob is that it is small enough to complete without requiring a large yarn supply, yet detailed enough to feel like a special handmade creation. It can become a practical key accessory, a cute bag charm, a thoughtful handmade present, or even part of a larger collection of miniature crochet designs.
If you try this Crochet Chapel Key Fob Pattern, I would love to hear what you think. Share your sincere opinion about the instructions, tell us which colors you chose, and leave any suggestions that could make the pattern easier or more enjoyable for other crocheters. Your feedback can help inspire new variations and make future crochet tutorials even better.