
Santa Hat Free Pattern Crochet Pattern is one of the most beloved seasonal projects among crafters around the world. Whether you’re an experienced crocheter or just picking up your hook for the first time, making a Santa hat brings warmth, joy, and festive cheer to your home during the holiday season. The charm of this pattern lies in its simplicity and timeless appeal. With just a few basic stitches, you can create a classic accessory that captures the true spirit of Christmas while letting your creativity shine.
Every crocheter loves a free pattern that’s easy to follow yet delivers a professional-looking result. Thi Santa Hat Free Pattern Crochet Pattern combines both qualities, making it perfect for those who enjoy making handmade gifts or decorating their homes with seasonal touches. The best part? You can customize your Santa hat by changing colors, yarn textures, or even adding pom-poms and embellishments to make each one unique. This project also works beautifully as a matching family set for festive photos or Christmas parties.
Crocheting a Santa hat is more than just a craft—it’s a tradition that connects generations. As you work through each row, you’ll find yourself immersed in the holiday mood, creating something filled with love and personality. The Santa Hat Free Pattern Crochet Pattern not only helps you improve your crochet skills but also allows you to share joy through handmade art. Let’s explore how you can bring this festive project to life, step by step, while keeping it simple, fun, and full of holiday magic.
1. Materials and Tools You’ll Need
Before starting your Santa Hat Free Pattern Crochet Pattern, it’s important to gather all the necessary materials. Choosing the right yarn, hook size, and tools ensures your final result looks and feels exactly how you imagine. Begin by selecting a soft, high-quality yarn that will be comfortable to wear and durable enough to last through many holiday seasons.
For a traditional look, choose red and white yarns. Acrylic or wool-blend yarns are ideal for this pattern since they provide warmth and elasticity. If you’re making hats for children or people with sensitive skin, consider using cotton or hypoallergenic yarn. The texture of your yarn plays a key role in how your finished hat drapes and stretches.
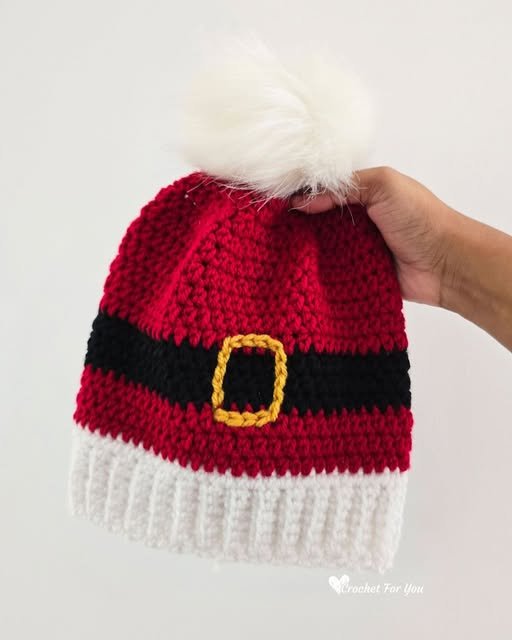
You’ll also need the right crochet hook for your yarn weight—typically a 5.0 mm (H) or 5.5 mm (I) hook works perfectly. Having a yarn needle for weaving in ends and a pair of sharp scissors will make finishing your hat clean and professional. Don’t forget the fluffy pom-pom for the tip of the hat—it’s the perfect finishing touch that gives your Santa hat its signature look.
A stitch marker can be useful if you’re working in continuous rounds. It helps you keep track of where each round begins and ends, ensuring your hat maintains even shaping. Consistency is key, so make sure your tension remains steady throughout the project.
When you have everything ready, create a small swatch to check your gauge. This simple step helps you ensure your hat will fit properly once finished. A correct gauge prevents your project from turning out too small or too large, saving you time and frustration later.
Finally, prepare your workspace. Having a clean, well-lit area will make crocheting more enjoyable and efficient. Keep your materials organized and your instructions nearby for easy reference as you begin your Santa Hat Free Pattern Crochet Pattern.
2. Step-by-Step Instructions for the Santa Hat
Now that your materials are ready, it’s time to start crocheting your Santa Hat Free Pattern Crochet Pattern. Begin at the tip of the hat and work your way down toward the brim, gradually increasing stitches to create the classic cone shape. This method ensures a smooth and natural taper that looks beautiful when worn.
Start with a magic ring and crochet a few single crochets into the ring. Pull tight to close, and continue working in the round. Each round will gradually increase in stitch count, forming the conical shape of Santa’s hat. Be sure to keep your stitches even, as this will give the hat a polished finish.
As you move along, you can experiment with different stitch patterns. Double crochet stitches are most common for this type of hat because they add flexibility and speed up your progress. You can alternate between single and double crochet rows to add a bit of texture.
When you reach the desired length, it’s time to start forming the brim. Switch to white yarn to create the fluffy trim that defines the Santa hat’s base. This part is usually made with single crochet stitches for a denser, thicker edge that resembles fur.
Add a pom-pom to the tip using either the same white yarn or a ready-made fluffy ball. Secure it tightly to avoid it coming loose. Once attached, weave in all loose ends with your yarn needle and shape the hat with your hands.
Your Santa Hat Free Pattern Crochet Pattern is now complete! You can try it on, gift it to a loved one, or make multiple hats in different sizes for everyone in your family.
3. Tips for Customizing Your Santa Hat
One of the best parts of working with the Santa Hat Free Pattern Crochet Pattern is how easily it can be customized. From colors to decorations, there are endless ways to make your hat reflect your personal style and creativity.
If you want a playful touch, consider using variegated yarn or even metallic thread to give your hat a subtle shimmer. You can also replace the classic red with green, gold, or silver for a modern twist on the traditional design.
For those who love texture, add some puff stitches or bobbles to the brim or body of the hat. These details create a cozy, wintery look that makes the piece stand out. You can also incorporate stripes by alternating yarn colors every few rows.
Adding embellishments like small bells, ribbons, or sequins can make your Santa Hat Free Pattern Crochet Pattern sparkle with festive charm. Just be sure any additions are securely fastened, especially if the hat will be worn by children.
If you plan to make matching hats for a group, consider crocheting name tags or initials and sewing them onto each hat. Personalized details like this add a heartwarming touch and make your handmade creations even more meaningful.
Finally, don’t be afraid to experiment with size and fit. Adjusting your hook size or yarn weight allows you to make hats for babies, children, and adults alike. Customization not only makes your projects unique but also ensures that everyone enjoys a comfortable and stylish fit.
4. Caring for Your Crochet Santa Hat
After putting so much effort into making your Santa Hat Free Pattern Crochet Pattern, it’s important to know how to care for it properly. Proper maintenance ensures your hat stays soft, vibrant, and ready for many Christmases to come.
Start by checking your yarn’s care instructions. Most acrylic yarns are machine washable, but if you used wool or specialty fibers, handwashing is often recommended to prevent shrinking or stretching.
When handwashing, use cold or lukewarm water with a mild detergent. Gently swirl your hat in the water without wringing or twisting it. Rinse thoroughly and press out excess water using a clean towel.
To dry, lay the hat flat on a dry towel in its natural shape. Avoid hanging it up, as this can stretch out the stitches. Allow it to air dry completely before storing or wearing it.
If your pom-pom starts to lose its fluffiness, gently shake it or use a hair dryer on a cool setting to restore volume. Keeping your hat stored in a clean, dry place helps it maintain its shape and texture.
With the right care, your Santa Hat Free Pattern Crochet Pattern will look as good as new for many holiday seasons. Handmade items carry sentimental value, and preserving them ensures those memories last for years.
FAQ – Santa Hat Free Pattern Crochet Pattern
1. What skill level is needed for this pattern?
This pattern is perfect for beginners and intermediate crocheters. Basic knowledge of stitches like single and double crochet is enough to complete it successfully.
2. How long does it take to make a Santa hat?
Depending on your skill level, it typically takes between two to four hours to complete one hat. Larger or more detailed versions may take slightly longer.
3. Can I use different yarn types?
Yes! You can use any yarn that matches your preferred texture and comfort. Acrylic yarn is great for beginners, while wool blends add extra warmth.
4. How do I make the hat larger or smaller?
To resize, simply adjust your hook size or add/remove rounds as you crochet. Measuring head circumference beforehand helps ensure a perfect fit.
5. Can I sell hats made from this pattern?
Absolutely. Since this is a free pattern, you can sell finished items. Just avoid claiming ownership of the pattern itself.
6. What makes this pattern unique?
The Santa Hat Free Pattern Crochet Pattern stands out for its simplicity, flexibility, and holiday appeal. It’s ideal for personal projects or festive gifts.
PATTERN HERE
Creating your own Crochet Santa Hat Free Pattern Crochet Pattern is a joyful way to celebrate the holiday season while expressing your creativity. With simple stitches, customizable options, and endless variations, it’s a project that welcomes all skill levels and brings warmth to every occasion. Remember to care for your handmade hat properly so it lasts for many festive seasons ahead.
We hope this guide inspired you to pick up your crochet hook and create your very own Santa hat. If you enjoyed this tutorial, please leave your honest opinion and share any suggestions or ideas you’d like to see next. Your feedback helps inspire future creative projects for everyone who loves the art of crochet.