
Elf Hat Crochet Pattern projects are a delightful way to bring magic and warmth into your handmade creations. Whether you are making one for the holiday season, a costume, or just for fun, this charming crochet design adds a touch of fantasy to any outfit. The best part is that even beginners can follow an Elf Hat Crochet Pattern with a little patience and the right guidance. In this article, you’ll learn all the steps, techniques, and creative tips to make your own elf hat come to life with ease.
Crocheting an elf hat combines classic stitches with playful design elements such as points, stripes, and even pom-poms. Using an Elf Hat Crochet Pattern gives you the structure to experiment with colors, yarn types, and sizes. You can adapt the pattern for babies, kids, or adults, creating a family set that stands out in holiday photos or themed events. Whether you prefer a traditional green-and-red look or a modern pastel twist, there’s endless room for creativity.
Before diving into the project, make sure you have all the materials ready. Choose soft, comfortable yarn that won’t irritate the skin, especially if the hat will be worn for long periods. You’ll also want a hook size that matches your yarn’s thickness. Following the Elf Hat Crochet Pattern step-by-step ensures your stitches are consistent, your shape is balanced, and the final result looks professional. Once you get the hang of it, crocheting these hats becomes an enjoyable and even relaxing hobby.
1. Understanding the Basics of an Elf Hat Crochet Pattern
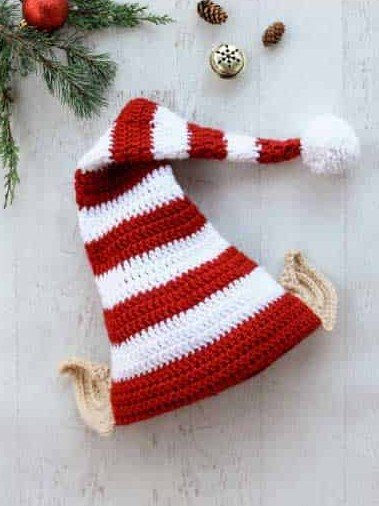
When starting any Elf Hat Crochet Pattern, it’s essential to understand the construction and structure of the design. An elf hat typically starts at the tip and gradually increases in size as you move toward the brim. This shape gives it that signature long, pointy top that can be curled or left loose depending on your preference. Knowing the basic anatomy of the hat helps you visualize your progress and avoid mistakes as you go.
To achieve a neat and even shape, count your stitches carefully after every round. Missing or adding stitches can distort the cone-like form of the hat. Most patterns will guide you through increasing stitches evenly to maintain symmetry. Take your time during these early rounds, as they set the foundation for the rest of your Elf Hat Crochet Pattern.
Selecting the right yarn weight also plays a significant role in the final look. Worsted-weight yarn works beautifully for most elf hats, offering warmth without being too bulky. Lighter yarns can create a more delicate and whimsical look, while thicker ones result in cozy winter-ready hats. Your yarn choice can transform the overall feel of your finished project.
Color combinations are another exciting part of crafting your elf hat. Classic holiday tones like green, red, and white instantly evoke festive vibes. However, don’t be afraid to experiment with metallic threads, stripes, or even ombré transitions. The flexibility of an Elf Hat Crochet Pattern means you can let your personality shine through your work.
If you’re a beginner, consider using stitch markers to help you track rounds and increases. This simple trick saves time and prevents confusion, especially when working on the elongated top section. Remember that patience and consistency are key when learning any new crochet technique.
Finally, always refer to your pattern’s gauge information. Making a quick sample swatch can help ensure that your finished hat will fit as intended. Small adjustments in hook size or tension can make a big difference in achieving the perfect fit for your Elf Hat Crochet Pattern.
2. Step-by-Step Instructions to Create Your Elf Hat
Once you have your materials ready, it’s time to begin crocheting your Elf Hat Crochet Pattern. Start at the top of the hat by chaining a small circle, usually between 3 to 5 stitches, and joining them to form a loop. From here, you’ll work in continuous rounds, gradually increasing the stitch count to expand the cone. The beginning stages are simple yet crucial for shaping the hat correctly.
As your cone grows, you’ll continue adding stitches at regular intervals. Most Elf Hat Crochet Patterns recommend increasing every few rounds to maintain a gradual widening. Be sure to check your stitch counts often to ensure accuracy. A stitch counter or notebook can help you keep track of your progress.
When your hat reaches your desired length, you’ll start forming the brim. The brim can be crocheted using ribbing techniques such as front and back post double crochet stitches. This gives the edge elasticity and a polished look. Some crocheters also like to fold the brim upward for a cozy, double-layered effect.
To add a whimsical touch, many Elf Hat Crochet Patterns include a pom-pom or bell at the tip. You can make a pom-pom using leftover yarn or attach a small jingle bell for an authentic elf look. This final detail brings personality and festive charm to your handmade hat.
Before finishing, weave in all your loose ends neatly using a yarn needle. It’s essential to secure the ends properly so the hat remains durable over time. Blocking your finished project by lightly steaming or shaping it also helps enhance its professional appearance.
At this point, your Elf Hat Crochet Pattern is complete, and you can try it on or gift it to someone special. Each handmade piece carries a unique charm that reflects your effort, creativity, and attention to detail.
3. Customizing Your Elf Hat for Any Occasion
One of the most enjoyable aspects of working with an Elf Hat Crochet Pattern is customization. You can modify color palettes, yarn textures, and embellishments to match any event or personality. For example, pastel tones work perfectly for children’s fantasy themes, while rich emerald and crimson hues fit perfectly with holiday traditions.
Adding decorative details such as buttons, ribbons, or even small crochet flowers can elevate your design. You can also crochet stripes or use color changes every few rows to create visual interest. Mixing textures with fuzzy or metallic yarns adds a playful sparkle that enhances your elf hat’s festive appeal.
For themed parties or costumes, consider incorporating ears into your Elf Hat Crochet Pattern. Small crochet ear attachments can be sewn onto the sides of the hat to mimic a classic elf look. This small addition can make your creation stand out in photos and performances.
Adjusting the size is another form of customization. You can easily adapt the Elf Hat Crochet Pattern for newborns, kids, or adults by altering the number of increase rounds or switching to a larger hook size. Making matching hats for the whole family is a fun idea, especially for holiday cards or group gatherings.
Adding a lining is another option if you want to make the hat warmer. A soft fleece lining can be hand-stitched to the inside, making it more comfortable for winter wear. This modification is particularly helpful when gifting your crochet creations.
Lastly, don’t forget the finishing touches. A neatly attached pom-pom, a decorative tassel, or a small bell can transform a simple elf hat into something truly magical. The possibilities with an Elf Hat Crochet Pattern are endless when you let your creativity guide you.
4. Tips for Perfecting Your Elf Hat Crochet Technique
To ensure your Elf Hat Crochet Pattern looks flawless, pay close attention to your tension. Consistent tension keeps your stitches even and prevents the hat from becoming lopsided. If your work starts curling or stretching unevenly, it might be time to adjust your grip or hook size.
Practice makes perfect, especially when mastering shaping techniques. The increasing rounds require focus and rhythm, but once you find your pace, the process becomes smooth and satisfying. Taking breaks during long crochet sessions also helps maintain precision and comfort.
Choosing the right hook material can improve your crocheting experience. Metal hooks glide easily, while ergonomic ones reduce hand fatigue. Finding the right tool for your comfort level can make crocheting an Elf Hat Crochet Pattern much more enjoyable.
Lighting also plays a significant role. Good lighting helps you see stitches clearly, especially when working with darker yarns. A bright workspace reduces mistakes and eye strain, allowing you to crochet longer without discomfort.
If you want to sell your handmade creations, presentation is key. Photograph your Elf Hat Crochet Pattern pieces with good lighting and neutral backgrounds to highlight your craftsmanship. High-quality photos can help your work stand out in online stores or craft fairs.
Finally, always store your finished hats properly. Keep them folded neatly in a dry, clean space to maintain their shape and color. Proper care ensures that your handmade items stay beautiful and ready to wear for many seasons to come.
FAQ – Common Questions About Elf Hat Crochet Pattern
1. What kind of yarn is best for an Elf Hat Crochet Pattern?
Worsted or medium-weight yarns are ideal because they offer the perfect balance of warmth and flexibility. Choose soft acrylic or wool blends for comfort.
2. Can beginners make an elf hat?
Yes! An Elf Hat Crochet Pattern is beginner-friendly, especially if you start with simple stitches and follow clear step-by-step instructions.
3. How long does it take to complete an elf hat?
Depending on your skill level and the size of the hat, it can take between 4 to 8 hours to finish one.
4. Can I make a baby-sized elf hat?
Absolutely. You can easily adapt the pattern by reducing the number of increase rounds or using a smaller hook.
5. How do I attach a pom-pom or bell securely?
Use a yarn needle and sturdy thread to sew the embellishment tightly to the tip. Double-knot and weave in ends to ensure durability.
6. Is blocking necessary?
Blocking helps the hat maintain its shape and gives it a polished look. It’s optional but recommended for best results.
7. Can I wash my crochet elf hat?
Most Elf Hat Crochet Pattern pieces made with acrylic yarn are machine washable on a gentle cycle. Always check the yarn label for care instructions.
8. What hook size should I use?
A 4.0 mm to 5.0 mm hook works well for most medium-weight yarns, but always check your pattern’s gauge first.
9. How can I make my hat more unique?
Experiment with color stripes, add decorations, or mix different yarn textures for a personalized touch.
10. Can I sell my finished elf hats?
Yes, handmade items based on free or personal-use Elf Hat Crochet Patterns can often be sold, as long as you credit the design appropriately.
Creating an Elf Hat Crochet Pattern is a rewarding project that combines creativity, craftsmanship, and a touch of festive fun. From choosing your yarn to adding the final pom-pom, each step allows you to express your personal style and skill. Whether you’re making it for yourself, as a gift, or to sell, your handmade elf hat will bring joy and warmth to anyone who wears it. I hope this guide has inspired you to pick up your crochet hook and start your own project. Don’t forget to share your thoughts and suggestions below — your feedback helps make each creation even more magical!