

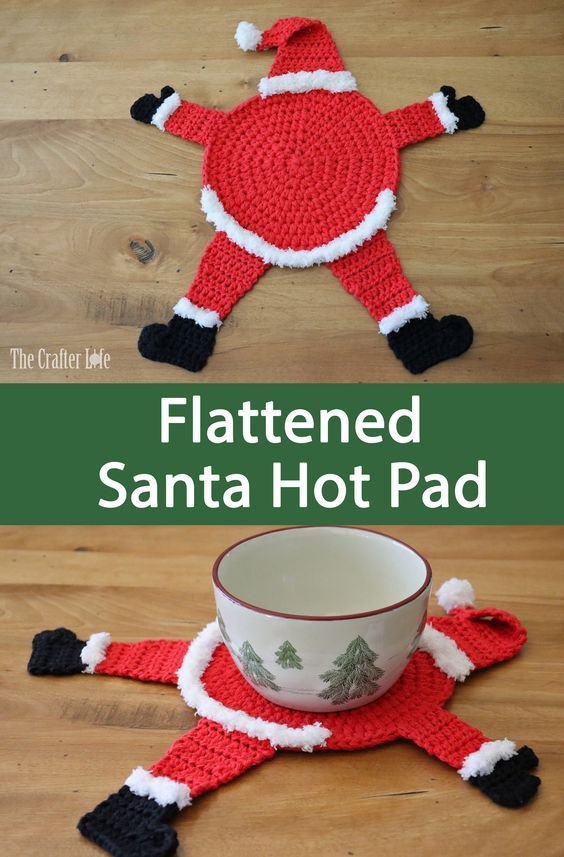
Flattened Santa Hot Pad Crochet Pattern is a delightful holiday project that combines the charm of handmade Christmas decorations with practical functionality. If you love adding a touch of festive spirit to your kitchen or dining area, this crochet pattern is perfect for you. Designed to be both decorative and useful, this hot pad can protect your surfaces from heat while serving as a joyful reminder of the holiday season. Its simple yet detailed design makes it an excellent project for both beginners and experienced crocheters.
The beauty of this Flattened Santa Hot Pad Crochet Pattern lies in its versatility. You can make it as a table accessory, a gift for loved ones, or even as a piece to sell at craft fairs during the Christmas season. The flattened design makes it easy to store or hang as a wall decoration when not in use. With its classic red, white, and black colors, this pattern instantly captures the essence of Santa Claus and spreads a cozy holiday feeling throughout your home.
In this guide, we’ll explore the materials you’ll need, the steps to create this adorable crochet piece, and some creative variations you can try. Whether you’re crafting for yourself or creating a handmade gift, following this Flattened Santa Hot Pad Crochet Pattern will surely bring joy to your holiday preparations. Let’s dive into the details and learn how to make this festive project step by step.
1. Materials and Tools You Will Need
Before starting your Flattened Santa Hot Pad Crochet Pattern, it’s important to gather all the necessary materials. Having everything prepared will make the process smoother and more enjoyable. The basic supplies include yarn, hooks, and a few additional tools to complete your project.
You’ll need medium-weight cotton yarn in red, white, black, and beige tones. Cotton yarn is ideal for hot pads because it resists heat better than acrylic fibers. The red color will form Santa’s hat and coat, while the white yarn will represent his beard and trim. Beige or light pink can be used for his face, and black will define his belt and eyes.
A 4.0 mm (G) crochet hook works perfectly for this project, offering a balance between stitch definition and flexibility. However, depending on your tension, you can go up or down one size to achieve the ideal texture. You’ll also need a yarn needle for weaving in ends and a pair of scissors to trim any excess yarn.
To ensure your hot pad maintains its shape, you may consider using a heat-resistant liner or double layering the piece. This extra step adds protection for surfaces when placing hot pots or dishes. Once you have your materials ready, you’re prepared to begin crocheting your Flattened Santa Hot Pad Crochet Pattern with confidence.
Lastly, don’t forget your stitch markers—they can be extremely helpful in keeping track of rounds or shaping sections like Santa’s hat and face. Preparing everything beforehand helps you focus on the creative process rather than searching for tools mid-project.
2. Step-by-Step Crochet Instructions
Now that your materials are ready, it’s time to start the exciting part—crocheting your Flattened Santa Hot Pad Crochet Pattern. Follow these steps carefully to achieve a beautiful and consistent result. Each section will build upon the last until your Santa comes to life.
Begin with a magic ring using beige yarn to form Santa’s face. Crochet in continuous rounds to create a circular base, gradually increasing stitches until it reaches your desired size. This will form the central portion of your hot pad. Make sure to keep your tension even for a flat and smooth result.
Next, switch to red yarn to begin Santa’s hat. The hat section is slightly triangular and flattened, sitting neatly above the facial portion. Use double crochet stitches to build height and texture, finishing with white yarn for the brim. This contrast is what gives the Flattened Santa Hot Pad Crochet Pattern its classic and cheerful appearance.
After completing the hat, crochet Santa’s beard using white yarn. This section adds dimension and softness to the design. You can use shell stitches or puff stitches for a fluffy effect. It’s essential to balance this area so that the overall piece stays even when laid flat on a surface.
For Santa’s belt, attach black yarn below the beard area. Work a few rows of single crochet stitches to form the belt, then switch to yellow or gold yarn to create the buckle. This detail adds charm and completes Santa’s iconic outfit.
Finally, use black yarn to add small eyes and a red piece for his nose. These finishing touches give personality to your Flattened Santa Hot Pad Crochet Pattern. Fasten off all ends, weave them securely, and block the piece if needed to ensure a perfectly flat and professional finish.
3. Customization Ideas and Creative Variations
One of the best things about the Flattened Santa Hot Pad Crochet Pattern is that it allows endless customization. You can experiment with different yarn textures, colors, and embellishments to make each piece unique and personal.
For instance, try using sparkly or metallic yarn for Santa’s belt buckle to add a festive shimmer. You can also incorporate fluffy eyelash yarn for his beard to make it even softer and more lifelike. Small variations like these can make your Santa design truly stand out.
If you want to match your kitchen décor, consider changing the traditional red and white to colors that suit your home. Some crocheters create pastel Santas for a softer aesthetic or even blue and silver versions for a winter wonderland theme. Each adaptation still maintains the charm of the Flattened Santa Hot Pad Crochet Pattern while offering a unique twist.
You can also add a loop to the top of Santa’s hat, turning your hot pad into a hanging decoration. This makes it easy to display on cabinet handles or walls during the holiday season. The versatility of this project means it can be both functional and decorative.
For a larger project, you can use the same design as a base to create matching placemats, coasters, or even pillow covers. Imagine a full Christmas table set with your handmade Santa designs—it’s a guaranteed way to impress guests and bring holiday warmth to your home.
Finally, if you plan to gift your crochet creation, wrap it with festive ribbon and add a handmade tag. Handmade gifts like this show care, effort, and creativity, making them far more special than store-bought items.
4. Tips for Perfecting Your Santa Hot Pad
To make your Flattened Santa Hot Pad Crochet Pattern look polished and professional, a few expert tips can make all the difference. Paying attention to detail helps elevate your crochet work from simple craft to handmade art.
First, maintain consistent tension throughout your project. Uneven tension can cause your hot pad to curl or lose its shape. If your stitches are too tight, the piece may warp; if too loose, it may lack structure. Practice a few test stitches before starting to find your ideal tension level.
Blocking your finished piece is another essential step. Wet blocking or steam blocking helps flatten the fabric and smooth any irregularities. Lay your Santa hot pad on a towel, pin it to shape, and allow it to dry completely. This technique enhances the appearance and ensures your creation lays perfectly flat on any surface.
When switching yarn colors, carry your yarn neatly along the back or fasten off and weave in ends immediately. This prevents tangling and keeps the back side clean. The back of your hot pad should look almost as neat as the front.
Consider lining your crochet with a thin heat-resistant fabric if you intend to use it regularly for hot pots or pans. This adds durability and protects your stitches from heat exposure, ensuring your Flattened Santa Hot Pad Crochet Pattern lasts for many seasons.
Another tip is to crochet with a soft touch. Let the yarn glide naturally through your fingers rather than pulling tightly. This not only prevents wrist strain but also produces a smoother texture for your final piece.
Lastly, enjoy the process. Crochet is not just about the finished item—it’s about relaxation, creativity, and self-expression. As you work through your Flattened Santa Hot Pad Crochet Pattern, take time to appreciate the joy of creating something beautiful with your own hands.
Frequently Asked Questions (FAQ)
1. Can I use acrylic yarn instead of cotton for this pattern?
While you can use acrylic yarn, cotton is highly recommended because it withstands heat better. Acrylic may melt or deform when exposed to high temperatures.
2. How long does it take to make the Flattened Santa Hot Pad?
Depending on your crochet speed, this project can take anywhere from 3 to 5 hours. Beginners might need a bit longer, but the pattern is simple enough for all skill levels.
3. Is the pattern suitable for beginners?
Yes! The Flattened Santa Hot Pad Crochet Pattern uses basic stitches like single crochet, double crochet, and slip stitch. It’s a fun and easy project for those learning how to shape and color-change in crochet.
4. Can I wash my Santa Hot Pad?
Absolutely. Since cotton yarn is durable, you can hand wash or machine wash it gently. Lay flat to dry to preserve its shape and colors.
5. Can I sell items made from this pattern?
Yes, as long as the finished product is handmade by you. Many crocheters sell their Flattened Santa Hot Pad Crochet Pattern creations at local craft fairs and online during the holiday season.
6. What size should the finished hot pad be?
Typically, it measures around 8 to 9 inches across, but you can adjust the size by using a larger or smaller hook and varying your yarn weight.
PATTERN HERE
Creating the Flattened Santa Hot Pad Crochet Pattern is a rewarding way to celebrate the holiday season with handmade charm. From the playful red hat to the fluffy white beard, every stitch captures the warmth and joy of Christmas. Whether you’re crafting it for yourself, as a gift, or to sell, this pattern combines functionality and festive spirit beautifully.
We hope this detailed guide inspires you to try making your own version of this adorable Santa hot pad. Share your honest opinion and suggestions below—we’d love to hear how your crochet project turned out and what creative twists you added to make it uniquely yours!