
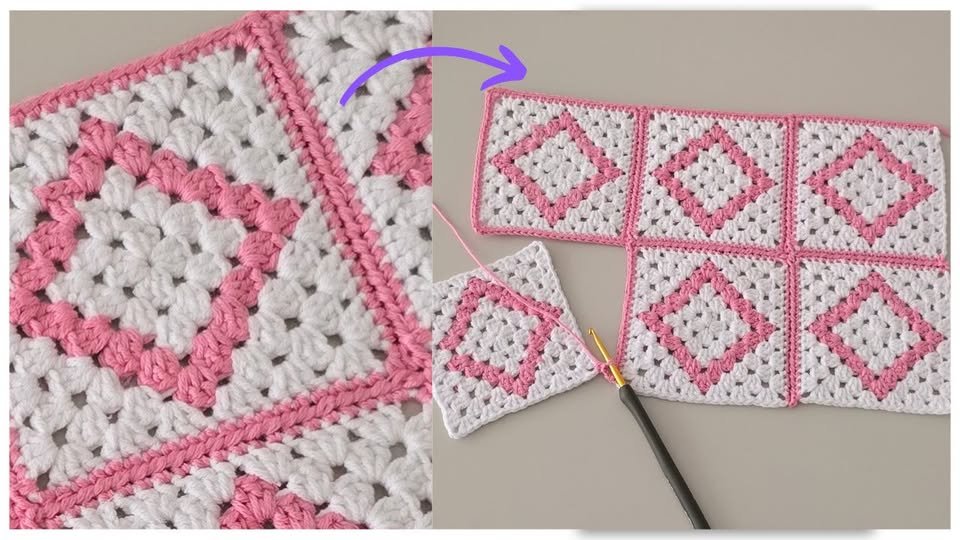
The Granny Square Join Crochet Pattern is one of the most timeless and creative techniques in the crochet world. Whether you are making a blanket, bag, pillow cover, or garment, learning how to join granny squares beautifully transforms individual motifs into a cohesive piece of art. Every crocheter, from beginner to advanced, can appreciate how this method allows for endless color combinations and personalized designs. With patience and attention to detail, the joining process becomes as satisfying as creating each square itself.
When it comes to crafting with granny squares, one of the most important skills to master is how to join them properly. Different joining methods give different textures, flexibility, and visual appeal to your final project. The granny square join crochet pattern can be made using several techniques such as slip stitch join, whip stitch join, or the join-as-you-go method. Each of these methods adds a unique charm and defines the overall finish of your project. Learning them will allow you to customize your work and elevate your crochet skills to a whole new level.
The beauty of the granny square join crochet pattern lies in its versatility. You can choose to make your joins invisible for a clean look or bold and decorative to add character. The possibilities are endless, depending on your yarn colors, stitch tension, and pattern layout. Moreover, joining squares gives a sense of accomplishment — seeing separate little squares turn into a large masterpiece is one of the greatest joys in crochet. Let’s explore the best techniques and tips to make your granny square joining experience smooth, creative, and enjoyable.
1. Understanding the Basics of Granny Square Join Crochet Pattern
Before you start joining, it’s essential to understand the structure of a granny square. Each square is made up of clusters of double crochets, separated by chain spaces. When joining them, aligning these chain spaces and corners is crucial to maintain balance and symmetry in your project.
A popular choice among crocheters is the slip stitch join, known for its neat, flat appearance. This method involves holding two squares together and working slip stitches through both layers across each stitch or chain space. It’s quick, secure, and perfect for those who prefer subtle joins.
Another beginner-friendly method is the whip stitch join, which uses a yarn needle instead of a hook. This sewing-like method is great for those who want control over the tightness of the join. It’s flexible, easy to adjust, and ideal when working with delicate yarns or complex color schemes.
If you prefer something more decorative, the single crochet join is perfect. It creates a beautiful raised ridge that highlights the outlines of each square. You can even use a contrasting yarn color to make the joins pop and give your project a bold look.
To keep your granny square join crochet pattern uniform, ensure each square has the same number of stitches along its edges. Blocking your squares before joining also helps them align perfectly and prevents warping. This small step makes a big difference in achieving a professional finish.
Finally, plan your layout before joining. Arrange your squares on a flat surface to visualize the pattern, making it easier to balance colors and ensure harmony in your final design.
2. Different Techniques to Join Granny Squares
One of the reasons the granny square join crochet pattern is so beloved is the variety of techniques you can use. Each method gives a different texture, flexibility, and look, so choosing the right one depends on your project type and personal taste.
The join-as-you-go (JAYG) method is a favorite for many crocheters because it saves time. Instead of joining after all squares are made, you connect them during the final round of each square. This technique eliminates the tedious process of sewing and keeps your work neatly connected as you progress.
The flat braid join is another beautiful technique that uses chains and slip stitches to create a delicate lacy effect between squares. It’s perfect for lightweight projects like shawls or decorative blankets. The intricate braids look like fine lacework, adding elegance and texture.
For a sturdy, seamless finish, the invisible join is ideal. This method uses a yarn needle to weave the edges together invisibly, resulting in joins that are almost impossible to detect. It’s perfect for garments and accessories where you want a smooth, continuous look.
Another creative option is the zig-zag join, where you work chains and slip stitches in a zig-zag motion across the squares. This adds a playful touch and flexibility to the project, making it ideal for vibrant or child-friendly crochet designs.
You can also experiment with the granny stitch join, which continues the traditional granny cluster pattern between squares. This maintains a consistent texture and flow across the entire project, ideal for classic-style blankets or vintage-inspired creations.
Lastly, the crochet-through-back-loops join gives a subtle ridge effect. It’s a neat, structured way to connect your squares while keeping the front side smooth and tidy.
3. Tips for a Perfect Granny Square Join
Achieving a perfect granny square join crochet pattern takes a bit of planning and patience, but the results are always worth it. Start by using the same yarn type and weight throughout your squares and joins. Mixing yarn textures can make your project uneven or bulky in certain areas.
Choose the right hook size — too tight, and your joins may pucker; too loose, and they may stretch. Consistency in tension is key to achieving smooth, flat joins that align beautifully.
When joining, work in good lighting and use stitch markers to align your corners and sides. Even a small misalignment can affect the symmetry of the entire project. Remember, attention to detail always shows in the final piece.
Blocking your squares before joining can make an incredible difference. It helps even out the stitches, defines the shape, and ensures your edges line up perfectly. You can steam block or wet block, depending on your yarn type.
If you’re working with multi-colored squares, plan your color layout before starting the join. A visually balanced arrangement creates harmony in your finished project. You can lay them out on the floor or use a photo editor to preview different combinations.
Lastly, don’t rush. The joining process can be meditative and enjoyable. Play your favorite music, take breaks, and appreciate how your collection of squares is slowly becoming a beautiful crochet creation.
4. Creative Ideas Using Granny Square Join Crochet Pattern
The granny square join crochet pattern opens a world of creative opportunities. Beyond traditional blankets, you can make everything from tote bags to cardigans, table runners, and cushion covers. The versatility of granny squares makes them suitable for almost any project you can imagine.
For home décor lovers, joined granny squares can become stunning crochet throws, bedspreads, or wall hangings. Try alternating solid and patterned squares for a modern look, or stick to a classic color palette for a timeless aesthetic.
Fashion enthusiasts can use the granny square join crochet pattern to create chic wearable pieces like vests, jackets, and skirts. Adding joins with contrasting colors makes these garments stand out and express your personal style.
You can also use smaller joined squares to craft accessories such as handbags, coasters, or even hats. Each project can tell a story through its colors, patterns, and arrangement.
For festive seasons, granny square joins are perfect for creating holiday-themed items like Christmas stockings, Easter table mats, or decorative garlands. They make thoughtful, handmade gifts full of warmth and creativity.
Finally, consider joining your squares with different shapes — hexagons, triangles, or circles — for a more artistic approach. The beauty of crochet lies in the freedom to experiment and innovate.
FAQ: Granny Square Join Crochet Pattern
1. What is the easiest way to join granny squares?
The easiest way is the whip stitch join, which uses a yarn needle and is simple enough for beginners. It’s quick, clean, and forgiving if you make small mistakes.
2. How do I keep my joins straight and even?
Make sure each square has the same stitch count and block them before joining. Use stitch markers to align corners accurately.
3. Can I join granny squares of different sizes?
Yes, but you’ll need to adjust by adding extra rounds or stitches to the smaller squares so they match in size.
4. What yarn is best for joining granny squares?
Use the same yarn type and weight as your squares. Acrylic, cotton, or blends work best for consistent tension and durability.
5. Should I use the same color for joining?
It depends on your design. Using the same color creates a seamless look, while contrasting colors make the joins stand out as a decorative element.
6. Can I mix different joining techniques in one project?
Absolutely! Combining techniques adds texture and uniqueness to your piece — just ensure it maintains structural integrity.
The granny square join crochet pattern is more than just a technique — it’s an art form that brings together creativity, patience, and skill. Whether you prefer invisible joins or decorative ridges, mastering different methods allows you to personalize every project. From cozy blankets to stylish accessories, the possibilities are endless once you know how to join your squares beautifully.
Now that you’ve learned the essentials of joining granny squares, take your yarn and hook, and start experimenting! Each project you make will tell its own colorful story. Don’t forget to share your thoughts and experiences in the comments — your opinion and suggestions help inspire future crochet lovers around the world.