
Halloween Bunting Crochet Pattern is the perfect project to bring spooky charm and handmade warmth to your Halloween decorations. Whether you’re preparing your home for a party or simply love creating festive crafts, crochet bunting offers a creative way to express your Halloween spirit. Using bright colors, classic motifs like pumpkins, ghosts, and bats, and simple crochet stitches, you can design a decoration that is both fun and timeless. This pattern is ideal for crocheters of all levels, from beginners who want to practice basic shapes to experienced crafters looking to add a seasonal twist to their collection.
One of the best things about this Halloween Bunting Crochet Pattern is its versatility. You can easily adjust the colors, motifs, and size according to your personal taste or the theme of your celebration. Whether you prefer traditional orange and black or modern pastel Halloween tones, your handmade bunting will stand out as a unique, reusable decoration year after year. Plus, crochet buntings are lightweight, easy to store, and can even be used outdoors for trick-or-treat events or porch decorations. Handmade details like this always bring a special charm that store-bought decorations can’t match.
Creating your own Halloween Bunting Crochet Pattern allows you to combine creativity with sustainability. Instead of buying disposable plastic banners, you can craft something that lasts, using leftover yarns or eco-friendly fibers. Each flag, pumpkin, or ghost can tell a small story through the stitches, making your decoration even more meaningful. In this article, you’ll discover how to bring this project to life, what materials you’ll need, and several tips to ensure your bunting looks beautiful and polished. Let’s dive into the world of spooky crochet and explore the steps to create your own masterpiece.
1. Materials and Tools Needed for Your Halloween Bunting
Before you start crocheting, it’s important to gather all your materials. For most Halloween Bunting Crochet Patterns, you’ll only need a few basic supplies. The right materials ensure your project turns out neat, durable, and vibrant.
You’ll need medium-weight yarn in classic Halloween shades like orange, black, white, and purple. Cotton yarn works best because it keeps its shape and offers a clean finish. You can also experiment with glitter or metallic yarn for a touch of sparkle.
Next, select an appropriate crochet hook, typically between 3.5 mm to 4.5 mm, depending on your yarn weight. Always check the yarn label for recommendations. Having a yarn needle and scissors on hand will make finishing off your pieces much easier.
A string or cord will be necessary to assemble the bunting. You can use crocheted chains, twine, or ribbon to connect the individual motifs. Choose something strong enough to hold the weight of your decorations.
Optional embellishments can include small buttons, beads, or felt details to enhance each motif. For example, add tiny black beads for ghost eyes or felt leaves for pumpkins. Personal touches like these make your Halloween Bunting Crochet Pattern stand out.
Lastly, make sure you have a comfortable workspace and good lighting. Crocheting dark yarn, especially black, can be challenging, so proper light helps you maintain accuracy and comfort while working on your festive masterpiece.
2. Choosing Your Halloween Crochet Motifs
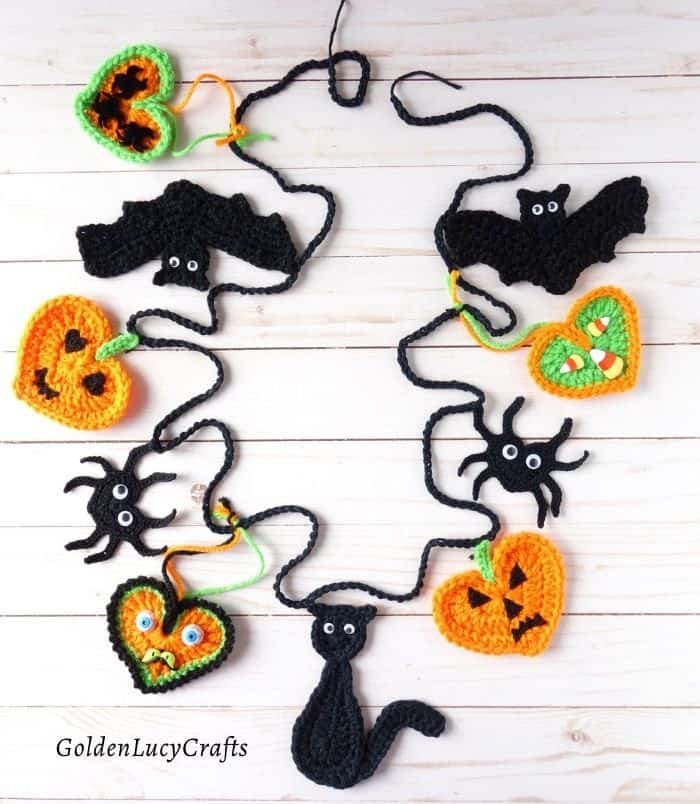
A big part of the fun in making a Halloween Bunting Crochet Pattern is deciding which motifs to include. The possibilities are endless — from spooky ghosts to cute pumpkins, bats, spiders, and even candy corns.
The pumpkin motif is one of the most popular and simplest to make. Using orange yarn, you can crochet a small circle and add ridges to give it a realistic pumpkin look. A touch of green for the stem completes the design beautifully.
Ghosts are another favorite. Crochet a teardrop-shaped body with white yarn and add embroidered or felt eyes. The simplicity of this motif makes it perfect for beginners, and it adds an instantly recognizable Halloween charm.
Bats can be made by shaping wings from black yarn using small shell stitches or loops. Though slightly more advanced, they bring a fun and spooky flair to your bunting when hung between other motifs.
If you want to add some color contrast, crochet small triangles in solid Halloween colors and alternate them with your motifs. This technique adds visual balance and keeps the decoration cohesive.
For those who love texture, try mixing stitches — use puff or bobble stitches for pumpkins or double crochet for ghosts. This variation keeps the project interesting and adds depth to your finished piece.
Whatever motifs you choose, the key is to maintain a consistent size and style throughout the bunting so the final decoration looks harmonious and professional.
3. Step-by-Step: Creating and Assembling the Bunting
Once your motifs are ready, it’s time to bring your Halloween Bunting Crochet Pattern together. The process is simple but requires attention to detail to ensure all pieces hang evenly and securely.
Start by blocking your motifs. This step helps them hold their shape and lie flat when strung together. Lightly dampen the pieces and pin them on a foam board or towel, then let them dry completely.
Next, prepare your string or crocheted chain. Measure the space where you plan to hang your bunting and add some extra length for tying. It’s better to have a bit more than not enough.
Attach each motif evenly along the chain, leaving about two to three inches between them. You can sew them directly onto the chain using a yarn needle or slip stitch them through with your hook.
If you’re making triangle flags instead of shaped motifs, join each triangle along the top edge of your crocheted chain as you go. This method keeps the bunting secure and adds a continuous look.
After assembly, check that everything hangs correctly and that the motifs face the same direction. Small adjustments here make a big difference in the final presentation.
Finally, weave in all loose ends carefully. This step polishes your work and ensures your Halloween Bunting Crochet Pattern is sturdy enough to last through many spooky seasons to come.
4. Creative Ideas and Variations for Your Bunting
The beauty of a Halloween Bunting Crochet Pattern lies in its flexibility. You can personalize it in endless ways, making each piece reflect your style and creativity.
Try creating themed sets, like a ghost-only garland for a minimalist look or a mix of pumpkins and bats for a classic Halloween vibe. This allows you to tailor your decoration to the space you have.
You can also experiment with yarn textures. Mixing matte and shiny fibers, or even using glow-in-the-dark yarn, adds a playful twist that kids and guests will love.
For a rustic aesthetic, use jute or natural cotton yarn. Combined with muted tones like cream, gray, and burnt orange, it gives your bunting a farmhouse Halloween appeal.
Adding embroidered details, such as faces or outlines, brings character to your motifs. For instance, stitch smiling expressions on your pumpkins or sleepy eyes on ghosts for extra charm.
If you enjoy working with patterns, alternate solid-colored flags with ones featuring striped or chevron designs. This keeps the bunting visually dynamic while staying cohesive in theme.
Finally, think about where you’ll display your bunting — above a fireplace, across a window, or even outdoors. Choosing the right placement enhances the festive atmosphere and showcases your handcrafted work beautifully.
FAQ: Halloween Bunting Crochet Pattern
1. What yarn is best for a Halloween bunting?
Cotton yarn is ideal because it holds its shape and offers crisp stitch definition. Acrylic yarn also works well for a lightweight, durable finish.
2. How long does it take to complete a bunting?
Depending on the number of motifs and your crochet speed, you can finish a bunting in one to three days. Beginners may take a bit longer to perfect their shapes.
3. Can I make this pattern if I’m a beginner?
Absolutely! The Halloween Bunting Crochet Pattern is beginner-friendly, especially if you start with simple shapes like triangles, ghosts, or pumpkins.
4. How can I make my bunting look more professional?
Block your motifs before assembling them, keep consistent tension while crocheting, and weave in all ends neatly. Small details make a big difference.
5. Can I use leftover yarn from other projects?
Yes! This pattern is perfect for using up scrap yarn. Combining different textures and colors can result in a unique and creative Halloween garland.
6. How do I store my crochet bunting?
After the season, gently fold your bunting and store it in a dry place. Avoid hanging it to prevent stretching, and keep it away from moisture.
PATTERN HERE
Creating a Halloween Bunting Crochet Pattern is a delightful way to celebrate the spooky season with a personal touch. You’ve learned how to choose your materials, crochet festive motifs, assemble your garland, and even customize it to match your style. This handmade decoration adds warmth, charm, and creativity to any space, making it a highlight of your Halloween décor.
Now it’s your turn to pick up your hook and yarn and start crafting your very own Halloween bunting. Whether you make it simple or elaborate, it will surely impress friends and family. Don’t forget to share your thoughts and experiences — leave an honest opinion and suggestions about this project. Your feedback helps inspire even more creative crochet ideas for the community!