
A Hello Kitty Crochet Dress is the perfect combination of cuteness and creativity for crochet enthusiasts. Whether you are making it for a child, as a gift, or simply for the joy of crocheting, a Hello Kitty Crochet Dress brings charm and personality to your handmade projects. This article will guide you through ideas, tips, and inspiration for creating your very own Hello Kitty Crochet Dress.
Crochet lovers adore designing garments that stand out, and few designs are as iconic as Hello Kitty. The character’s sweet and timeless appeal makes it a fantastic theme for dresses, especially when combined with the art of crochet. With the right pattern and materials, you can create a beautiful piece that reflects your passion and skill.
In this detailed guide, you’ll learn about choosing patterns, selecting materials, techniques for crafting the perfect dress, and creative ways to personalize your Hello Kitty Crochet Dress. Let’s dive into the world of crochet and discover how to bring Hello Kitty to life in dress form.
1. Choosing the Right Pattern for Your Hello Kitty Crochet Dress
Selecting the right pattern is the first and most important step in making your Hello Kitty Crochet Dress. A well-designed pattern will not only save you time but also ensure that your final project looks polished and fits well.
Many free and paid patterns are available online, ranging from beginner to advanced levels. When searching for the ideal crochet pattern, consider the size you need, the style you prefer (such as sleeveless, short sleeves, or with a tutu skirt), and any additional details like bows or applique.
Another key consideration is clarity. Look for patterns that come with detailed instructions, step-by-step images, or even video tutorials. These features are especially helpful for beginners or those trying a Hello Kitty Crochet Dress for the first time.
Don’t hesitate to read reviews or join crochet communities where others share their experiences with certain patterns. This can give you insight into potential challenges and tips for success.
You might also want to consider patterns that offer variations, so you can make small changes like color adjustments or adding embellishments to match the recipient’s style.
Finally, ensure that the pattern you select is designed for the type of yarn and hook you plan to use. This helps achieve the correct size and drape of your Hello Kitty Crochet Dress.
2. The Best Yarn and Materials for a Hello Kitty Crochet Dress
The materials you choose will significantly impact the look, feel, and durability of your Hello Kitty Crochet Dress. Softness, color vibrancy, and washability are important factors to consider.
Cotton yarn is often a top choice for dresses because it is breathable, soft, and holds its shape well. It’s perfect for warmer weather and comfortable against the skin, making it ideal for children’s garments.
Acrylic yarns are also popular for Hello Kitty Crochet Dress projects because they are affordable, available in a wide range of colors, and easy to care for. Acrylic blends can provide extra softness while retaining durability.
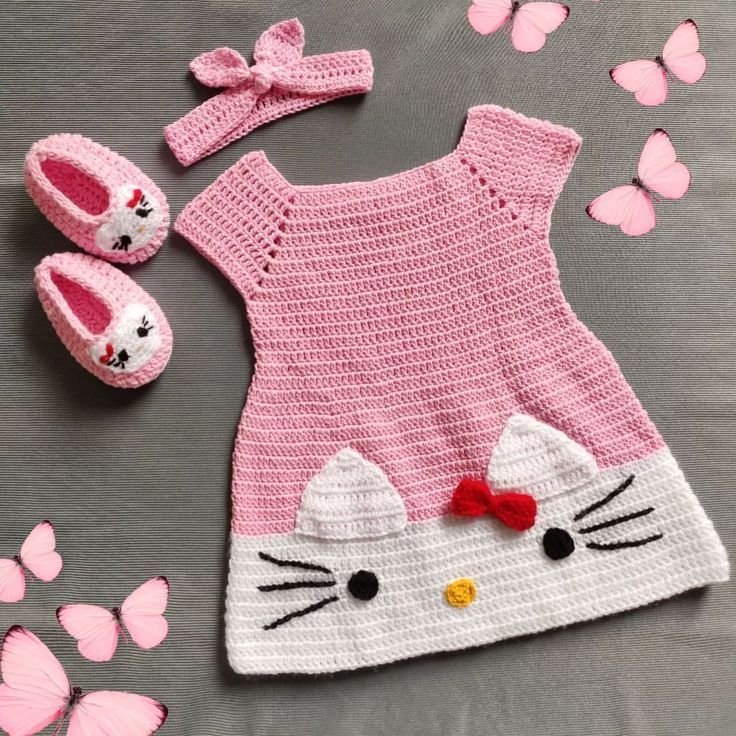
When choosing colors, stick to the classic Hello Kitty palette: white, red, pink, and maybe a touch of yellow for details like the nose or accessories. These colors help capture the iconic look.
You’ll also need the right hook size as specified in your pattern. Using the wrong size hook can result in a dress that’s too stiff or too loose, so it’s essential to check your gauge before starting the full project.
Other useful materials include buttons or snaps for closures, ribbons for decoration, and fabric lining if you want to add extra comfort or modesty to the dress.
Don’t forget about safety, especially if you’re making the dress for a baby or toddler. Avoid small detachable parts that could be a choking hazard, and ensure all embellishments are securely attached.
3. Techniques and Tips for Making Your Hello Kitty Crochet Dress
Crocheting a dress, especially one as cute as a Hello Kitty Crochet Dress, requires patience and attention to detail. Here are some techniques and tips to help you along the way.
Start with a gauge swatch. This small test piece ensures that your stitches match the pattern’s requirements, helping you avoid sizing issues later in the project.
Work in sections as indicated in the pattern. Many dress patterns are made in parts (like bodice, skirt, and sleeves) and then joined together. This method keeps your work neat and manageable.
Use stitch markers to keep track of rounds, especially if you are working in the round or on a complex section. This will prevent mistakes and save you from having to undo rows.
Don’t rush the decorative details. The Hello Kitty face, bow, or other applique are what make the dress special. Take your time with embroidery or crochet embellishments to ensure they look polished.
If you’re new to making garments, consider starting with a simpler dress design before adding Hello Kitty features. This allows you to get comfortable with shaping and joining techniques.
Lastly, try the dress on a mannequin or flat surface as you work. This helps you see how the pieces come together and adjust if needed before final assembly.
4. Creative Ideas to Personalize Your Hello Kitty Crochet Dress
Adding your unique touch to a Hello Kitty Crochet Dress makes the project even more special. There are countless ways to customize your design.
Consider adding a ruffled skirt or layered look to give the dress more flair. This can be achieved by working additional rounds with increases or using different stitch styles like shell stitches.
Play with color combinations. While classic Hello Kitty colors are always adorable, pastel shades, rainbow themes, or even metallic yarns can create a fresh and modern look.
You can also integrate fun textures by combining different yarns or adding tulle or lace layers to the skirt portion of the dress for extra volume.
Another idea is to create a matching accessory set. A Hello Kitty Crochet Dress pairs beautifully with a crocheted headband, purse, or booties to complete the outfit.
Personalized embroidery is a sweet touch. Adding the child’s name or initials in one corner of the dress makes it a treasured keepsake.
Finally, think about seasonal variations. A Hello Kitty Crochet Dress in red and green for the holidays, or with floral appliques for spring, allows you to tailor your creation to different times of the year.
FAQ About Hello Kitty Crochet Dress
What size should I make the Hello Kitty Crochet Dress?
The size depends on the recipient’s measurements. Always check the pattern’s sizing guide and make a gauge swatch to ensure accuracy.
Is a Hello Kitty Crochet Dress suitable for beginners?
Yes, there are beginner-friendly patterns available. Look for simple constructions with minimal shaping if you’re new to garment crochet.
What type of yarn works best for a Hello Kitty Crochet Dress?
Cotton and soft acrylic yarns are excellent choices because they are comfortable, washable, and hold their shape well.
How long does it take to crochet a Hello Kitty Dress?
The time varies based on the complexity of the pattern and your skill level. On average, it can take anywhere from a few days to a couple of weeks of dedicated crocheting.
Can I sell Hello Kitty Crochet Dresses that I make?
Be cautious, as Hello Kitty is a copyrighted character. While you can gift or use the dress personally, selling items with the character may require permission or a license.
How do I care for a Hello Kitty Crochet Dress?
Follow the yarn label’s washing instructions. Typically, handwashing or gentle machine cycles with mild detergent are best to keep the dress looking new.
Creating a Hello Kitty Crochet Dress is a rewarding and fun project that lets you combine your love of crochet with one of the world’s most beloved characters. From selecting the right pattern and materials to adding personalized details, every step offers an opportunity to express your creativity. We hope this guide has inspired you to start your own Hello Kitty creation. If you’ve made a dress or have tips to share, please leave your honest opinion and suggestions in the comments—we’d love to hear from you!