

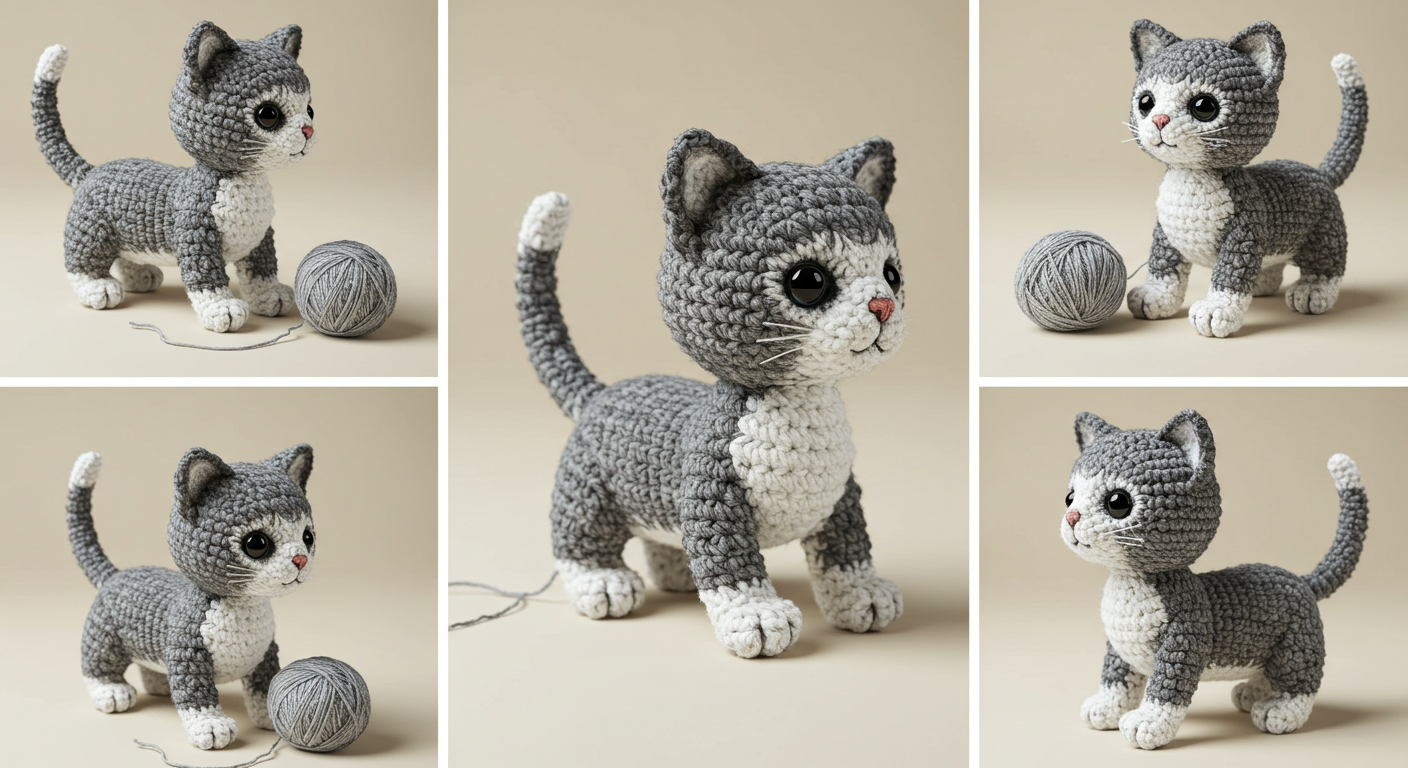
Learning how to create a realistic crochet cat CROCHE PATTERN is an exciting journey for crafters who love details, textures, and the magic of handmade art. Crocheted cats have become a popular project among beginners and advanced crocheters because they combine the cuteness of amigurumi with the challenge of realism. By using thoughtful stitches, carefully chosen yarn, and precise shaping, you can create a crocheted cat that looks almost lifelike.
One of the best parts about working with crochet cat patterns is the freedom to personalize them. You can choose the color of your yarn to match a real-life cat, add stripes, or even experiment with fur-like yarn to give a more realistic texture. Beyond appearance, the positioning of ears, eyes, whiskers, and tails are what truly transform a simple stuffed toy into a realistic crochet cat. That’s why understanding the structure of a cat and how to replicate it with yarn is essential.
If you are new to amigurumi, don’t worry—this project is still within your reach. With patience and practice, you will learn not only how to crochet shapes but also how to add finishing touches that bring your crochet cat to life. In this article, you will discover step-by-step tips and techniques for designing a lifelike feline friend. From basic stitches to creative details, let’s dive into the world of realistic crochet cat CROCHE PATTERN making.
Understanding the Basics of a Crochet Cat
To start your project, you need to understand the basics of creating a crochet cat pattern. This means becoming comfortable with amigurumi techniques, which focus on crocheting in the round to build three-dimensional shapes. The head, body, and tail are often crocheted separately and then joined together to create the foundation of your cat.
When planning your crochet cat, always begin with a simple sketch or mental image of the cat you want to create. Decide if your crochet project will be a small kitten or a larger adult cat. This decision helps you determine the yarn weight, hook size, and the number of stitches needed. Smaller cats require thinner yarn for delicate details, while larger cats can use medium-weight yarn for easier handling.
Another important aspect of the basics is the stuffing. A realistic crochet cat needs a proper stuffing balance to hold its shape. Too much stuffing will distort the stitches, while too little will make your cat floppy. Aim for firmness without overstretching the fabric. This balance ensures your cat sits properly and looks natural.
Once you have the body parts, you need to master attaching them seamlessly. The placement of legs, arms, and tails changes the entire posture of the cat. If you want a sitting cat, angle the legs differently than if you want your cat to appear lying down. These little adjustments are what add realism to your project.
Learning how to create facial features is equally important. The eyes, nose, and whiskers should be aligned properly. Safety eyes are commonly used for amigurumi, but for more realism, embroidered or glass eyes can make a striking difference. Adding a small embroidered nose and thin yarn whiskers gives your cat a lifelike charm.
Finally, don’t forget the finishing touches. Brushing yarn to create a soft fur effect or adding stripes with surface crochet can make your cat look incredibly realistic. Each detail you add contributes to making your crochet project look more like a true feline companion.
Choosing the Right Materials for Realism
The success of your realistic crochet cat CROCHE PATTERN depends largely on the materials you choose. Yarn, stuffing, eyes, and even thread colors play a huge role in achieving a natural look.
First, focus on yarn selection. Smooth cotton yarn works well for beginners, but if you want a realistic fur effect, consider specialty yarns such as brushed acrylic or fuzzy mohair blends. These yarns create a soft, furry texture that mimics a real cat’s coat. However, keep in mind that fur-like yarn can be more challenging to work with, so patience is key.
Your choice of stuffing also matters. Polyester fiberfill is the most common, but for added weight and stability, some crafters mix in plastic pellets at the base of the body. This gives your cat a realistic feel when sitting or standing. Weighted stuffing can make your crochet project look and feel more like a real pet.
For the eyes, safety eyes are a safe and practical option. They come in various sizes and colors, allowing you to match the eyes of real cats. If you want to go further, you can use realistic glass eyes that have depth and reflection. Embroidered eyes are also a good alternative for those making projects for young children, as they are completely safe.
Whiskers and fine details are what set your crochet cat apart. Thin black or white embroidery thread can be used for whiskers, while pink or brown yarn is perfect for noses and inner ears. Even adding small pads to the cat’s paws makes your project look polished and lifelike.
Don’t forget about color combinations. Cats come in countless patterns—tabby, calico, black, white, or gray. Try mixing yarn shades to replicate these natural patterns. For tabby cats, stripes can be added with surface crochet, and for calicos, you can crochet patches of color directly into the design.
Lastly, consider durability. If your crochet cat will be handled by children, choose sturdy yarn and secure attachments. If it’s for decoration, you can experiment with more delicate materials without worrying about wear and tear. Matching your materials to your intended use ensures the best results.
Step-by-Step Process to Crochet a Realistic Cat
Now that you understand the basics and materials, let’s go through the general process of making a realistic crochet cat CROCHE PATTERN. Each step requires patience, but the results are worth it.
Begin with the head. Using a magic ring, crochet in the round to form a sphere. Gradually increase your stitches to create a rounded shape. To capture realism, focus on proportions—cats have slightly wider heads compared to their bodies, especially if you want to replicate a kitten look.
The body comes next. Start with a cylinder shape, making it slightly tapered toward the top. Depending on your desired pose, you can elongate the body for a lying cat or shorten it for a sitting one. Remember to stuff as you go so the shape remains consistent.
For the legs and arms, crochet four elongated tubes. Slightly curve the legs to mimic a natural sitting or standing pose. Pay attention to paw details, adding small embroidered lines to separate the toes. This detail enhances the realistic look of your crochet cat.
The tail is an essential part of realism. Crochet a long tube, but keep it flexible by using less stuffing. This allows the tail to bend naturally. You can even wire the inside if you want a fully poseable tail. Attaching the tail in the correct position gives personality to your crochet cat.
Ears are another important feature. Cats’ ears are triangular and upright, but their size varies depending on the breed. Crochet two small triangles and shape them carefully. Slightly bend the tips or angle them to add character. A folded ear can make your crochet cat look playful or curious.
Finally, assemble your cat. Attach the head, body, legs, and tail with careful stitching. Once assembled, embroider the face and add finishing touches like stripes, spots, or even fur brushing. These last steps bring your crochet cat to life, making it look almost real.
Tips for Adding Realistic Details
The difference between a simple toy and a realistic crochet cat CROCHE PATTERN lies in the details. Adding these small but powerful touches will transform your work into a lifelike masterpiece.
First, study real cats. Look at photos or observe your own pet. Notice how their eyes shine, how their ears tilt, and how their fur patterns flow. Using real-life references will help you replicate these features in crochet form.
Experiment with fur techniques. You can brush out fuzzy yarn with a slicker brush to create a fluffy effect. Some crocheters even attach individual strands of yarn with a latch hook method to simulate long fur. Both techniques add depth and realism to your project.
Use shading to your advantage. You can crochet with multiple shades of yarn within the same project to create natural-looking shadows and highlights. This technique works well for tabby stripes or multicolored coats.
Don’t underestimate posture. A crochet cat that sits naturally or curls its tail looks far more realistic than one with stiff positioning. Adjusting the angle of legs and tails makes the figure appear lifelike.
Whiskers and tiny details make a huge difference. Adding whiskers, paw pads, or even a small embroidered mouth gives your crochet cat personality. These fine touches elevate your project from a simple amigurumi to a realistic creation.
Lastly, keep practicing. Each time you make a crochet cat, your attention to detail will improve. Over time, you’ll learn how to balance proportions, stitches, and textures to create cats that truly look alive.
FAQ About Realistic Crochet Cat Patterns
1. Is a realistic crochet cat pattern suitable for beginners?
Yes, beginners can attempt it, but it requires patience. Start with simpler amigurumi first to learn the basics before moving on to detailed cat patterns.
2. What yarn works best for a realistic crochet cat?
Cotton yarn is beginner-friendly, while fuzzy acrylic and mohair blends create realistic fur textures. The choice depends on your skill level and the look you want.
3. How do I make the eyes look more lifelike?
You can use safety eyes, glass eyes, or embroider them. Adding a tiny white stitch in the corner mimics light reflection, giving the eyes more depth.
4. How do I add whiskers to a crochet cat?
Use thin embroidery thread or fishing line for whiskers. Attach them securely with a needle to ensure they stay in place.
5. Can I customize my crochet cat to look like a real pet?
Absolutely! You can choose yarn colors and patterns to match your real-life cat, making it a special keepsake.
6. How long does it take to make a crochet cat?
It depends on size and detail. A small, simple cat may take a few hours, while a detailed, realistic one could take several days.
PATTERN HERE
Creating a realistic crochet cat CROCHE PATTERN is a rewarding experience for any crochet lover. By understanding the basics, selecting the right materials, following a careful process, and adding realistic details, you can bring a lifelike feline to life with yarn.
Now that you’ve learned the essential steps and tips, it’s your turn to try. Take your time, enjoy the process, and experiment with details that make your cat unique. I’d love to hear your sincere opinion about this guide and any suggestions you have—your feedback helps me improve and inspire more crochet creations.