
If you have ever wanted to make your own stylish accessory, this How to Crochet a Bucket Hat Tutorial CROCHE PATTERN will be the perfect guide for you. Bucket hats have become an iconic fashion item, blending functionality with style. They are light, practical, and ideal for any season, whether you want to protect yourself from the sun or add a unique handmade touch to your outfit. Crocheting your own hat allows you to customize the colors, textures, and size exactly the way you like.
Learning how to crochet a bucket hat is much simpler than it seems. Even if you are a beginner in the world of crochet, this project is a great way to practice essential stitches and improve your skills while creating something you can wear with pride. By following a detailed tutorial and using a reliable CROCHE PATTERN, you can achieve professional results without needing advanced experience. The charm of handmade crochet lies in its personal touch, making every piece truly one-of-a-kind.
This article is designed not only to explain the How to Crochet a Bucket Hat Tutorial CROCHE PATTERN, but also to inspire you to try new ideas, experiment with different yarns, and develop your own creative version. With patience, clear steps, and a little practice, you will be surprised at how enjoyable and rewarding the process can be. Now, let’s dive deeper into each stage of this creative journey.
Choosing the Right Materials for Your Bucket Hat
The first step in any crochet project is selecting the right materials. When working on a How to Crochet a Bucket Hat Tutorial CROCHE PATTERN, yarn weight and texture will make a huge difference in the final look and comfort of your hat. Cotton yarn is highly recommended because it is breathable, lightweight, and durable, making it perfect for summer wear.
Equally important is choosing the correct hook size. A crochet hook that matches your yarn ensures consistent stitches and a neat finish. Most patterns will recommend a specific size, but you can experiment depending on whether you want a tighter or looser texture. Remember that the hook size influences not only the structure but also the overall shape of your bucket hat.
Color selection is another exciting step. Whether you prefer neutral tones that go with everything or bright shades that make a bold fashion statement, color can completely transform your design. Solid colors give a sleek look, while variegated or striped yarn adds personality and uniqueness.
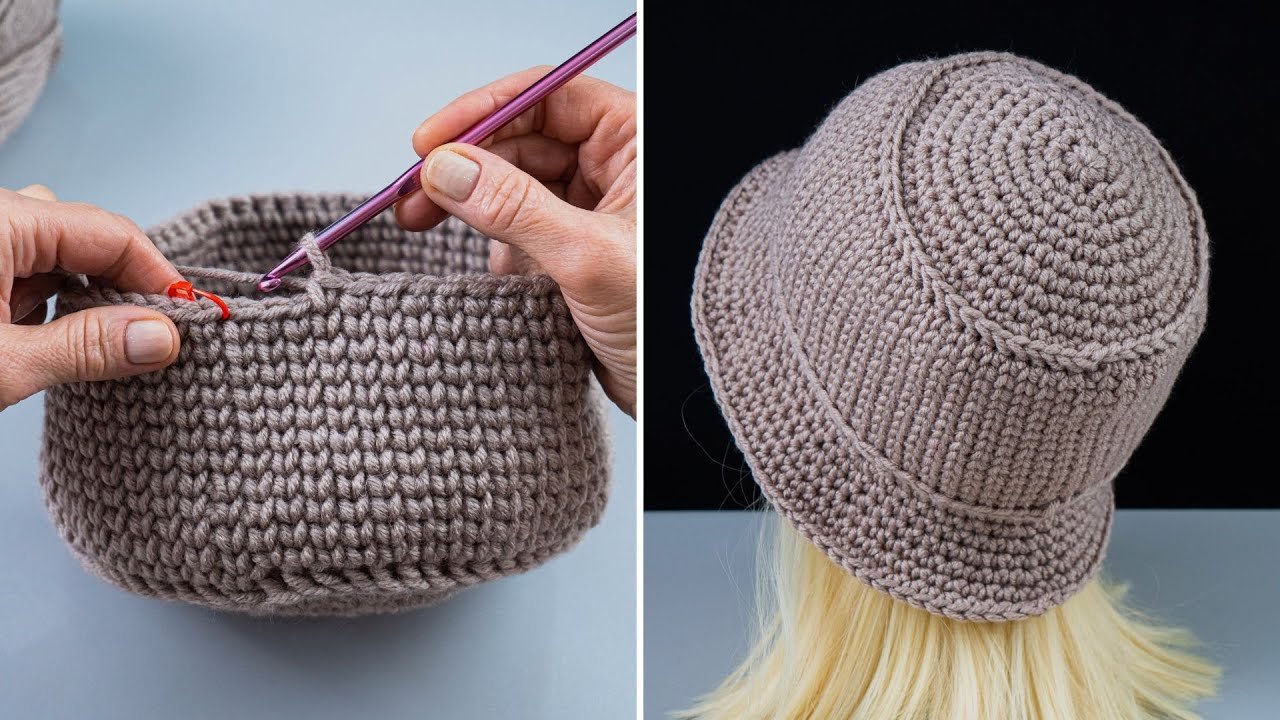
Don’t forget additional tools like stitch markers, a measuring tape, and scissors. These small accessories may seem minor, but they will help you keep track of your stitches, measure the crown diameter, and finish the project smoothly. Good preparation always saves time and frustration later.
Many crocheters also recommend using a lightweight yarn for the warmer months and a slightly thicker yarn for cooler weather. This way, you can create bucket hats suitable for every season. Having multiple versions in different yarns means you’ll always have the perfect handmade accessory ready.
Lastly, think about your personal style and comfort. Crocheting a bucket hat gives you the freedom to adapt the pattern so it fits perfectly into your wardrobe. That’s the beauty of following a CROCHE PATTERN—it provides structure while allowing creativity.
Step-by-Step Process of Crocheting a Bucket Hat
Once your materials are ready, it’s time to start the actual crocheting process. The How to Crochet a Bucket Hat Tutorial CROCHE PATTERN usually begins with creating the crown of the hat. This is achieved by working in the round, starting with a magic ring or a simple chain circle. From there, you gradually increase stitches to form a flat disk.
The increases are what determine the size and fit of your hat. By following a well-written CROCHE PATTERN, you will know exactly where to add stitches. This step is crucial, as improper increases can cause the crown to ripple or pucker, making the hat lose its neat appearance.
After the crown is complete, the next step is working on the body of the hat. This part usually involves crocheting in continuous rounds without increases, which creates the sides that give the hat its depth. Depending on your style preference, you can make this section taller for a deep fit or shorter for a snug look.
The brim is what makes a bucket hat instantly recognizable. To create the brim, you will return to adding increases. These increases allow the brim to flare out slightly, giving it that classic bucket hat shape. You can keep the brim narrow for a subtle look or make it wider for better sun protection.
Stitch choice is also important throughout the project. The single crochet stitch is commonly used because it provides a dense and structured fabric, but you can experiment with half double or double crochet stitches for a lighter texture. Mixing stitches adds creativity and makes your hat more unique.
At every stage, remember to measure your progress. This ensures the crown diameter, hat depth, and brim size all fit properly. One of the best aspects of a handmade hat is tailoring it perfectly to your own measurements.
Tips for Personalizing Your Crochet Bucket Hat
The fun part about following a How to Crochet a Bucket Hat Tutorial CROCHE PATTERN is that you don’t have to stick strictly to the basic version. Personalization is what makes crochet so enjoyable and rewarding. There are countless ways to adapt the pattern and make it reflect your personality.
One simple way is to experiment with color changes. Stripes, color blocks, or even gradient yarn can create eye-catching effects. Switching colors at different stages—like the crown, sides, or brim—adds visual interest. You can also use contrasting borders to highlight the brim or edge.
Another idea is to incorporate decorative stitches. For example, the puff stitch or shell stitch can be integrated into the hat body to add texture and charm. Small variations in stitches can completely transform the final look while still following the same CROCHE PATTERN structure.
Adding embellishments is another option. Crochet flowers, appliqués, or even a simple bow can turn a plain bucket hat into a fashion statement. Buttons and beads can also be sewn on for a touch of elegance or playfulness, depending on your style.
You can also customize the brim. A floppy brim gives a relaxed summer vibe, while a stiffer, structured brim adds sophistication. Some crocheters even add wire or use starch to give the brim extra firmness and shape.
Finally, consider adjusting the size. Using thicker yarn or a larger hook will naturally create a bigger hat, while finer yarn and a smaller hook will produce a more delicate version. This flexibility makes bucket hats a fantastic project for both adults and children.
Caring for Your Handmade Crochet Bucket Hat
Once your project is complete, proper care ensures your bucket hat lasts for years. Handmade crochet items deserve gentle treatment to preserve their shape and texture. Following care instructions is just as important as learning the How to Crochet a Bucket Hat Tutorial CROCHE PATTERN itself.
First, always check the yarn label for washing recommendations. Most cotton yarns are machine washable, but delicate yarns like blends with wool may require hand washing. Using cold or lukewarm water helps prevent stretching or shrinking.
When washing by hand, use a mild detergent and avoid harsh chemicals. Gently soak the hat and press out the water rather than wringing it. This prevents the stitches from distorting and keeps the shape intact.
Drying is equally important. Lay the bucket hat flat on a towel and reshape it while damp. Avoid hanging it, as this can stretch the fabric. Air drying is the best method to preserve the natural structure of the crochet stitches.
If your hat loses its shape, light blocking can help. Simply reshape the brim and crown while slightly damp, pinning it into place until it dries completely. This technique revives the structure without damaging the fibers.
Finally, store your hat in a cool, dry place. Avoid stacking heavy items on top of it to prevent flattening the brim. With proper care, your handmade crochet bucket hat will stay beautiful and wearable for many seasons.
FAQ about How to Crochet a Bucket Hat Tutorial CROCHE PATTERN
1. Is a crochet bucket hat beginner-friendly?
Yes, a How to Crochet a Bucket Hat Tutorial CROCHE PATTERN is a great beginner project. It mostly uses basic stitches and simple rounds, making it easy to follow while still producing a stylish result.
2. How long does it take to crochet a bucket hat?
On average, it can take 4 to 6 hours, depending on your speed, stitch choice, and experience. Beginners may take a little longer, but the process is enjoyable and rewarding.
3. What type of yarn is best for a crochet bucket hat?
Cotton yarn is the most recommended because it is lightweight, breathable, and holds its shape well. However, blends or acrylic yarn can also work, depending on the season and personal preference.
4. Can I adjust the size of my crochet bucket hat?
Yes, adjusting size is easy by changing the yarn thickness, hook size, or the number of increase rounds in the crown. This makes the hat customizable for adults, kids, or even toddlers.
5. How do I make the brim stiffer?
You can use thicker yarn, add more stitches for structure, or even reinforce the brim with wire or fabric starch. This ensures the brim stays firm and holds the desired shape.
6. Can I use decorative stitches in my bucket hat?
Absolutely! Adding puff stitches, shells, or textured patterns gives the hat a unique style while still following the base CROCHE PATTERN instructions.
Crocheting your own hat is not only creative but also practical, and this How to Crochet a Bucket Hat Tutorial CROCHE PATTERN has shown how simple and enjoyable the process can be. From choosing the right materials and following step-by-step instructions to personalizing and caring for your finished project, you now have all the tools to succeed. Whether you are making your first bucket hat or adding a new design to your collection, this tutorial empowers you to create something stylish and handmade.