
If you’ve been searching for a fun and quick handmade project, learning how to crochet a mini pumpkin keychain FREE PATTERN is the perfect choice. This adorable little accessory can be attached to your keys, bags, or even given as a charming handmade gift. The best part? You can make it in less than an hour, even if you’re a beginner in crochet.
Mini pumpkin keychains are not only cute, but they’re also an excellent way to use up leftover yarn from other projects. With just a small amount of orange and green yarn, a hook, and some stuffing, you can create a seasonal accessory that brings autumn vibes all year round. The crochet stitches used are simple, making this project enjoyable for all skill levels.
In this guide, you’ll learn how to crochet a mini pumpkin keychain FREE PATTERN step-by-step. We’ll cover everything you need to know: from choosing the right materials, to shaping the pumpkin, adding details, and attaching it to a keyring. Let’s get started!
1. Materials You’ll Need to Crochet a Mini Pumpkin Keychain
When starting any crochet project, having the right materials makes the process smoother and more enjoyable. For a mini pumpkin keychain, the list is short, so it’s budget-friendly and beginner-friendly.
First, you’ll need yarn in your desired pumpkin color—classic orange works perfectly, but you can also experiment with white, yellow, or even pastel shades for a unique touch. Make sure it’s medium-weight yarn to get a firm yet soft texture.
A crochet hook that matches your yarn weight is essential. For medium yarn, a 3.5 mm to 4 mm hook is ideal. This size helps create tighter stitches, ensuring your stuffing won’t peek through.
You’ll also need a small amount of green yarn for the stem. Cotton yarn works well because it holds its shape nicely. A yarn needle will help you sew the parts together securely.
Don’t forget fiberfill or any soft stuffing material to give your pumpkin a nice plump look. Even scrap yarn can be used for stuffing if you’re eco-conscious.
Finally, you’ll need a metal keyring and a small piece of chain or cord. This will turn your crochet pumpkin into a functional and adorable accessory.
With all materials ready, you’re set to move to the fun part—crocheting your mini pumpkin.
2. Step-by-Step: How to Crochet the Mini Pumpkin Body
The body of the pumpkin is the main feature of your crochet keychain. We’ll start with a simple pattern that even beginners can follow.
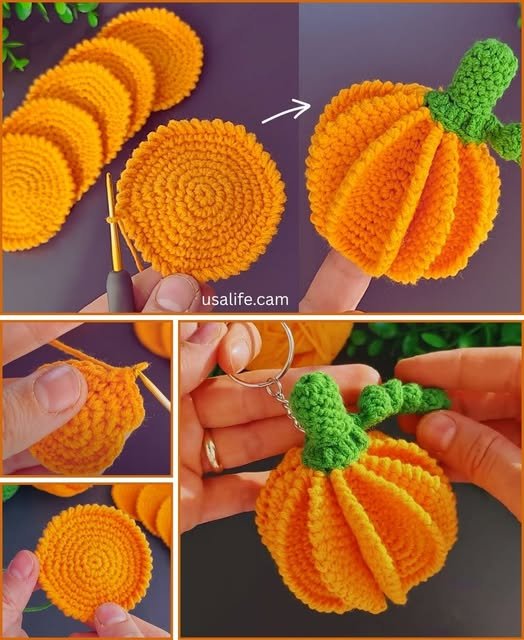
Begin with a magic ring and work a small number of single crochets into the ring. This will create a tight center for your pumpkin. Pull the yarn tail to close the ring tightly.
Next, increase the stitch count in each round to form a round shape. Using single crochet increases will give the pumpkin a smooth and compact texture. Work evenly, and remember to count your stitches to keep the shape symmetrical.
Once you reach the desired width, you’ll stop increasing and continue crocheting in the round. This forms the middle section of the pumpkin. Keep your stitches consistent so the pumpkin looks neat.
To shape the top, you’ll decrease stitches evenly until the opening becomes small. This is the perfect time to stuff the pumpkin with fiberfill before closing it completely.
After closing, you’ll use the yarn needle and the long tail to create the pumpkin ridges. Simply thread the needle through the center, pull tightly, and repeat several times to form the natural pumpkin sections.
At this stage, your pumpkin body is complete, and you’re ready to make the stem and assembly.
3. Making the Crochet Stem and Attaching to the Pumpkin
The stem adds character to your mini pumpkin, and it’s incredibly quick to make. Using green yarn, chain a few stitches depending on your preferred stem length. Then, work single crochets or slip stitches back along the chain to make it thicker.
Once you’ve finished the stem, leave a long tail for sewing. Position it on the top center of the pumpkin and use your yarn needle to secure it firmly. Make sure it’s attached tightly so it won’t loosen with use.
For added detail, you can crochet a tiny leaf using a small chain and a combination of slip stitches and single crochets. This will give your pumpkin a more realistic and decorative look.
Now it’s time to transform your pumpkin into a keychain. Using a small jump ring or chain, connect the pumpkin’s stem to a metal keyring. This will make your crochet creation functional.
If you want extra durability, you can reinforce the connection with a few stitches of strong sewing thread. This will ensure it can handle everyday use without detaching.
With this step complete, your crochet mini pumpkin keychain is ready to use or gift.
4. Creative Ideas and Uses for Crochet Mini Pumpkin Keychains
While these keychains are adorable on their own, there are endless ways to customize them and make them even more special.
One idea is to make them in different colors for seasonal collections—white pumpkins for a modern farmhouse look, pastel pumpkins for spring, or classic orange for autumn.
You can also add embroidered initials or small beads to personalize them. This makes them great gifts for friends, teachers, or party favors.
Another creative use is turning them into bag charms. Simply attach them to your backpack, purse, or tote bag to give it a handmade touch.
For home décor, you can skip the keyring and create several pumpkins to display in a small bowl or on a shelf. This brings a cozy, handmade feel to your space.
If you sell handmade items, these keychains can be a great addition to your craft fair table. They’re quick to make, affordable, and always attract attention.
Lastly, you can pair them with matching crochet accessories, such as hats or scarves, for a themed gift set.
FAQ – How to Crochet a Mini Pumpkin Keychain FREE PATTERN
Q1: How long does it take to crochet a mini pumpkin keychain?
A: For most crafters, it takes between 30 minutes to 1 hour, depending on your skill level.
Q2: Can beginners make this project?
A: Absolutely! This pattern uses basic stitches, making it perfect for beginners in crochet.
Q3: What is the best yarn for a mini pumpkin keychain?
A: Medium-weight cotton yarn works best because it holds its shape well and is durable for daily use.
Q4: Do I need to use a magic ring?
A: While you can start with chain stitches, a magic ring creates a neater, closed center for the pumpkin.
Q5: Can I wash my crochet pumpkin keychain?
A: Yes, but handwashing is recommended to maintain its shape and prevent wear on the keyring connection.
Q6: How can I make the pumpkin more realistic?
A: Adding ridges with a yarn needle and creating a leaf alongside the stem will give it a more authentic look
Learning how to crochet a mini pumpkin keychain FREE PATTERN is not only fun but also rewarding. With just a small amount of yarn and some simple stitches, you can create a charming accessory that makes people smile. From seasonal gifts to personal keyring decorations, the possibilities are endless.
I hope this guide has inspired you to pick up your hook and give this project a try. If you decide to make your own mini pumpkin keychain, I’d love to hear your honest opinion and see your creations. Share your thoughts and suggestions—I’m always excited to connect with fellow crafters.