
The Piggy Granny Square is one of the most adorable and playful designs you can incorporate into your crochet projects. Combining the charm of the classic granny square with the cuteness of a pig motif, this pattern has captured the hearts of crochet lovers around the world. Whether you’re a beginner or a seasoned crocheter, this design offers a delightful challenge and the perfect opportunity to add a touch of fun to your next handmade creation.
Rooted in tradition but refreshed with creativity, the Piggy Granny Square takes inspiration from the timeless granny square motif while adding personality through carefully stitched details like snouts, ears, and tiny piggy eyes. This combination of simplicity and character makes it a popular choice for blankets, bags, baby items, and home décor. By embracing this design, you’re not only crafting a beautiful piece but also spreading a little joy.
In this article, we’ll explore everything you need to know about crocheting a Piggy Granny Square. From choosing the right yarn and hook to step-by-step tips for shaping your pig features, we’ll walk you through the process while ensuring your project stays fun, engaging, and well within Google AdSense guidelines for clean, family-friendly content.
1. What is a Piggy Granny Square?
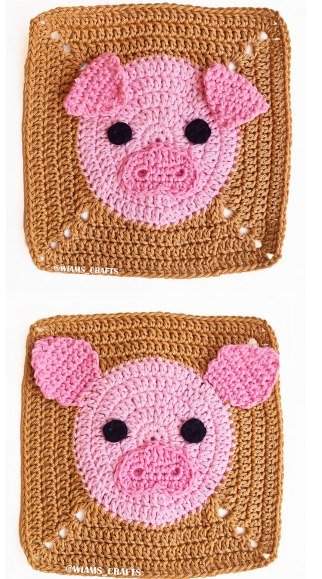
A Piggy Granny Square is a creative crochet pattern that blends the beloved granny square base with pig-themed embellishments. It’s designed to look like a cute pig face in the middle of a traditional square, adding an element of fun to your crocheted work.
These charming squares are usually created using soft, pastel yarns to replicate the gentle pink tones associated with pigs. Some variations may use bright or contrasting colors for a more cartoonish effect, giving each square a unique personality. They’re ideal for making baby blankets, children’s accessories, or even quirky adult projects like tote bags and pillows.
The crochet technique behind the Piggy Granny Square relies heavily on basic stitches such as double crochet (dc), single crochet (sc), and slip stitches. The pig’s face is typically formed separately and sewn onto the center of the granny square, although some patterns allow for seamless integration.
What makes the Piggy Granny Square so popular is its versatility. It can be used as a standalone motif or joined with others to form larger, more complex items. These squares are great stash busters, allowing crocheters to use leftover yarn in creative ways.
While it’s cute and playful in appearance, creating a Piggy Granny Square also teaches fundamental crochet skills like color changes, shaping techniques, and motif assembly. Beginners can use it as a learning tool, while advanced crocheters enjoy the opportunity to personalize their piggies with embellishments.
Overall, the Piggy Granny Square crochet pattern is more than just a decorative element—it’s a celebration of creativity and craftsmanship that adds warmth and whimsy to any handmade item.
2. Materials and Tools Needed for a Piggy Granny Square
Before you begin crafting your own Piggy Granny Square, it’s important to gather all the necessary materials and tools to ensure a smooth and enjoyable experience. Preparation is key when working with detailed patterns like this one.
The primary material you’ll need is yarn. Most crafters use worsted weight yarn for the base square and a soft pink or blush shade for the pig features. Cotton yarn is a great option due to its stitch definition and durability, especially if you’re making baby items or home décor.
Your crochet hook size will depend on the yarn you choose, but an H/8 (5.0 mm) or G/6 (4.0 mm) hook is generally suitable for worsted yarn. Check the yarn label for the recommended hook size to avoid overly tight or loose stitches.
In addition to yarn and hook, you’ll need a yarn needle for weaving in ends and attaching facial features like the pig’s snout and ears. Safety eyes or embroidery floss can be used to create the eyes, depending on your style preference.
If your pattern includes stuffing for a 3D pig snout or ears, make sure to have a small amount of fiberfill on hand. A stitch marker may also be helpful when working in the round or counting rows.
A printed or digital copy of your Piggy Granny Square crochet pattern will keep you on track. Many patterns are available for free from crochet blogs and craft websites, often with photo tutorials or video guides for additional support.
Lastly, keep scissors nearby and perhaps a small project bag to store all your tools and yarn. Staying organized can make your crochet time more enjoyable and efficient, especially for repeat projects.
3. Step-by-Step Guide to Making a Piggy Granny Square
Starting your Piggy Granny Square begins with the familiar granny square base. Begin with a magic circle or chain 4 and join into a ring. Then, work your first round using double crochet clusters, typically forming four corners.
Once you’ve created a few rounds of the basic square, it’s time to shape your piggy’s face. This is usually made separately using pink yarn. Crochet a small circle for the head, typically with single or half-double crochet stitches to create a tight, dense shape.
After forming the face, you’ll craft the pig’s snout. This often involves a smaller pink circle sewn onto the center of the face. Add two small black stitches for nostrils, or use embroidery floss or safety eyes if you want extra dimension.
Next, crochet the ears—these are generally small triangles or rounded shapes made with single crochet. You can stitch them onto the top of the pig’s head symmetrically for a balanced, cute look.
Eyes come next. Use black yarn to embroider sleepy eyes, or attach safety eyes for a cartoonish appearance. Some crafters also add tiny eyelashes or blush using yarn or fabric paint to enhance the pig’s personality.
Finally, sew the completed piggy face onto the center of your granny square. Make sure it’s centered and secure. You can now join multiple squares together to form a full-sized project or keep it as a decorative accent piece.
4. Creative Ways to Use Your Piggy Granny Square
Once you’ve mastered the Piggy Granny Square, the possibilities are endless! This adorable motif is perfect for a variety of creative and practical projects.
One of the most common uses is in baby blankets. Stitch several piggy squares together with plain granny squares to make a soft, eye-catching gift. It’s ideal for baby showers and adds a homemade touch to nursery décor.
Another great idea is to incorporate them into pillows or cushions. A front panel of piggy squares can turn a plain throw pillow into a cheerful accent piece for a child’s bedroom or playroom.
Tote bags are another fun and functional use. Combine multiple Piggy Granny Square crochet motifs to create a unique and personalized bag. Reinforce it with lining and handles for everyday use.
Wall hangings are gaining popularity among crafters. A few well-placed squares on a wooden dowel or canvas board can brighten up any corner of your home with charm and character.
You can even use them to make garments like vests or cardigans by combining them with other themed granny squares. This approach works particularly well in playful, festival-style fashion.
Finally, consider holiday and seasonal adaptations. Add a Santa hat to the piggy for Christmas or a flower crown for springtime flair. Your imagination is the limit with this delightful square.
FAQ: Piggy Granny Square Crochet
Q1: Is the Piggy Granny Square suitable for beginners?
Yes, this pattern is beginner-friendly, especially if you’re already familiar with basic stitches like single and double crochet. The pig features are simple to create and can be customized.
Q2: What yarn is best for making Piggy Granny Squares?
Worsted weight cotton yarn is recommended due to its softness and clear stitch definition. It’s also easy to work with and comes in a variety of colors.
Q3: Can I use safety eyes on baby projects?
It’s best to avoid safety eyes on items for infants under three years. Instead, use embroidered eyes to ensure safety and prevent choking hazards.
Q4: How do I attach the pig face to the granny square?
Use a yarn needle and matching yarn to securely stitch the face onto the center of the square. Make sure the edges are neatly sewn down for a polished finish.
Q5: Can I sell items made with the Piggy Granny Square pattern?
Yes, handmade items using free or paid Piggy Granny Square patterns can typically be sold, but always check the pattern’s copyright or licensing terms.
Q6: Where can I find Piggy Granny Square patterns?
Many free patterns are available on crochet blogs, Pinterest, and crafting websites. YouTube also offers excellent video tutorials for visual learners
The Piggy Granny Square brings joy, personality, and creative flair to the world of crochet. With just a few stitches and a bit of imagination, you can transform traditional squares into whimsical piggy designs that are perfect for a wide range of projects. From blankets to bags and beyond, this motif offers endless opportunities for fun and customization.
We hope this guide has inspired you to start your own Piggy Granny Square crochet journey. If you’ve already tried this pattern or are planning to, we’d love to hear your thoughts! Leave a sincere comment below and feel free to share suggestions, variations, or questions. Your feedback helps us—and the crochet community—grow together! 🧶💬