
If you’re looking for a creative and charming Rooster Amigurumi Crochet Tutorial FREE PATTERN, you’ve come to the right place. This step-by-step guide will help you craft your very own crocheted rooster, perfect for decorating your home, gifting, or simply enjoying the joy of crochet. Whether you are a seasoned crocheter or just starting out, this FREE PATTERN is designed to be clear, friendly, and fun to follow.
In this article, we’ll dive into the delightful world of amigurumi crochet and walk you through each stage of crafting a rooster – from the comb to the tail feathers. The pattern provided is not only free but also adaptable to suit different skill levels. We’ll also provide valuable tips to help you achieve the best results.
Crocheting animals like roosters is a satisfying way to express your creativity. Plus, making a Rooster Amigurumi can bring a touch of farmhouse charm to your space or even act as a fun toy for kids. Let’s get started on this Rooster Amigurumi Crochet Tutorial FREE PATTERN adventure!
1. Materials and Tools You’ll Need
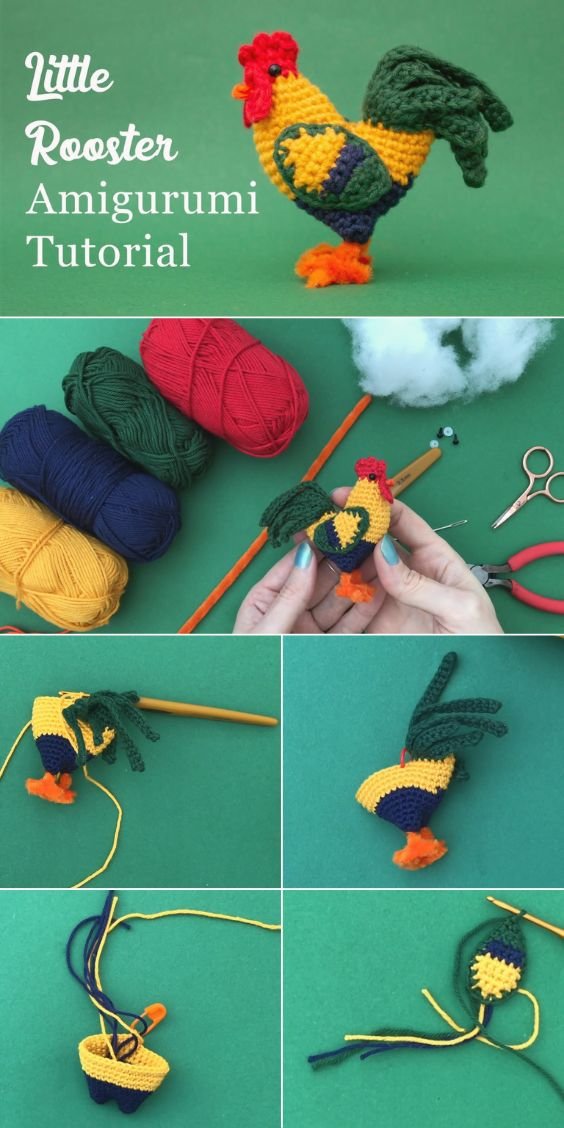
Before diving into this crochet project, it’s important to have all your supplies ready. Preparing the right tools ensures your Rooster Amigurumi will turn out just right. Here’s what you’ll need to gather:
- Use worsted weight yarn in red, white, yellow, brown, and black. These are the traditional rooster colors, but feel free to personalize.
- A 3.5 mm crochet hook is ideal for tight stitches, which is essential for amigurumi so the stuffing doesn’t peek through.
- You’ll also need fiberfill stuffing for shaping the body and making the rooster plush and soft.
- Get a yarn needle for sewing the parts together. A tapestry needle works great.
- You may want safety eyes or embroider your own for a child-safe toy version.
- Finally, keep a pair of scissors and some stitch markers nearby to help track your rounds.
These are basic supplies, most of which you may already have. Keeping them organized will make the entire Rooster Amigurumi Crochet Tutorial FREE PATTERN smoother and more enjoyable.
Working with the right yarn is key. Cotton yarns give your rooster a neat look, while acrylics offer more color variety and stretch.
Don’t skip the stitch markers. They’re extremely helpful in keeping your work aligned, especially when working in continuous rounds.
The tools you choose affect the outcome. For example, a smaller hook gives you tighter stitches, which is great for detailed amigurumi work.
With your materials ready, you’re set to begin this fun crochet project. Let’s move on to shaping your rooster’s body!
2. Crocheting the Body and Head
The body and head form the core of the Rooster Amigurumi, and in most patterns, they are crocheted as one continuous piece. This helps in maintaining a smooth and unified structure.
Start with a magic ring and build up in rounds. Increase your stitches to shape a sphere for the body, then gradually taper for the neck and head.
Use single crochet stitches throughout, increasing evenly for a rounded shape. This is typical for amigurumi and helps the stuffing stay firm.
Once the body is done, begin decreasing to form the neck and then increasing again to create the head. Keep checking for symmetry.
Stuff the body and head as you go. Don’t wait until the end, as it’s harder to reach tight spaces once stitched up.
Use safety eyes or embroider them after the head is shaped. Positioning them evenly gives your rooster a more expressive face.
When completed, the body should stand upright and have a nice rounded shape. Now you’re ready to add character with combs, beaks, and wings.
3. Adding the Comb, Beak, Wings, and Tail
These parts bring your rooster to life! Each detail adds personality and flair to your Rooster Amigurumi Crochet Tutorial FREE PATTERN creation.
The comb is typically red and sits on top of the head. Crochet small scalloped pieces and sew them securely in place.
For the beak, use yellow yarn. A simple triangle or cone shape works best and should be centered under the eyes.
The wings can be made separately and sewn onto each side. You can crochet oval-shaped wings or use layered feathers for a more dynamic look.
When making the tail, feel free to get creative. Use various colors and shapes. Curled feathers made with chain stitches and single crochets are a popular choice.
Attach all parts securely. Amigurumi toys are often handled or gifted, so strong stitching is essential to keep everything intact.
Once attached, step back and admire how your rooster begins to take form. The combination of parts gives it its iconic rooster look and charm.
4. Final Assembly and Finishing Touches
Now that all pieces are made, it’s time to bring everything together and add those final creative details that make your crochet rooster unique.
Sew each part to the body carefully. Use a yarn needle and matching yarn colors to blend stitches invisibly.
Make sure the comb and beak are symmetrical. Small adjustments during this step can significantly improve the final appearance.
Consider adding embroidered details like a wattle (under the beak) or feathers on the wings using surface crochet.
Use a lint roller or gently brush to clean off any loose fibers or fuzz from the yarn to give your project a polished look.
If you’re gifting the rooster or selling it, consider attaching a handmade tag or ribbon around the neck for extra flair.
At this stage, your Rooster Amigurumi Crochet Tutorial FREE PATTERN is complete! Take a photo, share it with fellow crocheters, and start planning your next crochet animal.
FAQ: Rooster Amigurumi Crochet Tutorial FREE PATTERN
Q1: Is this pattern suitable for beginners?
Yes! This Rooster Amigurumi Crochet Tutorial FREE PATTERN includes clear instructions and basic stitches, making it accessible for beginners.
Q2: What stitches do I need to know?
You’ll need to be familiar with single crochet (sc), increase (inc), and decrease (dec). A magic ring is also used to start most pieces.
Q3: Can I use different yarn types?
Absolutely. Just remember that yarn thickness will affect the size. Cotton yarn gives a clean look, while acrylic offers flexibility.
Q4: Is it safe for kids?
If you’re making it for children, avoid safety eyes and instead embroider the eyes to ensure there are no choking hazards.
Q5: How long does it take to complete?
On average, 4–6 hours depending on your skill level. More experienced crocheters may finish faster.
Q6: Can I sell items made from this pattern?
Yes, you can sell the finished items. Just credit the pattern if it’s derived from a shared source. Always check specific pattern licenses if using third-party sources.
In this article, you learned how to create your very own Rooster Amigurumi Crochet from start to finish. From gathering the right materials to stitching together all the colorful parts, we hope this FREE PATTERN helped you enjoy the charm of handmade crochet. This delightful rooster will surely brighten your home or make someone’s day as a gift.
If you followed this Rooster Amigurumi Crochet Tutorial FREE PATTERN, we’d love to hear from you! Share your experience, leave a sincere comment, or drop suggestions below. Your feedback inspires future patterns and helps us improve the community. Happy crocheting!
Let me know if you’d like the full pattern formatted as a downloadable PDF or want images included for each step!