
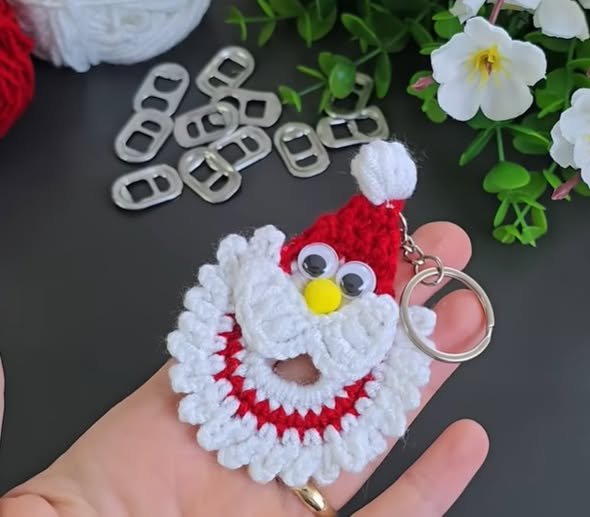
Santa Keychain Crochet Pattern is the perfect small project to bring holiday cheer wherever you go. Whether you’re a beginner looking for an easy Christmas-themed craft or an experienced crocheter searching for something festive and quick, this charming little keychain is an ideal choice. Handmade keychains make great gifts, stocking stuffers, or even market items to sell during the holiday season. With its cute red hat, fluffy beard, and tiny jolly face, this Santa Keychain Crochet Pattern captures the true spirit of Christmas in every stitch.
Crocheting miniature projects like this one is not only fun but also a great way to use leftover yarn. You can make these adorable Santa keychains using simple stitches and a few basic supplies. The project is small enough to finish in one sitting, yet the result is detailed and heartwarming. Following this pattern will help you master shaping techniques, color changes, and working in the round—all essential crochet skills that will boost your confidence. Plus, each finished piece can be customized with little embellishments like bells, buttons, or even a pom-pom on Santa’s hat.
What makes the Santa Keychain Crochet Pattern so special is its versatility. You can turn the finished Santa into an ornament, a backpack charm, or a cute accessory for your keys. The size is perfect to carry around and share the Christmas spirit wherever you go. This is also a wonderful handmade project to sell at craft fairs or to give as personalized gifts. Let’s dive into the details and learn how to create your very own crocheted Santa keychain that will make everyone smile this holiday season.
1. Materials and Tools You’ll Need
Before starting your Santa Keychain Crochet Pattern, gather all the necessary materials. Preparing your supplies in advance ensures a smoother and more enjoyable crafting experience. Here’s what you’ll typically need to complete this festive project.
First, choose your yarn wisely. Acrylic or cotton yarn in red, white, black, and beige or skin tone shades will give you the perfect Santa color palette. Make sure to use yarn that holds its shape well since this keychain will be handled frequently. Lightweight yarns like DK or sport weight are ideal to keep the keychain small and neat.
Next, you’ll need a crochet hook that matches your yarn weight. Most crafters find that a 2.5 mm to 3.5 mm hook works perfectly for small amigurumi-style pieces. A smaller hook helps create tight stitches that prevent stuffing from showing through. Always test your tension before starting the main piece.
Other essential tools include a yarn needle for sewing parts together, scissors for trimming ends, and some stuffing material such as polyester fiberfill. You’ll also need a metal keychain ring or clasp to attach your finished Santa. This adds the final functional touch to your adorable creation.
Don’t forget about safety eyes or black embroidery thread to create Santa’s facial features. Tiny buttons or felt pieces can also enhance the design. If you plan to make several keychains, consider preparing all your materials in batches—it saves time and helps you maintain consistency.
Lastly, keep your work area bright and comfortable. Since you’ll be working with small pieces, proper lighting helps prevent eye strain and allows you to enjoy the process. Now that you have everything ready, let’s move on to creating the main parts of the Santa.
2. How to Crochet the Santa Head and Hat
The heart of the Santa Keychain Crochet Pattern lies in the head and the iconic red hat. This part gives your Santa its character and charm. Even if you’re new to crochet, the steps are simple enough to follow and produce impressive results.
Start by crocheting the head using your skin tone or beige yarn. Work in continuous rounds to form a small sphere. The head usually takes about five to six rounds, depending on your preferred size. Remember to stuff it lightly before closing it up, keeping the shape firm but not too tight.
Next, switch to red yarn to create Santa’s hat. Begin at the bottom and gradually decrease stitches to shape the hat into a cone. A few rounds in red followed by a final round in white will give it the classic Christmas look. Add a tiny white pom-pom on top for that extra festive touch.
Once the head and hat are complete, sew them together carefully. Position the hat at a slight angle for a playful appearance. If you’re adding safety eyes, insert them before sewing the parts together. Embroider a small smile or nose to bring Santa’s face to life.
For the beard, use fluffy white yarn or loop stitches to create texture. A simple semi-circle or U-shape works beautifully under the face. Secure it well, and trim the yarn ends evenly to shape the beard. You can also brush it slightly to make it look softer.
Finally, double-check all connections. Every stitch should be secure since this item will be handled often. At this stage, you’ll see your Santa taking shape—a tiny, smiling face topped with a cheerful red hat, ready to spread joy.
3. Assembling the Keychain and Adding Finishing Touches
After finishing the crochet parts, it’s time to assemble the Santa Keychain Crochet Pattern. This is where the magic happens as all your crocheted elements come together into a functional accessory.
First, make sure your Santa piece is stuffed and stitched securely. Then, thread a piece of yarn or embroidery floss through the top of Santa’s hat. Use this thread to attach the metal keychain ring. You can also use a small jump ring or lobster clasp for easy attachment.
To make your Santa extra special, consider personalizing it. Add tiny details like buttons on the body, a belt buckle using gold thread, or even a small jingle bell. Little accessories like these make each keychain unique and more attractive as a gift.
If you want your keychain to be more durable, apply a small drop of fabric glue on knots and ends. This prevents unraveling and keeps everything neat. Be sure to let it dry completely before handling.
You can also experiment with different expressions for Santa. A wink, rosy cheeks (using blush or fabric paint), or a small mustache can give your creation a one-of-a-kind look. This freedom to customize makes the project both creative and personal.
Once all details are added, give your keychain a gentle press to shape it nicely. Attach it to your keys, bag, or backpack, and admire your handmade work. It’s a cheerful reminder of the holiday season every time you see it.
4. Tips for Selling or Gifting Your Santa Keychain
The Santa Keychain Crochet Pattern isn’t just for personal use—it’s also a wonderful item to sell or gift during the holiday season. With a few thoughtful touches, your handmade creations can become treasured keepsakes or successful craft fair items.
If you’re planning to sell them, focus on presentation. Packaging matters—a simple paper tag, festive ribbon, or small gift box can make a huge difference. People love buying items that look ready to gift. Add a little handwritten tag that says “Handmade with love” to make it feel more personal.
Pricing your crochet keychains fairly is important. Consider the cost of materials and the time spent making each piece. Offering discounts for sets or customizing options can attract more buyers. These are ideal for teachers, coworkers, or party favors.
When gifting them, think about the recipient’s preferences. Some may prefer a traditional Santa, while others might love modern color combinations like pink and gold or green and white. You can easily adapt the pattern to match different styles.
Promote your creations on social media by showcasing the keychains in festive settings. A photo with Christmas lights or ornaments in the background will capture attention. Sharing the story behind your handmade project can make people feel connected to your work.
Lastly, don’t underestimate the power of a small handmade gift. A crocheted Santa keychain shows thoughtfulness, creativity, and love. It’s a tiny piece of Christmas spirit that fits right in your pocket and spreads joy wherever it goes.
FAQ – Santa Keychain Crochet Pattern
1. What skill level is needed for this project?
The Santa Keychain Crochet Pattern is beginner-friendly. Basic knowledge of stitches like single crochet, increase, and decrease is all you need.
2. How long does it take to make one keychain?
On average, it takes about one to two hours to complete a Santa keychain, depending on your speed and experience.
3. Can I use leftover yarn for this pattern?
Yes! This project is perfect for using small yarn scraps. Just make sure the yarns are of similar thickness.
4. What size should the final keychain be?
Most finished Santa keychains measure between 2.5 to 3.5 inches tall, making them ideal for keys or bags.
5. Can I wash the crochet keychain?
Handwashing gently in cool water is recommended. Avoid wringing to keep the stuffing intact.
6. Is this pattern suitable for kids to try?
Absolutely! With adult supervision, kids can enjoy this project and learn basic crochet techniques.
7. How can I make the beard fluffier?
Use a small brush or a piece of Velcro to gently tease out the yarn fibers for a soft, fluffy beard.
8. Can I sell the finished items made from this pattern?
Yes, you can sell your handmade Santa keychains, but always credit the pattern source if it’s from another creator.
9. What’s the best stuffing to use?
Polyester fiberfill works best because it’s lightweight, washable, and easy to handle in small projects.
10. How can I add a scent or festive touch?
A drop of peppermint or cinnamon essential oil inside the stuffing adds a delightful holiday aroma.
Creating your own Santa Keychain Crochet Pattern is a joyful and rewarding experience. From gathering your materials to adding the final pom-pom, every step brings the magic of Christmas to life in your hands. Whether you make it for yourself, as a gift, or to sell, this small yet meaningful project spreads happiness wherever it goes.
Crocheting these adorable Santa keychains can become your new holiday tradition—an easy, creative way to share warmth and cheer. Now that you’ve learned how to make them, why not give it a try? Let your creativity shine and fill the season with handmade charm.
We’d love to hear from you! Leave your honest opinion and share your suggestions about this project. Your feedback inspires more festive ideas and helps keep the crochet spirit alive. Happy crocheting and Merry Christmas!