
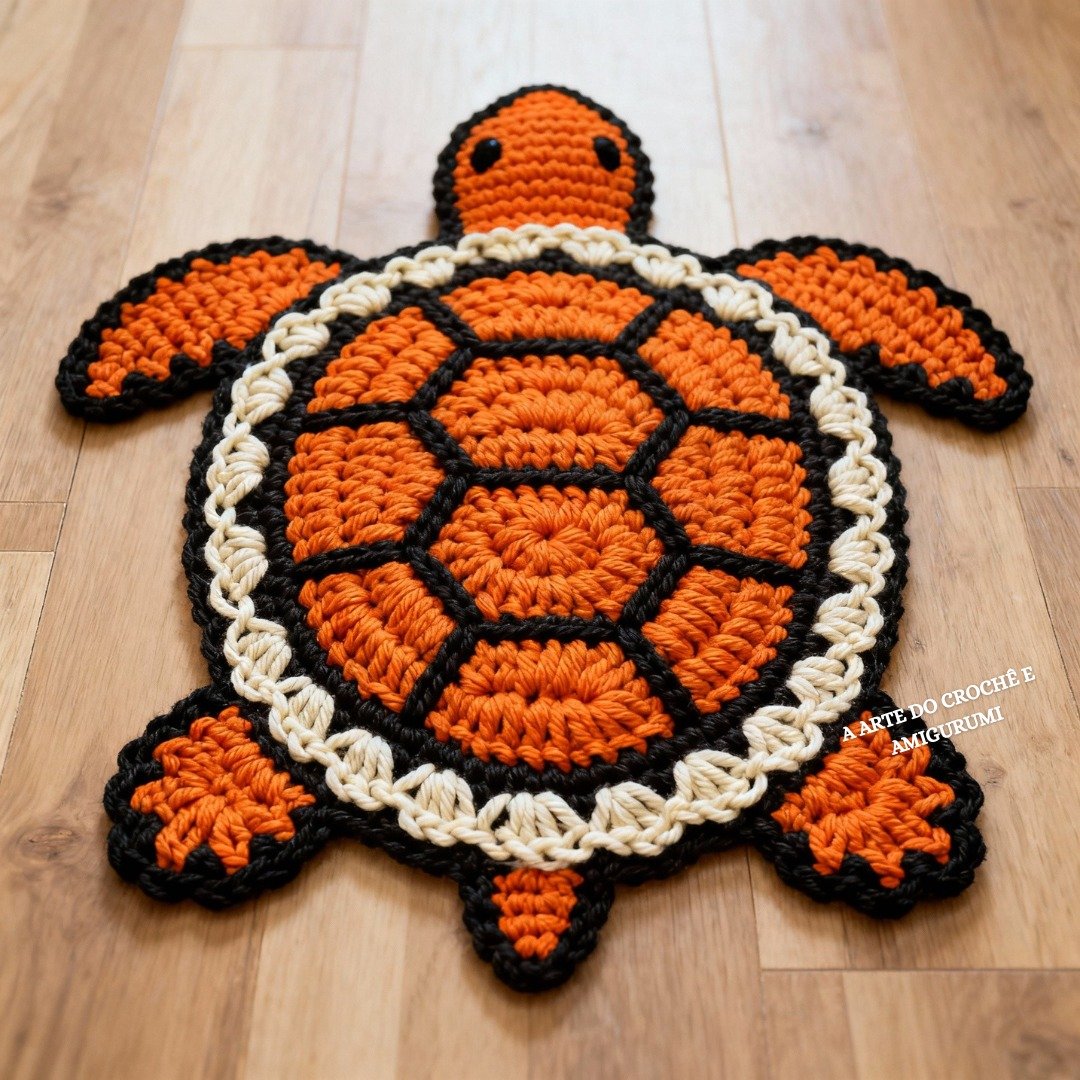
The turtle rug crochet pattern is a charming and creative way to bring the beauty of the ocean into your home décor. This project combines the art of crocheting with the delightful imagery of turtles, resulting in a cozy, unique rug that appeals to both children and adults. Whether you’re a beginner or an experienced crocheter, this pattern offers an enjoyable experience filled with texture, color, and creativity. The turtle rug crochet pattern not only adds warmth and softness to your space but also tells a story through its playful design.
Creating a turtle-shaped rug gives any room a welcoming and joyful touch. Many crafters enjoy using soft cotton yarns or bulky acrylics to make the rug both durable and comfortable underfoot. The turtle rug crochet pattern can be adapted to various color combinations—ranging from realistic ocean greens to bright, whimsical shades that pop in a nursery or playroom. It’s a wonderful handmade gift idea that showcases your crochet skills and attention to detail.
What makes this project even more special is its versatility. You can create the turtle rug in different sizes, from a small decorative mat to a large statement piece for a living area. Each part of the turtle—from its shell to its flippers—offers the opportunity to experiment with different stitches, making every rug one-of-a-kind. As you follow the turtle rug crochet pattern, you’ll find yourself immersed in a relaxing, rhythmic process that captures the serenity of seaside life.
1. Materials and Preparation for the Turtle Rug Crochet Pattern
Before you begin crafting your turtle rug crochet pattern, it’s important to gather the right materials. Choosing high-quality yarn ensures that your rug will not only look beautiful but also last a long time. Most crocheters prefer using cotton or acrylic yarn, as these fibers are durable and easy to wash. Cotton gives a natural, earthy finish, while acrylic provides bright colors and softness.
Next, you’ll need to select the proper hook size. Typically, a larger hook—such as 6.0mm or 7.0mm—is ideal for creating rugs because it allows the stitches to be looser and the fabric to lie flat. You can adjust your hook size depending on the yarn’s thickness and your desired rug texture. Always check your gauge to make sure your turtle comes out in the right proportions.
In addition to yarn and hooks, you’ll need a stitch marker, tapestry needle, and scissors. The stitch marker helps keep track of rounds when working on the turtle’s shell, while the tapestry needle will be useful for weaving in loose ends after finishing each section. Having all your materials ready ensures a smooth crocheting process.
Color selection is another exciting part of preparing your project. You can stick with traditional turtle hues—like green, brown, and beige—or go creative with pastel tones for a softer look. The turtle rug crochet pattern looks fantastic when you use gradient yarns that naturally blend colors across the shell, giving it a realistic or artistic effect.
It’s also wise to plan your workspace. Since you’ll be managing several yarn colors and parts of the turtle, organizing your materials helps prevent tangling. Keep your yarns separated, and label each color if needed. Proper organization contributes to a stress-free and enjoyable crafting experience.
Finally, read through the entire turtle rug crochet pattern before starting. This helps you understand the construction steps, special stitches, and assembly instructions. Knowing what comes next allows you to work more efficiently and avoid mistakes along the way.
2. Step-by-Step Guide to Crocheting the Turtle Rug
Now that your materials are ready, it’s time to start crocheting. The turtle rug crochet pattern usually begins with the turtle shell, which forms the center of the rug. You’ll start with a magic ring and work in the round using basic stitches like single crochet (sc), half double crochet (hdc), and double crochet (dc). Increasing gradually helps the shell lay flat and form a perfect circle.
Once the base circle is large enough, you can begin adding shell patterns or textures. Many crocheters use granny-style hexagons or spiral patterns to mimic the natural geometry of a turtle shell. Using alternating colors enhances the visual appeal, giving depth and definition to your design.
After completing the shell, you’ll move on to crocheting the head and flippers. These are usually made separately and then sewn onto the main body. The flippers should be slightly curved to mimic the turtle’s natural shape. Using slightly tighter stitches for these parts helps maintain their form.
Next, you can crochet the tail and decorative details, such as outlines or edging. Some crafters like to add a border around the entire rug using slip stitches or crab stitches for a neat, finished look. Adding a simple border helps the rug lie flat and adds durability to the edges.
Assembly is an exciting step. Carefully arrange the head, flippers, and tail around the shell and sew them securely with matching yarn. This process brings your turtle to life, transforming your work into a cozy, adorable rug.
Finally, weave in all the ends and block your rug if necessary. Blocking helps smooth out any curls or uneven stitches, making your finished turtle rug crochet pattern look professional and polished.
3. Customization Ideas and Creative Touches
The best part about the turtle rug crochet pattern is how customizable it is. You can modify the size, colors, and design details to match your style or room décor. For example, using shades of blue and turquoise can create a coastal vibe, while greens and browns evoke a more natural, woodland theme.
Adding texture is another fun option. You can incorporate puff stitches, bobble stitches, or surface slip stitches to give the turtle shell a three-dimensional look. Textured patterns make the rug feel plush and engaging, perfect for a child’s play area.
If you want your rug to be more functional, consider adding a non-slip backing. You can attach a rug pad or use non-slip fabric paint on the back to keep it securely in place. This is especially useful if you plan to use the turtle rug in a nursery or bathroom.
Personalization also makes your project extra special. Try embroidering initials, small flowers, or sea-themed motifs around the shell. These details transform your turtle rug crochet pattern into a personalized piece of art that reflects your creativity.
Some crocheters even enjoy creating sets—such as matching turtle pillows or coasters—to complement their rugs. This cohesive approach adds harmony to your space and lets your crochet skills shine in multiple ways.
Lastly, don’t forget to play with yarn textures. Combining matte and glossy yarns can give your turtle shell depth and contrast, while using chunky yarns makes it extra cozy. Every choice you make adds personality to your rug and makes it truly one-of-a-kind.
4. Care, Maintenance, and Long-Term Use THE BEST CROCHE PATTERN
After completing your turtle rug crochet pattern, proper care ensures that it stays beautiful and functional for years. The first step is understanding your yarn’s care instructions. Most cotton rugs can be machine washed gently, while acrylic yarns may need a bit more care to prevent stretching.
Always wash your rug in cold water with mild detergent, and avoid harsh chemicals or bleach. For large rugs, it’s best to hand wash and lay them flat to dry to preserve their shape. Rolling your rug in a towel before air drying can help remove excess water without damaging the stitches.
Regular maintenance includes light vacuuming or shaking out the rug to remove dust. Avoid heavy vacuum suction, as it may pull on the stitches. For added protection, rotate your rug occasionally to prevent uneven wear, especially in high-traffic areas.
If your rug starts to lose shape, blocking it again can help restore its form. Simply dampen the rug, pin it to shape on a flat surface, and let it air dry completely. This keeps your crochet work looking crisp and even.
For storage, keep your turtle rug crochet pattern in a cool, dry place. Avoid folding it tightly to prevent creases. Rolling it loosely with tissue paper between layers helps maintain the fabric’s integrity.
With proper care, your handmade turtle rug will remain a treasured piece—soft underfoot, full of character, and a beautiful reminder of your craftsmanship.
FAQ – Turtle Rug Crochet Pattern
1. What type of yarn is best for the turtle rug crochet pattern?
Cotton yarn is the best choice because it’s durable, absorbent, and easy to clean. However, acrylic yarn can also be used for a softer, more colorful finish.
2. Is this project suitable for beginners?
Yes! The turtle rug crochet pattern is beginner-friendly. It uses basic stitches, and with patience, even new crocheters can achieve a great result.
3. How long does it take to complete a turtle rug?
Depending on size and skill level, it usually takes between two to five days to complete. Larger rugs or intricate color changes may take longer.
4. Can I adjust the size of the turtle rug?
Absolutely. You can make your rug smaller by reducing rounds or larger by adding more rounds to the shell. The pattern is easily customizable.
5. How do I make the rug non-slip?
You can apply non-slip backing fabric, rubber spray, or add a rug pad underneath to prevent sliding on smooth surfaces.
6. What is the best way to clean the rug?
Hand washing with mild soap and cold water is recommended. Avoid twisting the rug and let it dry flat to maintain its shape.
The turtle rug crochet pattern is a delightful blend of creativity, craftsmanship, and comfort. It offers the perfect opportunity to express your love for marine life while enhancing your home with a handmade touch. From choosing your yarns and colors to assembling the turtle’s adorable shape, every step is filled with joy and satisfaction. With proper care, your rug will last for years, serving as a reminder of your crochet talent and attention to detail.
If you enjoyed this article, share your thoughts below! I’d love to hear your opinions, suggestions, or unique variations of the turtle rug crochet pattern you’ve made. Your feedback helps inspire other crocheters to start their next beautiful project.