
If you’re looking for a fun, colorful, and eye-catching project, a Wind Spinner Free CROCHE PATTERN might be exactly what you need. This playful crochet decoration is perfect for brightening up your porch, garden, or even your living room. It spins beautifully in the breeze, creating a mesmerizing spiral effect that makes it a favorite among crochet enthusiasts. The best part? You can customize it with your favorite colors and patterns to make it truly unique.
Crocheting a wind spinner is not just about the final product—it’s about the joy of creating something that combines movement, texture, and vibrant colors. With the Wind Spinner Free CROCHE PATTERN, you can work at your own pace and use up leftover yarn from previous projects. Whether you’re an experienced crocheter or just starting out, this project is a great way to practice stitches and experiment with color combinations while ending up with a stunning decoration.
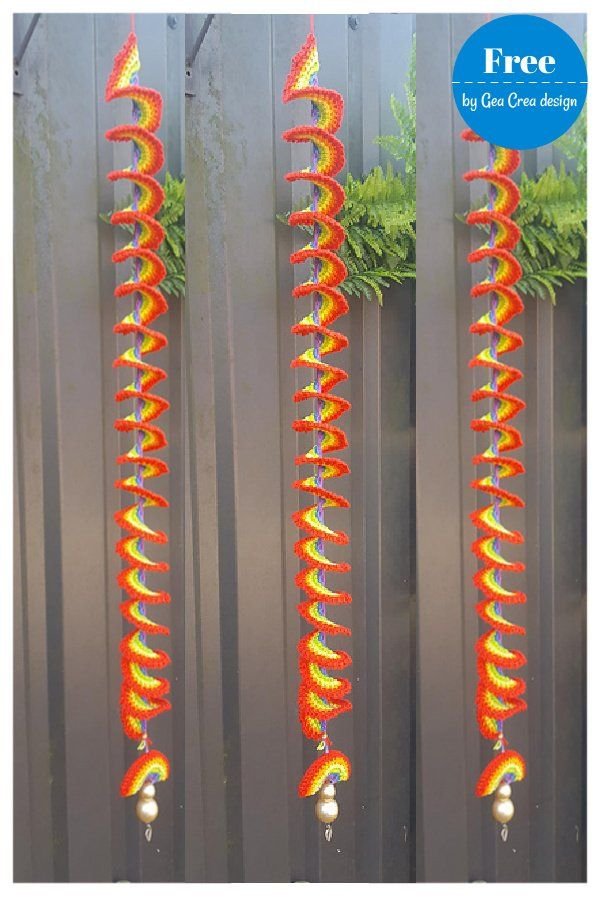
The versatility of this crochet pattern means it can fit any style. From rainbow gradients to earthy tones, you can adapt the Wind Spinner Free CROCHE PATTERN to match your home décor or personal taste. It’s also a wonderful handmade gift idea, offering a unique present that feels thoughtful and personal. Plus, its small size makes it quick to complete, yet the finished effect is impressive enough to wow anyone who sees it.
1. Materials and Tools You Will Need
To create your Wind Spinner Free CROCHE PATTERN, you will need only a handful of supplies, most of which you probably already have at home. The simplicity of the materials makes this project accessible to all crocheters.
First, you’ll need yarn in your chosen colors. Cotton yarn is often preferred for outdoor decorations because it’s durable and holds its shape well. Acrylic yarn is another option if you’re making the spinner for indoor use, as it offers a wide range of bright and vibrant colors.
You will also need the right crochet hook size, typically recommended on your yarn label. A medium-sized hook, such as 4mm or 5mm, works well for most yarns and helps create even stitches.
A pair of sharp scissors will be essential for trimming your yarn ends cleanly, and a yarn needle will help weave in those ends neatly. If you want your wind spinner to spin freely, you can attach it to a swivel hook or a small metal ring at the top.
Depending on your personal preference, you may also add beads or tassels to the bottom of the spinner for extra weight and decorative flair. This not only makes it look more polished but can also enhance the spinning effect in the breeze.
Lastly, you’ll want a measuring tape to ensure your spinner sections are even. While this step isn’t mandatory, it helps maintain a uniform shape, especially if you’re following a specific Wind Spinner Free CROCHE PATTERN measurement guide.
2. Step-by-Step Instructions for Crocheting Your Wind Spinner
The beauty of a Wind Spinner Free CROCHE PATTERN lies in its simplicity. Even if you are a beginner, you can complete this project without stress.
Begin by making a chain of the desired length. This chain will determine the overall size of your wind spinner. A longer chain will create a larger spiral, while a shorter one will make a more compact design.
Once you have your chain, work your way back with stitches that gradually increase in size. This is what creates the spiral effect. For example, you might start with single crochet stitches, then switch to half double crochet, and finally to double crochet as you move along the chain.
Changing colors as you work can make your wind spinner more visually striking. You can switch yarn colors every few rows or create a gradient effect by blending shades.
When your spiral is complete, fasten off and weave in the yarn ends securely. If you plan to hang it outdoors, make sure the ends are tightly secured to prevent fraying in the wind.
Attach your finished spiral to a swivel hook, string, or a sturdy ring. This will allow it to spin freely when the wind blows.
Finally, hang your wind spinner in your desired location and watch it come to life in the breeze. The movement, combined with your color choices, will make it a true conversation piece.
3. Creative Variations and Color Ideas
One of the best aspects of a Wind Spinner Free CROCHE PATTERN is the freedom to personalize it. You can adapt it to fit different themes, seasons, or even holidays.
For a summer look, consider using bright colors like yellow, orange, turquoise, and pink. These will stand out beautifully against green garden backgrounds.
If you prefer a more natural or rustic style, choose earthy tones such as beige, brown, olive green, and cream. These work well for blending your spinner into natural surroundings while still adding a touch of texture.
Holiday-themed wind spinners are also a great idea. Red, white, and green make for a perfect Christmas decoration, while orange, purple, and black can give you a fun Halloween vibe.
You can also experiment with different yarn textures. Combining smooth cotton with fluffy or metallic yarn can add depth and interest to your design.
Some crocheters like to add extra embellishments, such as beads, bells, or small crochet flowers. These additions not only make the piece more decorative but also give it a gentle sound or sparkle when it moves.
Don’t be afraid to mix and match colors or even create multiple wind spinners of different sizes and hang them together for a more dynamic display.
4. Care and Maintenance Tips
A handmade Wind Spinner Free CROCHE PATTERN will last longer if you take care of it properly. While crochet is durable, exposure to the elements can cause wear over time.
If you hang your wind spinner outdoors, consider bringing it inside during heavy rain or storms. Prolonged exposure to moisture can cause certain yarns to fade or lose shape.
You can gently hand wash your spinner if it gets dirty. Use cool water and mild soap, then reshape it while damp and let it air dry completely before hanging it again.
If your spinner starts to lose its twist over time, you can re-block it to restore its spiral shape. This involves dampening it slightly and pinning it in place until it dries.
For spinners with beads or metal parts, check periodically to make sure nothing has come loose. A quick inspection every month or so will help keep it in top condition.
If fading is a concern, choose UV-resistant yarns or hang the spinner in a shaded area. This will help preserve the vibrancy of your colors for a longer period.
By following these care tips, your Wind Spinner Free CROCHE PATTERN creation can stay beautiful and functional for years to come.
FAQ – Wind Spinner Free CROCHE PATTERN
Q: Is this project suitable for beginners?
A: Yes! The Wind Spinner Free CROCHE PATTERN is beginner-friendly and requires only basic stitches, making it perfect for those new to crochet.
Q: How long does it take to complete a wind spinner?
A: Depending on your skill level and the size you choose, it can take anywhere from 2 to 5 hours.
Q: Can I use any type of yarn?
A: You can, but cotton yarn is often preferred for outdoor use because it holds its shape better and withstands weather conditions.
Q: How do I make my wind spinner spin more easily?
A: Attaching it to a swivel hook or ring at the top will help it rotate freely in the breeze.
Q: Can I make it without changing colors?
A: Absolutely! A single-color wind spinner can look elegant and minimalist while still offering a captivating spiral movement.
Q: Is it safe to hang it outdoors year-round?
A: While it can be hung outdoors, it’s best to bring it inside during extreme weather to prolong its life.
PATTERN HERE
Making a Wind Spinner Free CROCHE PATTERN is a joyful, creative experience that results in a beautiful decoration for your home or garden. From choosing your colors to watching it twirl in the wind, every step offers satisfaction and room for personal expression. With the right materials, a bit of patience, and the tips shared here, you can create a piece that brings movement, color, and charm wherever you place it.
I’d love to hear what you think about this project! Share your honest opinion and any suggestions you might have—your feedback helps inspire even more creative ideas for crochet lovers everywhere.
If you’d like, I can also prepare an SEO meta description and keyword list for this article so it’s fully optimized for Google search. Would you like me to do that next?