
The beauty of a Butterfly Quilt free quilt pattern lies in its graceful design that captures the delicate charm of butterflies fluttering in a garden of colors. This project is ideal for both beginners and experienced quilters who want to bring nature-inspired elegance into their creations. With its playful patterns, vibrant fabrics, and gentle curves, this quilt design brings a refreshing sense of calm and creativity to any home decor. Whether you are crafting a baby quilt, a wall hanging, or a full-size bedspread, this pattern offers endless opportunities for personalization.
Creating a Butterfly Quilt is not just about sewing fabrics together—it’s about expressing emotion through colors and shapes. Every butterfly wing can be made unique by using different prints, tones, and stitching techniques, making your finished piece a reflection of your personality. The soft blend of patchwork pieces and the delicate wings create a visual story that feels alive and dynamic. It’s a truly rewarding experience for anyone who enjoys quilting and wants to experiment with artistic expression.
With a free quilt pattern, you can easily follow along step-by-step to craft your own masterpiece without feeling overwhelmed. This project is accessible, budget-friendly, and offers a fulfilling result that you’ll cherish for years to come. Using fabrics from your stash, you can design each butterfly in your quilt with unique color combinations—bringing your imagination to life stitch by stitch. Let’s explore how to make the most of this delightful pattern, along with some creative ideas to help you design your perfect Butterfly Quilt.
1. Choosing Fabrics for Your Butterfly Quilt
The success of your Butterfly Quilt free quilt pattern begins with selecting the right fabrics. The colors and prints you choose will define the overall feel of your project. Go for bright, cheerful tones if you want a lively design, or stick to soft pastels for a more delicate look. Mixing floral and geometric patterns can add visual interest while maintaining a cohesive style.
When choosing fabrics, remember that butterflies are known for their variety of colors, so don’t be afraid to play with contrasts. Try using scraps from previous quilting projects to give your quilt a personal and eco-friendly touch. Combining prints from different collections can make your quilt unique and full of personality.
High-quality cotton fabrics work best for quilts because they are easy to sew and durable. Make sure to prewash your fabrics before cutting to avoid shrinkage later. Ironing them flat will also make your cutting more precise, ensuring your quilt blocks align perfectly.
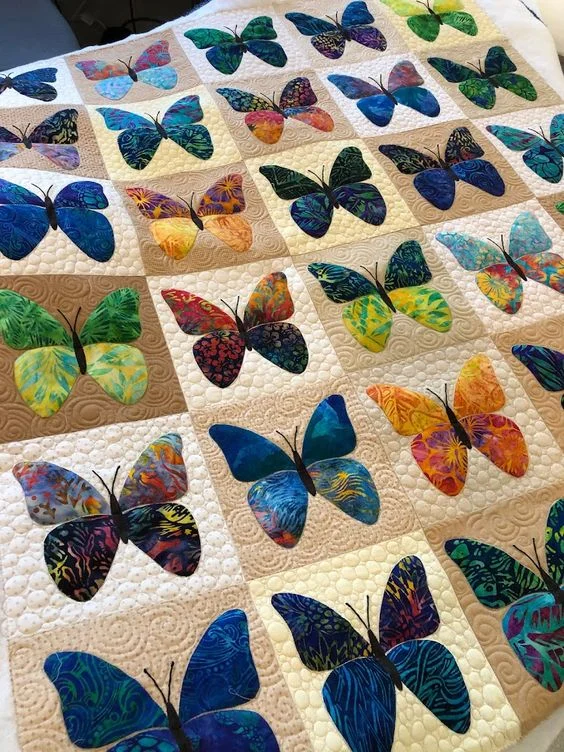
Consider using fabrics with gradients or ombré effects for the butterfly wings. This subtle change in color will give your butterflies a more realistic appearance and make the quilt look more dynamic. Soft background fabrics like cream, white, or sky blue can help your butterflies stand out beautifully.
Don’t forget to think about the backing and binding. A soft, coordinating fabric on the back will make your quilt cozy and comfortable, while a bright binding adds a professional finish. You can even use leftover butterfly fabrics for a matching border.
Lastly, remember that fabric selection is part of the fun! Take your time to enjoy the process and imagine how your butterflies will look as they come together in your quilt. Every color choice contributes to the charm of your finished piece.
2. Cutting and Piecing the Butterfly Quilt Blocks
The key to a stunning Butterfly Quilt free quilt pattern is accurate cutting and careful piecing. Begin by following the measurements from your chosen pattern. Using a rotary cutter, ruler, and cutting mat will help you make precise cuts. Each butterfly block usually consists of several small pieces that form the wings, body, and background.
It’s best to cut all the pieces for one butterfly at a time to keep things organized. Label your pieces if necessary to avoid confusion during assembly. Once everything is cut, lay out your fabrics before sewing to ensure that your color combinations work well together.
Start sewing the smaller pieces first, such as the wings, then move on to the butterfly body. Use a quarter-inch seam allowance to maintain consistency across all blocks. Press your seams flat after each step to help the pieces fit together neatly.
When joining the butterfly blocks to the background fabric, take extra care to align the edges accurately. This will make your finished quilt look professional and tidy. Pin or clip the pieces before sewing to prevent shifting during stitching.
After completing all your butterfly blocks, arrange them on a large surface or design wall. Experiment with different layouts until you find one that feels balanced and visually appealing. The placement of colors and shapes can make a big difference in the overall look of your quilt.
Once you’re happy with the layout, sew the blocks together in rows, then join the rows to complete your quilt top. Press the seams one final time to prepare for the quilting stage.
3. Quilting and Assembling Your Butterfly Masterpiece
Now that your quilt top is ready, it’s time to bring your Butterfly Quilt to life through quilting. This step adds texture and stability, making your project both beautiful and durable. Start by layering the quilt top, batting, and backing fabric. Use quilting pins or basting spray to hold the layers in place.
Choose a quilting design that enhances your butterfly pattern. Simple straight-line quilting works well for a modern look, while free-motion quilting can add intricate detail. You might even consider stitching around the butterfly wings to make them pop off the fabric.
When quilting, work from the center outward to prevent wrinkles and bunching. Take your time and move slowly to maintain control over your stitches. Whether you’re hand quilting or using a sewing machine, patience is key to achieving smooth, even results.
Once the quilting is complete, trim any excess batting and backing fabric from the edges. Then, it’s time to attach the binding. Choose a color that complements your quilt’s overall design. You can sew the binding by machine for durability or hand-stitch it for a more traditional finish.
If you want to add a personal touch, consider sewing a fabric label on the back of your quilt with your name and the date it was finished. This small detail turns your quilt into a keepsake that can be passed down through generations.
Finally, give your quilt a gentle wash and let it air dry to achieve that soft, crinkled texture quilters love. Once it’s clean and dry, your Butterfly Quilt free quilt pattern masterpiece is ready to be admired or gifted!
4. Creative Variations and Display Ideas
One of the best things about the Butterfly Quilt free quilt pattern is its versatility. You can adapt it to suit different occasions, color themes, and quilt sizes. For instance, use pastel fabrics for a baby quilt or bold, vivid tones for a spring-inspired wall hanging. The pattern’s flexibility makes it perfect for creative expression.
If you enjoy mixing techniques, try incorporating appliqué or embroidery to highlight the butterfly wings. Adding small embellishments like beads or sequins can give your quilt a unique sparkle. Just remember to keep these decorations minimal if the quilt will be used frequently.
Another fun variation is to create a garden-themed quilt by mixing butterfly blocks with flower or leaf blocks. This combination adds depth and storytelling to your design, turning your quilt into a visual journey through nature.
You can also experiment with background fabrics. A gradient or pieced background can create the illusion of butterflies in motion, adding a dynamic effect. Using a dark background can make bright butterflies stand out dramatically.
When your quilt is finished, think about how to display it. Hang it on a wall, drape it over a couch, or use it as a bedspread. Handmade quilts make wonderful gifts, especially for special occasions like birthdays, weddings, or anniversaries.
Remember, quilting is about creativity and joy. There are no strict rules—only possibilities waiting to be explored. Every Butterfly Quilt you make will tell its own beautiful story through color and design.
FAQ – Butterfly Quilt Free Quilt Pattern
1. What size should I make my Butterfly Quilt?
That depends on your goal. A baby quilt might measure around 36” x 48”, while a full-size bed quilt could range from 80” x 90”. You can easily adjust the number of butterfly blocks to fit your desired size.
2. Can beginners make a Butterfly Quilt?
Absolutely! The Butterfly Quilt free quilt pattern is beginner-friendly, especially when you follow simple templates. Start with a small project, and as your confidence grows, you can try more complex variations.
3. What kind of fabric works best for butterfly quilts?
High-quality cotton fabric is ideal because it’s durable, easy to sew, and available in endless prints. Batik fabrics also work beautifully for butterfly wings due to their vibrant, organic patterns.
4. How can I make my butterflies look more realistic?
Play with fabric gradients, shading, and contrasting colors for the wings. You can even add embroidered details to create veins or textures that resemble real butterfly wings.
5. Do I need a special sewing machine for quilting?
No special machine is required, but a walking foot or free-motion quilting foot can make quilting smoother. These tools help guide layers evenly for professional-looking stitches.
6. How should I care for my Butterfly Quilt?
Wash your quilt gently with mild detergent and cold water. Air-drying is best to preserve colors and fabric quality. Avoid bleach or strong chemicals that can damage your handmade work.
PATTERN HERE
Creating a Butterfly Quilt free quilt pattern is a rewarding and artistic journey that blends creativity with craftsmanship. From choosing your fabrics to adding the final stitches, every step reflects your personal touch. This project invites you to explore color, texture, and imagination while producing something timeless and meaningful.
If you love quilting, the Butterfly Quilt is a perfect addition to your collection—vibrant, delicate, and endlessly customizable. It’s a wonderful reminder that beauty can be found in the smallest details of your handiwork.
We’d love to hear from you! Share your thoughts, opinions, and suggestions about this article. Have you tried making a butterfly quilt before? Tell us about your experience and inspire others to start their own quilting journey.