
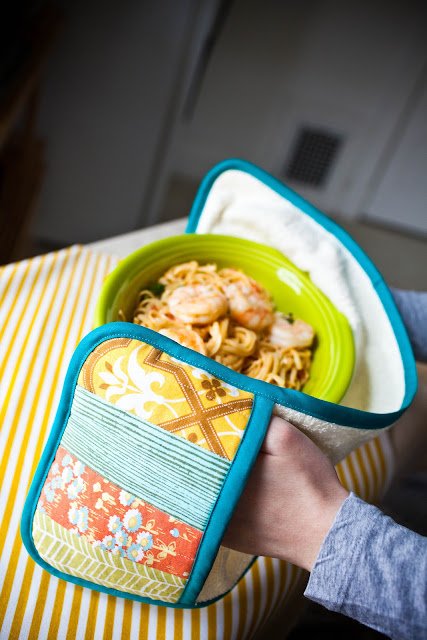
Looking to elevate your quilting game with a practical and creative project? This Double Potholder Tutorial QUILT will guide you through the process of making a beautiful and functional double potholder that protects your hands and adds charm to your kitchen. Whether you’re a seasoned quilter or a beginner eager to learn, this tutorial provides a detailed, beginner-friendly approach to crafting a stunning quilted kitchen accessory.
In this guide, we’ll explore how to make a double potholder using classic quilting techniques while ensuring that the project stays fun, practical, and beginner-friendly. Using a double potholder tutorial QUILT approach not only sharpens your piecing and binding skills but also allows you to create something useful for daily life or gift-giving. You’ll learn how to choose the right fabrics, sew layers together effectively, and finish the project with clean edges.
A double potholder tutorial QUILT is a perfect way to use your favorite fabric scraps, experiment with color combinations, and practice your quilt block skills on a smaller scale. This tutorial emphasizes functionality and safety, while also being a delightful outlet for creativity. Whether you’re sewing for yourself or making a heartfelt handmade gift, this guide has all the steps and tips to help you succeed.
1. Choosing Materials and Tools
To start your double potholder tutorial QUILT, the right materials are essential. Choose 100% cotton fabric because it’s heat-resistant and easy to quilt. For the top layer, pick two or three complementary prints that suit your kitchen décor or personal style. Backing fabric can be a solid color or another print that contrasts nicely.
You’ll also need Insul-Bright, a special batting that helps insulate heat, making your potholder safe for oven use. Layering it between two cotton battings gives you extra protection. Remember, using regular polyester batting alone isn’t ideal due to its lower heat resistance.
Essential tools include a rotary cutter, quilting ruler, cutting mat, pins or clips, and a sewing machine with a walking foot (if available). These tools will help you achieve straight cuts, precise seams, and an even stitch while quilting layers together.
Color coordination matters, especially in quilting. Choose fabrics that contrast well for the pockets and center panel so your finished double potholder quilt has visual interest. Consider warm tones for a rustic kitchen or bright tones for a playful look.
For the binding, you can use store-bought bias tape or make your own. Homemade binding adds a personalized touch, especially if you use matching or contrasting fabric from the potholder body. Binding not only adds strength but gives your project a polished finish.
Having everything ready before you start sewing makes the process smoother and more enjoyable. Lay out your materials, pre-cut your pieces, and label them if necessary. This will help you stay organized and reduce mistakes while assembling your quilted potholder.
2. Cutting and Preparing the Pieces
Your double potholder tutorial QUILT begins with cutting all the necessary fabric pieces. For the body, cut a rectangle measuring 8” x 18” from your chosen fabric, cotton batting, and Insul-Bright. You’ll also need two pocket pieces each measuring 8” x 8” and matching pieces of batting and Insul-Bright.
Stack each layer in the following order: top fabric (right side up), batting, Insul-Bright, and backing fabric (right side down). Pin or clip the layers together securely to prepare for quilting. Repeat this for both the main body and each pocket piece.
Mark your quilting lines using a water-soluble pen or chalk. Diagonal lines spaced 1” to 2” apart work well for potholders and give a classic quilted texture. This step helps guide your stitches and ensures a professional finish.
Quilt each layered piece by stitching along your marked lines. Use a walking foot if available to prevent fabric shifting. This step is essential for durability and prevents your potholder from becoming lumpy after washing or repeated use.
Once quilting is complete, trim all edges neatly to ensure all layers are even. This step prepares your pieces for binding and final assembly. Clean edges are critical for a smooth and even finish when sewing pieces together.
If you’d like, you can also add a hanging loop at this stage. Cut a small strip of fabric (about 2” x 6”), fold and stitch it into a loop, and baste it onto one end of the body piece. This makes it easy to hang your double potholder on a hook in your kitchen.
3. Step-by-Step Double Potholder Tutorial Instructions
With all pieces quilted and trimmed, the next step in this double potholder tutorial QUILT is assembling the body and pockets. Place the pockets on each end of the long body piece, aligning the bottom edges. The pockets should be quilted side up, facing you.
Pin the pockets in place and baste along the side edges to keep them secure. Make sure the batting sides are facing in and the backing fabrics are outside. This layout will ensure proper insulation and a balanced look when folded.
Next, attach the binding. Start on one of the long sides, folding the binding over the raw edge, and sew it in place using a straight stitch. Corners should be mitered neatly for a clean, professional finish. Work slowly and carefully to catch both front and back sides of the binding.
Sew binding around the entire potholder, including pockets and the main body. Fold the corners carefully as you go. Some prefer to bind the pockets separately before attaching, but sewing it all at once reduces bulk and ensures uniformity.
Once binding is complete, fold the potholder in half, aligning pockets on top of each other. Stitch down the center if you prefer a fixed fold. Otherwise, leave it flexible for easier storage and versatile use in the kitchen.
Your assembled double potholder quilt is now complete! Double-check the seams, trim any loose threads, and give it a light press with an iron for that final touch. The result is both practical and attractive—a handmade kitchen tool you’ll be proud to use or gift.
4. Tips for Customization and Usage
One of the best parts of the double potholder tutorial QUILT is the endless customization possibilities. Use holiday-themed fabric for a festive kitchen accent or match your color palette to your existing home décor. Personalization adds value, especially if you’re making gifts.
Add a label or initials to make your potholder unique. This can be done with embroidery or a printed tag. It’s a great way to brand your creations if you sell handmade goods or just want to leave your personal mark.
If you’re teaching quilting or sewing classes, this project is a great teaching tool. It’s small enough to complete in one session and involves all key techniques: cutting, quilting, binding, and finishing. Students can learn while creating something they’ll actually use.
These potholders are ideal for holiday markets or craft fairs. Bundle them in sets of two or three with a matching tea towel or apron. Handmade kitchen sets are always popular and practical.
Use leftover fabric scraps from larger quilt projects to make your potholder. This is a sustainable approach that reduces waste while keeping your fabric stash fresh and exciting.
Lastly, don’t be afraid to experiment. Try different quilting patterns, add extra padding for more heat resistance, or attach buttons and loops for multifunctional use. The more you play, the better your quilting skills will become over time.
Frequently Asked Questions (FAQ)
What is a double potholder?
A double potholder is a long, quilted piece with two pockets on either end, designed to protect both hands when handling hot pans or dishes. It often includes a layer of heat-resistant batting for added protection.
Can I wash a quilted potholder?
Yes, double potholder quilts are machine washable. Use cold water and a gentle cycle. Lay flat or hang to dry to preserve the fabric and quilting stitches.
What type of fabric is best for potholders?
Always use 100% cotton fabric and batting. Avoid synthetic materials, as they can melt under heat. Insul-Bright batting is ideal for adding insulation.
Is this project suitable for beginners?
Absolutely! This double potholder tutorial QUILT is beginner-friendly and a great way to learn quilting techniques on a small, manageable scale.
How can I add more insulation to the potholder?
Double up on the batting and add Insul-Bright between layers. Just be sure your sewing machine can handle the thickness.
Can I sell the potholders I make?
Yes, handmade double potholder quilts are perfect for selling at craft fairs or online. Be sure to photograph them well and mention the materials used in your product descriptions.
PATTERN HERE
This double potholder tutorial QUILT has shown how you can create a functional and stylish kitchen accessory using simple quilting techniques. From choosing the right fabric to cutting, assembling, and binding, you’ve learned each step in detail with tips for success.
We hope this guide has inspired you to try your own quilted double potholder. Whether you’re sewing for yourself, for gifts, or to sell at markets, this project is practical and enjoyable. Let us know your thoughts—leave a sincere opinion and feel free to share your suggestions for future tutorials!