
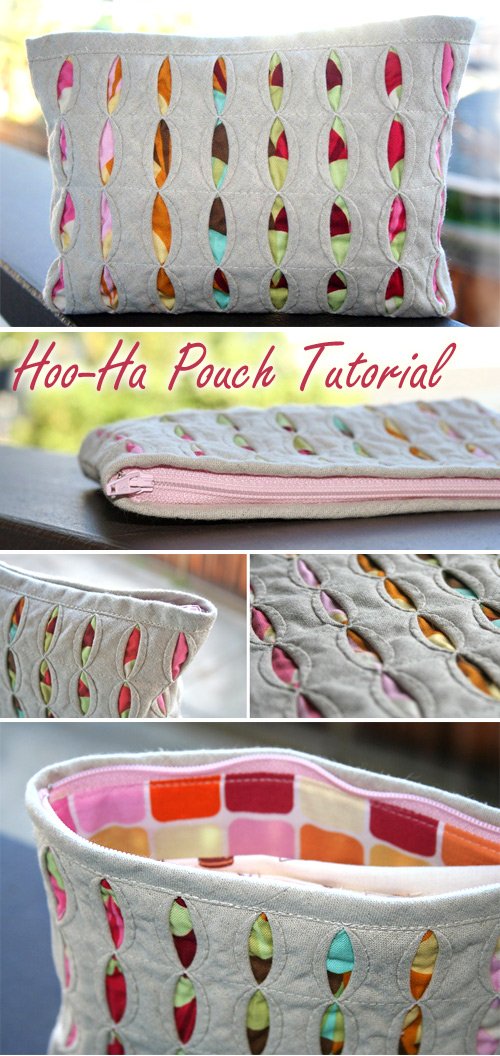
The Hoo-Ha Bag Tutorial Quilt Pattern is one of those creative projects that combines functionality, beauty, and the joy of quilting into a single item. For those who love sewing and experimenting with unique quilting ideas, this bag pattern is an exciting way to explore different fabrics and techniques. Not only does it allow you to express your creativity, but it also gives you a finished piece that is stylish, practical, and made entirely by hand.
Creating a quilted bag like the Hoo-Ha Bag Tutorial Quilt Pattern is a rewarding experience for beginners and advanced quilters alike. Beginners can learn essential quilting and bag-making skills, while advanced crafters will enjoy the chance to refine their techniques and play with fabric combinations. A quilted bag has the charm of something handmade while also offering durability and comfort for everyday use. This makes the process and the final product equally fulfilling.
If you have ever wanted to dive deeper into the world of quilting beyond blankets and wall hangings, this project is perfect. The Hoo-Ha Bag Tutorial Quilt Pattern encourages crafters to take their patchwork knowledge and apply it to something wearable and practical. From fabric choices to cutting, piecing, and sewing, every step of this tutorial can teach you something new while also sparking fresh design ideas.
Choosing the Right Fabrics for Your Hoo-Ha Bag
When starting your Hoo-Ha Bag Tutorial Quilt Pattern, fabric selection is the first and one of the most important steps. The fabrics you choose will determine the overall look, style, and durability of your finished bag. A mix of vibrant colors and neutral tones often creates a beautiful balance, while themed fabrics can make your project more personalized.
Cotton fabrics are the most popular choice for quilting, and they work wonderfully for this bag pattern. They are easy to cut, press, and sew, which makes the process smoother for quilters at all levels. Adding a lining fabric is also essential, as it helps your bag hold its shape and protects the seams from wear over time.
Don’t be afraid to experiment with fabric scraps from previous projects. The Hoo-Ha Bag Tutorial Quilt Pattern is a great opportunity to use up smaller pieces, creating a patchwork effect that adds character and uniqueness. Scrap quilting can result in a colorful and artistic design that reflects your personal style.
Consider texture when selecting fabrics. While quilting cotton is classic, you can mix in denim, canvas, or linen for added strength and visual interest. Combining textures will not only make your bag sturdier but also give it a modern and stylish appearance.
Stabilizers and interfacing are additional fabric elements worth considering. These materials will add structure and durability to your quilted bag, ensuring it can carry weight without losing its shape. Choosing the right type of stabilizer is just as important as the fabric itself.
Finally, keep in mind your everyday use for the bag. If you want it to be casual, light cottons may be best. If you prefer a more formal or heavy-duty version, sturdier fabrics like canvas can elevate the project. With the right fabric selection, your Hoo-Ha Bag Tutorial Quilt Pattern will be both beautiful and practical.
Cutting and Piecing the Quilt Pattern
The cutting and piecing stage of the Hoo-Ha Bag Tutorial Quilt Pattern is where the creative vision begins to take shape. Accurate cutting ensures that all pieces fit together seamlessly, resulting in a professional finish. Using a rotary cutter, self-healing mat, and quilting ruler is highly recommended.
Start by carefully measuring your fabric pieces according to the pattern instructions. Precision is key, as even small mistakes in measurement can affect the alignment of your quilt blocks. Always double-check your measurements before making cuts.
Once your fabric pieces are ready, begin the piecing process. This is where you sew the fabric blocks together to create the outer panels of the bag. Depending on the pattern design, this may involve patchwork squares, strips, or more intricate quilt block styles.
Pressing seams is an important part of piecing. Use an iron to press each seam flat as you sew, which helps create smooth, sharp lines in your quilting. Pressing also prevents bulk at the seams, making the construction of your bag much easier.
For those who want to add extra flair, piecing can include creative techniques such as half-square triangles, log cabins, or appliqué designs. The Hoo-Ha Bag Tutorial Quilt Pattern leaves plenty of room for creativity, allowing you to adapt it to your quilting style.
After piecing is complete, you will have the front and back panels of your bag ready for assembly. This is a major milestone in the project, as you can finally begin to see your quilted bag taking shape.
Assembling and Quilting the Hoo-Ha Bag
The assembly stage of the Hoo-Ha Bag Tutorial Quilt Pattern brings all your hard work together. At this point, you will combine the quilted panels, add lining, and create the overall structure of the bag. Careful attention during this step ensures a strong and durable final product.
Begin by layering the quilt top, batting, and backing fabric for each panel. This is the quilting sandwich that gives your bag its characteristic texture and padded feel. Secure the layers with quilting pins or basting spray before sewing.
Quilting can be done in many styles, from simple straight-line stitching to free-motion quilting designs. Choose a quilting method that complements your fabric choices and fits the overall look of your bag. Quilting not only enhances beauty but also strengthens the structure of the panels.
Once the quilting is finished, trim the edges and prepare to add the lining. The lining gives your bag a clean interior and prevents seams from fraying. It is also a great opportunity to add a pop of color or pattern inside your bag.
Sew the quilted panels together, carefully matching seams to create a polished look. Adding pockets to the lining is optional but highly recommended for extra functionality. A quilted bag with inside compartments is both stylish and practical.
Finally, add straps or handles to your bag. These can be quilted from matching fabric, made of webbing for durability, or crafted from leather for a more polished finish. At this stage, your Hoo-Ha Bag Tutorial Quilt Pattern transforms into a fully functional accessory.
Creative Variations and Personal Touches
One of the joys of working with the Hoo-Ha Bag Tutorial Quilt Pattern is the ability to personalize the design. This bag pattern is flexible, allowing you to experiment with colors, shapes, and finishing details to create something unique.
Adding embellishments is one way to make your bag stand out. Decorative buttons, embroidery, or appliqué patches can bring personality and style to your quilted bag. These small details make the final project feel truly one of a kind.
You can also adjust the size of the bag depending on your needs. By enlarging or reducing the pattern, you can create anything from a compact everyday handbag to a roomy tote bag. The versatility of this pattern makes it appealing for all types of projects.
Consider experimenting with quilt block designs. Instead of sticking with a simple patchwork, try using more complex blocks like stars, hexagons, or flying geese. This will elevate your Hoo-Ha Bag Tutorial Quilt Pattern into something truly artistic.
Handles and closures are another area where creativity can shine. From magnetic snaps to zippers or button loops, the finishing details can completely change the style of the bag. Choose options that match your personal preference and intended use.
Lastly, remember that quilting is about creativity and joy. Don’t be afraid to take risks with your design choices. The Hoo-Ha Bag Tutorial Quilt Pattern is meant to be fun, educational, and a reflection of your unique quilting journey.
FAQ about the Hoo-Ha Bag Tutorial Quilt Pattern
What skill level is required to make the Hoo-Ha Bag Tutorial Quilt Pattern?
This pattern is suitable for both beginners and advanced quilters. Beginners will learn valuable skills, while experienced crafters can refine techniques.
How long does it take to complete the bag?
The time depends on your sewing speed and quilting method. On average, it can take a weekend to finish.
Can I use fabric scraps for this project?
Yes, the Hoo-Ha Bag Tutorial Quilt Pattern is perfect for using fabric scraps, making it eco-friendly and cost-effective.
Do I need special sewing equipment?
A sewing machine, quilting ruler, rotary cutter, and iron are recommended. However, it can be done with basic tools if necessary.
Is lining necessary for the bag?
Yes, lining adds durability and gives the interior a clean, professional look.
Can the bag pattern be customized in size?
Absolutely, you can resize the pattern to make anything from a small handbag to a large tote.
PATTERN HERE
The Hoo-Ha Bag Tutorial Quilt Pattern is more than just a sewing project—it’s a creative journey that blends quilting with functional design. From selecting fabrics to piecing, quilting, and adding personal touches, each step offers a chance to learn and enjoy the process. Whether you are new to quilting or have years of experience, this pattern provides a fun and rewarding way to create a stylish handmade bag. We hope this guide has inspired you to try making your own version. Please leave your sincere opinion and suggestions about this article—we’d love to hear your thoughts and creative experiences!