
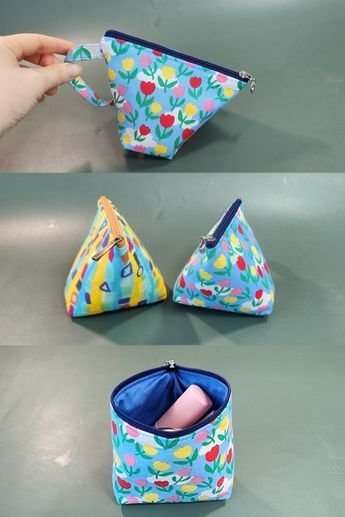
If you’ve ever wondered how to make a zipper bag with a cute handle, you’re in for a treat. This simple yet stylish project is perfect for both beginners and experienced crafters who want to create something both functional and adorable. Not only is it a great way to practice sewing techniques, but it’s also the perfect handmade gift or personal accessory that adds charm and character to any outfit or purpose.
Learning how to make a zipper bag with a cute handle combines creativity with practicality. These bags are ideal for organizing cosmetics, storing small essentials, or even carrying light items on the go. Plus, adding a cute handle gives it a fun and personalized touch, making it stand out from ordinary pouches. Whether you’re crafting for yourself or to sell, these handmade zipper bags are always in demand.
In this article, we’ll guide you step-by-step through the entire process, from materials to finishing touches. Using clear language and detailed explanations, we’ll ensure that your final product looks polished and professional. This guide also incorporates SEO-optimized tips for crafters and makers looking to share their creations online or blog about their DIY journeys. Let’s dive into how to make a zipper bag with a cute handle and unlock your creativity!
1. Choosing the Right Materials
Selecting the right materials is the foundation of any great zipper bag. You’ll want to start with quality fabrics that are both durable and attractive. Cotton is a popular choice due to its ease of use and wide variety of patterns. You can also use canvas for a more structured bag or linen for a rustic look.
Your zipper selection is also crucial. For a standard bag, a 7- to 9-inch zipper is usually sufficient. Choose a zipper color that either matches or contrasts nicely with your fabric. This small detail can make a big difference in the final look of your zipper bag with a cute handle.
Next, consider interfacing. Interfacing gives your bag structure and durability. Fusible interfacing is the easiest to work with, as it adheres to fabric with an iron. Choose a medium-weight interfacing for best results.
Handles can be made from matching fabric, twill tape, leather strips, or even upcycled belts. The cute handle is where your personality can really shine. Think of colorful patterns, braided fabric, or decorative stitching to add flair.
Don’t forget thread and basic sewing tools. Make sure you have matching thread, scissors, pins or clips, a ruler, and an iron. A sewing machine will speed up the process significantly, though you can also sew by hand if needed.
Finally, gather embellishments if you wish—buttons, patches, embroidery, or custom tags can add unique finishing touches that elevate your zipper bag with a cute handle from simple to stunning.
2. Cutting and Preparing the Pieces
Once your materials are ready, it’s time to cut your fabric. You’ll need two outer pieces and two lining pieces, all the same size. A common dimension for a medium bag is 9″ x 6″, but you can adjust this to your preferred size.
Place your fabric right sides together and cut both the outer and lining fabrics to ensure consistency. Don’t forget to also cut interfacing pieces to the same size. Apply the interfacing to the wrong side of the outer fabric using an iron, following the manufacturer’s instructions.
Now it’s time to create your handle. Cut a strip of fabric about 12″ x 2″ for a short handle. Fold the long edges toward the center, then fold it in half again, and sew along both sides for durability. This will be your cute handle, and you can make it extra charming with topstitching or decorative thread.
Once your handle is ready, pin it to the top edge of one of your outer fabric pieces, about 1.5″ from the edge. Make sure it’s facing inward (looped inside), as it will be turned right-side out later during construction.
If you want to include a label or embellishment on the front, now is the time to sew it on. Doing it before the bag is assembled ensures a clean, secure application. Personal touches help make your zipper bag with a cute handle truly unique.
Double-check your measurements and layout before moving on. Accuracy in cutting and placing components will help everything come together smoothly later.
3. Sewing the Zipper and Assembling the Bag
With everything prepared, now comes the fun part—assembly! Begin by placing one outer fabric piece face up. Align the zipper face down along the top edge. Then, place one lining piece face down on top, sandwiching the zipper between the layers.
Use clips or pins to hold everything in place, then sew along the edge using a zipper foot if you have one. Turn the pieces right side out and press them flat, then topstitch near the zipper for a finished look. Repeat this process with the other outer and lining pieces on the other side of the zipper.
Once both sides are attached to the zipper, unzip it halfway (important!) and align the outer fabric pieces right sides together and the lining pieces right sides together. Clip or pin the layers, making sure the zipper teeth point toward the lining.
Sew around the entire perimeter, leaving a 3″ opening in the bottom of the lining for turning. Use a 1/4″ seam allowance for neat results. Clip corners and trim excess fabric if needed to reduce bulk.
Turn the bag right side out through the lining. Push out the corners gently with a tool or chopstick for a crisp shape. Once fully turned, sew the lining opening closed with a small stitch by hand or on the machine.
Give your bag a final press with the iron, focusing on the seams and zipper area. Your zipper bag with a cute handle should now look neat and functional, with everything properly aligned and secured.
Add any final decorative touches or charms to personalize it. You now have a finished zipper bag with a cute handle that you can proudly use or gift!
4. Creative Variations and Extra Tips
Once you master the basic technique, you can get creative with different shapes and styles. Try a boxed bottom for extra depth—simply pinch the corners after sewing and stitch across them to form a flat base.
Experiment with color blocking or patchwork for a more artistic version. Mix different fabrics to create a one-of-a-kind zipper bag with a cute handle that showcases your style. Upcycling old clothes can also be a fun and eco-friendly option.
Add interior pockets for better organization. Use leftover fabric to create small sections inside the lining, perfect for holding lipstick, cards, or earbuds. It’s a simple addition that adds functionality to your bag.
If you’re gifting or selling your bags, consider branding. Sew a small fabric tag with your name or logo on the side. High-quality photos of your finished bags can be used for promoting your items on social media or selling platforms.
Practice makes perfect. Don’t worry if your first attempt isn’t flawless—every bag you make will get better. Keeping a notebook of your sizes, fabric combinations, and tweaks will help refine your process.
Lastly, have fun with it! Making a zipper bag with a cute handle is meant to be a joyful experience. Use it as a moment to relax, express your creativity, and maybe even involve friends or family in your sewing projects.
FAQ: How to Make a Zipper Bag with a Cute Handle
Q1: What is the best fabric to use for a zipper bag with a cute handle?
A: Cotton is the most recommended fabric for beginners because it’s easy to work with. Canvas and linen are also great options for more structure.
Q2: Do I need a sewing machine to make a zipper bag?
A: While a sewing machine makes the process quicker, you can also sew by hand. Just be sure to use small, tight stitches for durability.
Q3: How do I attach a cute handle to the bag?
A: Handles can be sewn into the seam of the outer fabric before stitching the bag together. Position it on the top edge and sew over it for strength.
Q4: Can I make these bags in different sizes?
A: Yes! Adjust the size of your fabric pieces and zipper to create larger or smaller bags depending on your needs.
Q5: What size zipper should I use?
A: A 7- to 9-inch zipper works well for most medium-sized bags. Be sure it matches the width of your fabric.
Q6: Is interfacing necessary?
A: Interfacing adds structure and helps the bag hold its shape. It’s highly recommended, especially if you’re using lightweight fabric.
Making a zipper bag with a cute handle is an enjoyable and rewarding project for crafters of all skill levels. From choosing fabrics to sewing on that final handle, this guide walks you through every step with clarity and creativity. Whether for personal use or gifting, these bags are both functional and fashionable.
We hope this tutorial helped you understand how to make a zipper bag with a cute handle from start to finish. If you enjoyed this article or have tips of your own, please leave a genuine comment or suggestion below—we love hearing from fellow makers and sewists!