
The Mariners Compass Quilt Pattern is one of the most iconic and revered designs in the quilting world. Known for its intricate starburst shape that resembles a compass rose, this pattern has been a favorite among quilters for centuries. Its complexity and elegance make it a sought-after design for those looking to challenge their skills and create a stunning piece of art. Whether you’re a seasoned quilter or just beginning your quilting journey, the Mariners Compass offers a unique opportunity to explore precision, creativity, and tradition.
The origins of the Mariners Compass Quilt Pattern can be traced back to the 18th century, where it was often used to symbolize direction and guidance. The pattern’s symmetrical points and radiating lines mimic the appearance of a navigational compass, making it not only visually striking but also symbolically meaningful. Over time, it has become a staple in the quilting community, with countless variations and interpretations emerging from different cultures and regions.
Creating a Mariners Compass quilt requires patience, precision, and an eye for detail. The pattern is typically composed of multiple triangles, diamonds, and other geometric shapes that converge at a central point, forming the characteristic compass design. While it may seem daunting at first, with the right guidance and tools, even intermediate quilters can master this pattern. In this article, we’ll dive into the essential aspects of the Mariners Compass Quilt Pattern, from choosing your fabrics to assembling the final quilt, providing you with all the information you need to embark on this rewarding project.
1. Understanding the Mariners Compass Quilt Pattern
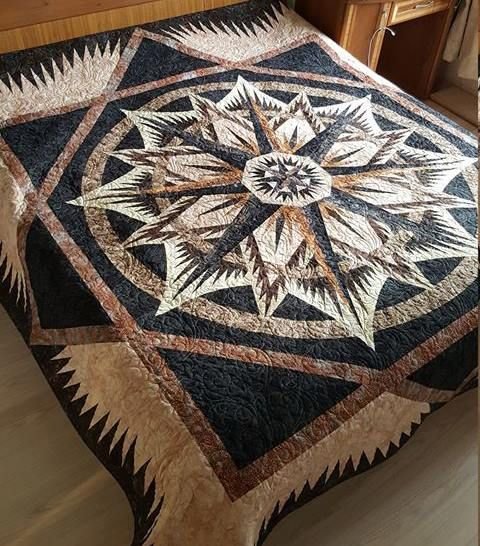
The Mariners Compass Quilt Pattern is renowned for its intricate design and the precision required to piece it together. At its core, the pattern features a series of radiating points that resemble the points on a compass, creating a dynamic and eye-catching focal point. The design can be as simple or as complex as you desire, with variations ranging from basic eight-point stars to elaborate 32-point compass roses.
The first step in understanding the Mariners Compass Quilt Pattern is to familiarize yourself with its basic structure. The pattern is typically divided into sections, with each section representing a “spoke” or “point” of the compass. These sections are then pieced together to form a complete circle or starburst shape. The points are usually made up of triangles and diamonds, which are carefully arranged to create the desired effect.
One of the key challenges of the Mariners Compass Quilt Pattern is achieving precise points and sharp angles. This requires careful cutting and piecing, as even slight deviations can throw off the symmetry of the design. To ensure accuracy, many quilters use templates or foundation paper piecing techniques, which help to maintain consistent shapes and sizes throughout the project.
Color choice plays a crucial role in the success of the Mariners Compass Quilt Pattern. The use of contrasting colors can enhance the definition of the points, making the compass design stand out. Alternatively, a more subtle color palette can create a soft, blended effect, giving the quilt a different kind of charm. When selecting fabrics, consider how the colors will interact with each other and how they will contribute to the overall aesthetic of the quilt.
Another important aspect to consider is the scale of the pattern. The Mariners Compass can be adapted to fit various sizes, from small wall hangings to large bed quilts. The size of the individual blocks will determine the overall scale of the design, so it’s important to plan accordingly. Larger blocks will require fewer points and pieces, making the project more manageable for beginners, while smaller blocks can be more intricate and time-consuming.
Finally, it’s essential to take your time with the Mariners Compass Quilt Pattern. This is not a pattern that can be rushed; careful planning, cutting, and piecing are key to achieving a beautiful result. By breaking the project down into manageable steps and focusing on one section at a time, you’ll find the process to be both rewarding and enjoyable.
2. Choosing the Right Fabrics for Your Mariners Compass Quilt
Selecting the right fabrics is a critical step in creating a successful Mariners Compass Quilt Pattern. The fabrics you choose will not only determine the overall look of your quilt but also affect the ease with which the pattern comes together. Here are some tips to help you choose the best fabrics for your project.
First, consider the color scheme of your quilt. The Mariners Compass Quilt Pattern is highly geometric, and the contrast between colors can make or break the design. High-contrast color combinations, such as black and white, blue and yellow, or red and green, will make the compass points pop and give your quilt a striking appearance. On the other hand, using colors that are closer on the color wheel can create a more subtle, harmonious effect.
Next, think about the type of fabric you’ll use. Cotton is the most common choice for quilting due to its durability, ease of use, and wide availability. However, you might also consider experimenting with other materials, such as silk or linen, to add texture and interest to your quilt. Just keep in mind that these fabrics can be more challenging to work with, especially when it comes to achieving sharp points and angles.
Patterned fabrics can also add depth and dimension to your Mariners Compass quilt. Small-scale prints, such as polka dots or tiny florals, can be used to add visual interest without overwhelming the design. Larger prints should be used sparingly, as they can distract from the precision of the compass points. Stripes or plaids can be particularly effective if aligned carefully with the direction of the points, adding a dynamic, directional feel to the quilt.
When choosing fabrics, it’s also important to consider the value of each color, which refers to the lightness or darkness of the fabric. Using a range of values within your color scheme can add depth and contrast to the design, making the compass points stand out more distinctly. For example, pairing a dark background fabric with lighter compass points can create a dramatic effect, while a lighter background can give the quilt a softer, airier feel.
The texture of the fabric is another factor to consider. Smooth, tightly woven fabrics are generally easier to work with and will help you achieve crisp, sharp points. However, adding a few textured fabrics, such as a subtle batik or a slightly nubby linen, can add a tactile quality to your quilt. Just be sure to test these fabrics before committing to them, as they may behave differently when cut and sewn.
Finally, it’s essential to pre-wash your fabrics before starting the project, especially if you’re using a mix of different fabric types. Pre-washing will help to remove any sizing or chemicals from the fabric, reduce the risk of colors bleeding, and allow the fabrics to shrink before they’re sewn into your quilt. This step is particularly important for the Mariners Compass Quilt Pattern, as any changes in fabric size after washing could distort the design.
3. Piecing the Mariners Compass Quilt Pattern
Piecing together the Mariners Compass Quilt Pattern is both a challenge and a joy for quilters. This stage of the process requires precision and attention to detail, but the results are well worth the effort. Here’s how to approach piecing this intricate pattern.
Start by preparing your templates or foundation paper. Templates are essential for ensuring that each piece of the compass is cut accurately. If you’re using foundation paper piecing, print out the pattern on lightweight paper, and make sure it’s properly aligned before cutting your fabric pieces. This method is particularly useful for beginners, as it helps maintain accuracy during the piecing process.
Cutting your fabric is the next crucial step. Because the Mariners Compass involves many small, precise pieces, it’s important to cut each piece carefully, following the template exactly. Use a sharp rotary cutter and a ruler to ensure clean, straight edges. For tricky angles or curves, sharp scissors may provide better control.
Once your pieces are cut, it’s time to start sewing. Begin by assembling the individual points of the compass. Each point typically consists of several smaller triangles or diamonds that are sewn together to create a larger, pointed shape. When sewing, use a consistent seam allowance, typically 1/4 inch, to ensure that all the pieces fit together correctly.
After you’ve assembled the points, you’ll sew them together to form the full compass. This step requires careful alignment, as the points need to meet precisely in the center to create the starburst effect. Pinning the pieces together before sewing can help ensure that everything stays in place. If any points don’t align perfectly, don’t be afraid to rip out a seam and try again—precision is key in this pattern.
The next step is to sew the compass to a background fabric. The background fabric frames the compass and provides contrast, making the design stand out. When attaching the compass to the background, make sure the compass is centered and lies flat. Any puckering or shifting could distort the design, so take your time with this step.
Finally, after the compass is securely sewn to the background, you’ll need to press your quilt top. Pressing is different from ironing—use a gentle up-and-down motion to flatten the seams without stretching the fabric. This will help to set the seams and give your quilt top a crisp, professional finish.
4. Finishing Your Mariners Compass Quilt
Once the quilt top is complete, the next step is to finish your Mariners Compass Quilt. This involves layering the quilt, quilting the layers together, and then binding the edges. Here’s how to finish your quilt with finesse.
First, prepare your quilt sandwich, which consists of the quilt top, batting, and backing fabric. Lay the backing fabric flat, with the wrong side facing up. Then, place the batting on top of the backing, followed by the quilt top, with the right side facing up. Smooth out any wrinkles and ensure all layers are aligned before basting them together with pins or a temporary adhesive spray.
The next step is quilting, which involves sewing through all three layers to hold them together. The quilting can be as simple or as elaborate as you like. For the Mariners Compass Quilt Pattern, you might choose to quilt along the lines of the compass, enhancing its sharp, geometric design. Alternatively, you could add more intricate quilting patterns in the background areas to complement the central design.
When quilting, it’s important to work from the center of the quilt outwards. This helps to prevent any puckering or distortion as you sew. Use a walking foot or free-motion quilting foot on your sewing machine for the best results. If you prefer hand quilting, be sure to use a sturdy quilting thread and a sharp needle to stitch through all three layers.
After quilting, the final step is binding the quilt edges. Binding not only finishes the quilt neatly but also protects the edges from wear and tear. Cut strips of fabric for the binding, fold them in half lengthwise, and press. Attach the binding to the edge of the quilt by sewing it to the front side, then folding it over to the back and hand-stitching it in place.
Once the binding is secure, give your quilt a final press to flatten any remaining wrinkles and set the seams. At this point, your Mariners Compass Quilt is complete and ready to be displayed or gifted. Whether you hang it on a wall, drape it over a bed, or give it to a loved one, this quilt is sure to be cherished for years to come.
Finally, consider adding a quilt label. This can include your name, the date, and any other details you’d like to remember. Quilt labels are a great way to personalize your work and ensure that future generations know the story behind the quilt.
FAQ: Mariners Compass Quilt Pattern
Q: Is the Mariners Compass Quilt Pattern suitable for beginners? A: While the Mariners Compass Quilt Pattern is known for its complexity, it can be tackled by confident beginners who are comfortable with precise cutting and piecing. Using foundation paper piecing can make the process more manageable.
Q: What size should I make the Mariners Compass blocks? A: The size of the blocks can vary depending on your project. Common sizes range from 12 inches to 20 inches, but you can scale the pattern up or down as needed. Larger blocks are generally easier to piece.
Q: Can I use patterned fabrics for the Mariners Compass? A: Yes, patterned fabrics can add visual interest to your quilt. However, small-scale patterns or subtle prints work best, as large, bold patterns can overwhelm the intricate design of the compass.
Q: How do I ensure that my points are sharp and precise? A: Precision is key in the Mariners Compass Quilt Pattern. Using templates or foundation paper piecing can help maintain accuracy. Take your time when cutting and sewing, and don’t hesitate to redo seams if needed.
Q: What is the best way to quilt the Mariners Compass pattern? A: Quilting along the lines of the compass can enhance the design. You might also consider echo quilting or adding intricate patterns in the background areas. Choose a quilting method that complements your design.
Q: How do I care for my Mariners Compass Quilt? A: To care for your quilt, wash it gently in cold water and dry it flat or on a low heat setting. Regularly airing out the quilt can also help keep it fresh and in good condition.
Join our VIP broadcast list and gain access to exclusive patterns, all for free. As a VIP member, you’ll receive the best patterns daily, delivered directly to your device. ✨📱 It’s a unique opportunity to stay up-to-date with the latest trends and designs, curated just for you. Don’t miss out on enhancing your projects and discovering new inspirations with the best patterns every day! 🎨🔝
Conclusion
The Mariners Compass Quilt Pattern is a stunning and rewarding project that offers both challenges and creative satisfaction. By carefully selecting your fabrics, mastering precise piecing techniques, and finishing the quilt with care, you can create a beautiful piece that showcases your quilting skills. Whether you’re making this quilt for yourself or as a gift, the Mariners Compass is sure to be a cherished and admired creation.
We hope this guide has provided you with the inspiration and information needed to start your own Mariners Compass Quilt. If you have any questions or suggestions, or if you’d like to share your experience with this pattern, please leave a comment below. Happy quilting!