
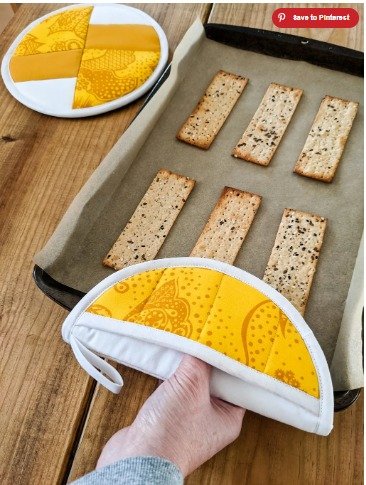
Modern quilted potholders DIY sewing pattern projects are a fun, functional, and beginner-friendly way to add a touch of creativity and charm to your kitchen. Whether you’re new to quilting or a seasoned sewist looking for a quick project, these small but practical items are the perfect canvas for experimenting with color, pattern, and stitching techniques. They also make wonderful handmade gifts that anyone can appreciate.
Creating your own modern quilted potholders gives you control over design choices such as fabrics, quilting lines, and shape. Unlike traditional designs, modern styles emphasize clean lines, bold colors, negative space, and improvisational piecing. With a DIY sewing pattern, you not only save money but also learn valuable sewing skills that can be applied to larger quilting projects in the future.
In this article, we’ll walk you through everything you need to know to make your own modern quilted potholders DIY sewing pattern, from material selection and cutting techniques to stitching and finishing. You’ll also discover how to personalize your potholders to reflect your own unique style, while following a process that’s enjoyable and deeply rewarding.
1. Choosing Materials and Tools for Modern Quilted Potholders
When starting your modern quilted potholders DIY sewing pattern, the first step is selecting the right materials. Quality fabrics and tools can make a huge difference in both the process and final result.
Use 100% cotton fabric for both the top and bottom layers of the potholder. Cotton is heat-resistant, easy to work with, and available in countless colors and prints—perfect for modern quilting designs.
Select a heat-resistant batting, such as Insul-Bright, which helps protect hands from hot surfaces. Layer it with a thin cotton batting for extra padding and durability.
A rotary cutter, self-healing cutting mat, and clear acrylic ruler will help ensure accurate cuts, which is essential for the polished, geometric look of modern quilted potholders.
Use quilting cotton thread in a color that contrasts or coordinates with your fabric. For a bold modern aesthetic, contrasting threads can really make the quilting lines pop.
Keep your sewing machine in good working order, and consider using a walking foot to help prevent fabric layers from shifting while quilting.
Lastly, invest in good fabric scissors and pins or clips to hold your layers together while sewing. These small tools can save you a lot of time and effort in the long run.
2. Cutting and Assembling Your Potholder
Once your materials are ready, it’s time to dive into cutting and assembling your DIY sewing pattern for potholders. Accuracy and precision here are key to achieving that clean, modern look.
Start by cutting your fabric and batting into square or rectangular shapes. A standard potholder is 8″x8″, but feel free to adjust the size to suit your needs.
Cut one square each from your top fabric, bottom fabric, cotton batting, and Insul-Bright. Layer them in this order: bottom fabric (right side down), Insul-Bright, cotton batting, and top fabric (right side up).
Secure the layers together using safety pins or quilting clips. Pin at the center and corners to prevent shifting as you sew.
Plan your quilting design. Modern quilts often feature straight-line stitching, grids, or diagonal lines. Use a fabric-safe marking pen to draw guide lines if needed.
Sew through all layers along your marked quilting lines. Take your time and sew slowly to maintain straight, even stitches that give your potholder a professional look.
Once quilting is complete, trim the edges of your potholder to square it up and prepare it for binding. Clean edges help your finished project look neat and polished.
3. Binding and Finishing Touches
THE BEST QUILT PATTERN
Adding the binding is the final step in your modern quilted potholders DIY sewing pattern project. This step not only holds everything together but also frames your design beautifully.
Cut 2.5″ wide strips of fabric to use as your binding. You can use the same fabric as your backing or a contrasting color for visual impact.
Join the strips together to make one continuous length, and fold it in half lengthwise with the wrong sides together. Press well to form a crisp crease.
Attach the binding to the front side of the potholder using a 1/4″ seam. Carefully round the corners or leave them square depending on your design preference.
Flip the binding over to the back and hand-stitch or machine-stitch it down. Make sure your stitches are secure and evenly spaced for a clean finish.
To add functionality, sew a small loop of fabric into one corner of your potholder before stitching down the binding. This loop makes it easy to hang in the kitchen.
Give your finished potholder a final press with a hot iron, smoothing out any wrinkles and helping the seams lay flat. Now it’s ready to use or gift!
4. Personalization Ideas for Modern Quilted Potholders
One of the best aspects of making modern quilted potholders DIY sewing pattern is the ability to customize them completely to your liking. Let your creativity shine through with these fun personalization tips.
Mix and match fabric patterns and solids to create eye-catching contrasts. Geometric prints, bold florals, or minimalist solids all work beautifully in modern designs.
Incorporate appliqué or embroidery to add personal touches. For example, stitch a family name, a fun quote, or a kitchen-themed motif on the front.
Experiment with improv piecing techniques—popular in modern quilting—to create one-of-a-kind designs. These techniques allow for freedom and artistic expression.
Play with color blocking using a color palette that fits your kitchen decor or the recipient’s style. Bright colors and high contrast work especially well in modern quilting.
Use decorative stitching on your sewing machine to add extra detail to the binding or quilting lines. This subtle enhancement can elevate the overall look.
Consider themed potholders for holidays, seasons, or special occasions. These make wonderful, heartfelt gifts that are also useful year-round.
FAQ – Modern Quilted Potholders DIY Sewing Pattern
Q1: What fabric is best for quilted potholders?
A: 100% cotton fabric is best for quilted potholders due to its heat resistance and ease of use. Avoid synthetic materials which may melt under high heat.
Q2: What size should a potholder be?
A: The most common size is 8″x8″, but you can adjust based on preference. Some people prefer rectangular potholders (6″x10″) for better grip.
Q3: Can I wash quilted potholders?
A: Yes, most quilted potholders made with cotton fabric and batting are machine washable. Use cold water and air-dry for best results.
Q4: Do I need a special sewing machine to quilt potholders?
A: No, a regular domestic sewing machine works fine. A walking foot is helpful but not essential for small projects like potholders.
Q5: How can I make my potholders more heat-resistant?
A: Use a layer of heat-resistant batting like Insul-Bright and a layer of cotton batting. These two layers combined offer excellent insulation.
Q6: Can I sell potholders made from DIY patterns?
A: Yes, as long as the pattern is labeled for commercial use or you created it yourself. Always check the licensing terms if using another designer’s pattern.
Q7: What makes a potholder design “modern”?
A: Modern designs typically use bold colors, simple shapes, clean lines, negative space, and innovative piecing techniques, setting them apart from traditional styles.
Creating your own modern quilted potholders DIY sewing pattern is a delightful and satisfying way to combine function with style. From choosing high-quality materials to exploring modern design aesthetics and finishing your project with clean, professional touches, this guide has walked you through every step. Whether you’re sewing for your own kitchen or making thoughtful gifts, these potholders are a versatile and creative outlet.
If you enjoyed this tutorial or tried it out, we’d love to hear from you! Please leave a sincere opinion or suggestion below—your feedback helps us create even better content for passionate makers like you.