
The Nordic Mini Quilt Along – free pattern is a delightful project that brings together the charm of Nordic design with the creativity of quilting.
This quilt along is perfect for quilters of all levels who want to explore the beauty of Scandinavian-inspired patterns in a manageable, mini quilt format.
Whether you’re looking to expand your quilting skills or simply enjoy a fun and engaging project, this quilt along offers an excellent opportunity to create something truly unique.
In this blog post, we’ll walk you through the Nordic Mini Quilt Along – free pattern, providing step-by-step instructions and helpful tips to guide you through the process. From selecting your fabrics to assembling your mini quilt, each step is designed to ensure that you achieve a stunning finished product.
This quilt along is a great way to connect with fellow quilters, share your progress, and enjoy the sense of accomplishment that comes with completing a beautiful quilt.
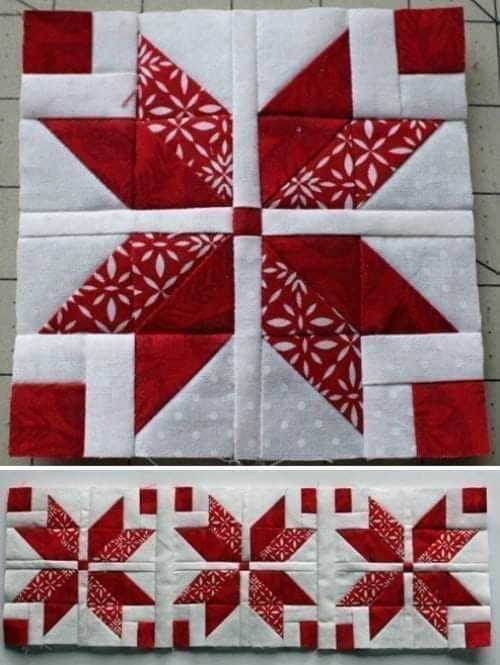
The Nordic Mini Quilt Along is also a fantastic way to celebrate the minimalist yet intricate designs that are characteristic of Nordic culture.
The pattern incorporates geometric shapes, clean lines, and balanced symmetry, making it both aesthetically pleasing and fun to create.
Let’s dive into the details of this exciting quilt along and get started on your very own Nordic Mini Quilt!
1. Preparing for the Nordic Mini Quilt Along
Before you begin the Nordic Mini Quilt Along – free pattern, it’s essential to gather all the necessary materials and prepare your workspace. Proper preparation will set the stage for a smooth and enjoyable quilting experience.
First, let’s talk about fabric selection. The Nordic Mini Quilt typically features a limited color palette that reflects the simplicity and elegance of Scandinavian design. Choose fabrics in neutral tones, such as white, gray, or soft pastels, to achieve the classic Nordic look. Alternatively, you can opt for bolder colors if you prefer a more modern twist on the traditional design.
Next, gather your quilting tools. You’ll need a rotary cutter, cutting mat, acrylic rulers, and a sewing machine. Ensure that your rotary cutter blade is sharp and that your sewing machine is in good working order. Having the right tools at your disposal will make the quilting process much more efficient and enjoyable.
Once you have your materials, it’s time to prepare your workspace. Set up a clean, organized area where you can cut, sew, and press your fabric. Having a dedicated space for each step of the process will help you stay focused and keep your project on track.
Take a moment to review the Nordic Mini Quilt Along – free pattern instructions. Familiarize yourself with the pattern, noting any special techniques or tips provided by the designer. This will help you anticipate any challenges and plan accordingly.
If you’re participating in the quilt along as part of a group, consider joining an online community or social media group where you can share your progress and connect with other quilters. This can be a great source of motivation and inspiration throughout the project.
Finally, set a timeline for your quilt along. While mini quilts are generally quicker to complete than larger quilts, it’s still important to pace yourself and allow time for each step of the process. By planning ahead, you can ensure that you enjoy the journey without feeling rushed.
2. Cutting and Piecing Your Fabric
With your materials prepared and your workspace ready, it’s time to start cutting and piecing the fabric for your Nordic Mini Quilt Along – free pattern. Precision is key in this step, as accurate cutting and piecing will ensure that your quilt comes together beautifully.
Begin by carefully cutting your fabric according to the pattern instructions. The Nordic Mini Quilt features geometric shapes such as squares, rectangles, and triangles, which need to be cut with precision. Use your rotary cutter and rulers to achieve straight, clean edges, and double-check your measurements before making any cuts.
As you cut your fabric, it’s helpful to organize the pieces by type and size. This will make the piecing process more efficient and help you avoid any confusion as you work through the pattern. Consider using small trays or labeled containers to keep your pieces organized.
Once your fabric is cut, it’s time to start piecing the blocks. The Nordic Mini Quilt pattern typically involves creating a series of smaller blocks that are then joined together to form the larger quilt top. Follow the pattern instructions carefully, and take your time to ensure that each seam is sewn accurately.
As you sew, be sure to press your seams. Pressing is an important step that helps your blocks lie flat and ensures that the pieces fit together correctly. Use an iron to press each seam open or to one side, depending on the pattern’s instructions. This will reduce bulk and make it easier to align the blocks when assembling the quilt top.
If you’re new to quilting or working with small pieces, consider using pins or clips to hold your fabric in place before sewing. This can help prevent shifting and ensure that your seams are straight and even.
After piecing the individual blocks, lay them out in the desired arrangement before sewing them together. This will give you a chance to see how the blocks fit together and make any adjustments if needed. Once you’re satisfied with the layout, sew the blocks together to complete the quilt top.
3. Assembling the Quilt Top
With your blocks pieced and pressed, the next step in the Nordic Mini Quilt Along – free pattern is assembling the quilt top. This is where your mini quilt begins to take shape, and the geometric design comes to life.
Start by arranging your blocks according to the pattern’s layout. The Nordic Mini Quilt typically features a symmetrical design, so take care to align the blocks correctly. Use a design wall or flat surface to lay out the blocks and experiment with different arrangements until you find the one that looks best.
Once you’re satisfied with the layout, begin sewing the blocks together. Start with the rows, sewing the blocks together horizontally. Press the seams of each row before moving on to the next. Then, join the rows together to complete the quilt top, taking care to match up the seams as you sew.
As you assemble the quilt top, pay attention to the alignment of the blocks and seams. Accurate alignment is crucial for achieving a clean, polished look. If any seams don’t match up perfectly, consider ripping them out and resewing for a better fit.
Press the entire quilt top once it’s assembled. This final pressing will help set the seams and ensure that the quilt top lies flat. Take your time to press each seam carefully, as this will make the quilting process easier and more precise.
If you’d like, you can add a border to your quilt top. A border can frame the design and add a finishing touch to your Nordic Mini Quilt. Choose a fabric that complements the colors and patterns in the quilt top, and follow the pattern’s instructions for cutting and sewing the border.
After the quilt top is complete, it’s time to prepare for quilting. Consider your quilting design and how it will enhance the geometric patterns in the quilt top. Straight-line quilting or simple geometric designs are often a good choice for Nordic-inspired quilts, as they complement the clean lines and symmetry.
4. Quilting and Finishing Your Nordic Mini Quilt
The final steps in the Nordic Mini Quilt Along – free pattern are quilting and finishing your mini quilt. These steps will bring your quilt to life and turn it into a finished piece ready for display or gifting.
Start by layering your quilt top with batting and backing fabric. The batting adds warmth and dimension to the quilt, while the backing fabric completes the quilt sandwich. Use a spray adhesive, pins, or basting stitches to hold the layers together, ensuring that they stay aligned during quilting.
Next, choose a quilting design. The Nordic Mini Quilt often looks best with simple quilting designs that enhance the geometric patterns in the quilt top. Straight-line quilting, grid patterns, or echo quilting are all great options for this type of design. If you’re more experienced, you might try free-motion quilting to add a unique, personal touch.
Quilt the layers together using your sewing machine or by hand. Start from the center of the quilt and work your way outwards to prevent any shifting or bunching. Take your time, and be mindful of keeping your stitches even and consistent.
Once the quilting is complete, it’s time to trim the excess batting and backing fabric. Use a rotary cutter and ruler to square up the quilt, making sure the edges are straight and the corners are square. This will make the binding process easier and give your quilt a professional finish.
Finally, add the binding to your quilt. Binding is the fabric strip that finishes the edges of the quilt, giving it a clean, polished look. Cut your binding fabric according to the pattern’s instructions, and sew it to the edges of the quilt. Fold the binding over to the back of the quilt and hand-stitch it in place for a neat finish.
After binding, give your quilt a final press to set the seams and remove any wrinkles. Your Nordic Mini Quilt is now complete and ready to be displayed, gifted, or enjoyed!
FAQ: Nordic Mini Quilt Along – Free Pattern
Q: Is the Nordic Mini Quilt Along suitable for beginners?
A: Yes, the Nordic Mini Quilt Along – free pattern is designed to be accessible to quilters of all skill levels, including beginners. The pattern includes detailed instructions to guide you through each step.
Q: What type of fabric should I use for the Nordic Mini Quilt?
A: The Nordic Mini Quilt looks best with fabrics in neutral tones or soft pastels that reflect the simplicity and elegance of Scandinavian design. However, feel free to experiment with bolder colors if you prefer.
Q: Can I resize the Nordic Mini Quilt pattern?
A: While the pattern is designed as a mini quilt, you can resize the blocks and create a larger quilt if desired. Just be sure to adjust the fabric requirements accordingly.
Q: How do I join a quilt along community?
A: Many quilt alongs have online communities on social media platforms like Facebook or Instagram. You can join these groups to share your progress, ask questions, and connect with other quilters.
Q: What quilting design works best for the Nordic Mini Quilt?
A: Simple quilting designs like straight lines, grids, or echo quilting often complement the geometric patterns in the Nordic Mini Quilt. Choose a design that enhances the clean lines and symmetry of the quilt top.
Q: How long does it take to complete the Nordic Mini Quilt?
A: The time required to complete the Nordic Mini Quilt varies depending on your quilting speed and the amount of time you can dedicate to the project. However, since it’s a mini quilt, it generally takes less time than larger quilts.
Join our VIP broadcast list and gain access to exclusive patterns, all for free. As a VIP member, you’ll receive the best patterns daily, delivered directly to your device. ✨📱 It’s a unique opportunity to stay up-to-date with the latest trends and designs, curated just for you. Don’t miss out on enhancing your projects and discovering new inspirations with the best patterns every day! 🎨🔝
Conclusion
The Nordic Mini Quilt Along – free pattern is a fantastic way to explore the beauty of Nordic design while honing your quilting skills. With its clean lines, geometric shapes, and elegant simplicity, this mini quilt is sure to become a cherished piece in your collection. Whether you’re a seasoned quilter or just starting, this quilt along offers a rewarding and enjoyable experience.
We hope this tutorial has inspired you to start your own Nordic Mini Quilt. If you have any questions or suggestions, please leave a comment below. We’d love to see your finished quilts and hear about your quilting journey. Happy quilting!