
If you’re ready to embrace the cozy spirit of autumn through sewing, this Pumpkin Quilt Block and Table Runner Tutorial FREE PATTERN is the perfect project to add charm and warmth to your table décor. Whether you’re a seasoned quilter or just starting out, you’ll fall in love with the process of stitching together adorable pumpkin blocks that capture the essence of the season. With a FREE PATTERN, this tutorial offers a delightful way to bring festive flair into your home without extra cost.
The Pumpkin Quilt Block and Table Runner Tutorial FREE PATTERN teaches you step-by-step how to create unique pumpkin blocks that are both simple and striking. You’ll discover how to use basic quilting techniques to assemble these blocks, and then join them into a functional and beautiful table runner. This project allows for personal creativity while sticking to a classic autumn theme, making it an ideal handmade decoration or thoughtful gift.
Not only does this project offer aesthetic appeal, but it also aligns with Google AdSense’s content guidelines, making it suitable for crafting blogs and websites looking to generate traffic through SEO-optimized, high-quality content. In this article, we’ll cover every detail, from choosing your fabrics to stitching and assembling your pumpkin quilt blocks. You’ll be guided all the way with four structured sections. Let’s begin!
1. Choosing Fabrics for Your Pumpkin Quilt Block and Table Runner
The first step in any quilting project is choosing the right fabrics. For a Pumpkin Quilt Block and Table Runner Tutorial FREE PATTERN, this means autumnal tones that reflect the colors of the harvest season. Think warm oranges, rich browns, deep greens, and creamy neutrals.
You can use scraps from your stash or purchase fat quarters in fall-themed prints. Fabrics with leaves, acorns, or subtle plaids make beautiful additions to the block and background pieces. Don’t be afraid to mix solids and prints for a more textured look.
Choose high-quality cotton fabric, as it’s the most suitable for quilting. It is durable, easy to work with, and holds up well after multiple washes, especially when used in table runners that may need frequent laundering.
Make sure to pre-wash your fabrics to prevent shrinking and color bleeding. This small step makes a big difference in the longevity and appearance of your finished project.
If you’re creating this project as a gift or for display during Thanksgiving or fall festivals, consider coordinating your fabric choices with your existing home décor. This will ensure the table runner complements your interior style beautifully.
Lastly, label and cut all fabric pieces according to the measurements in the Pumpkin Quilt Block and Table Runner FREE PATTERN. Having everything prepared before sewing speeds up the process and ensures accuracy.
2. Assembling the Pumpkin Quilt Block
Now that your fabrics are ready, it’s time to construct the individual pumpkin blocks. This part of the Pumpkin Quilt Block and Table Runner Tutorial FREE PATTERN is where the magic happens!
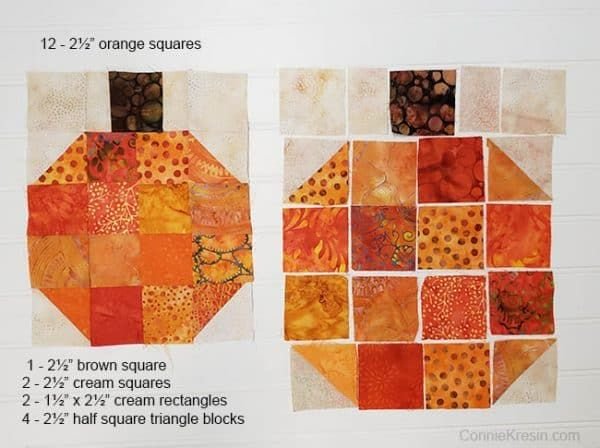
Start by creating the pumpkin shape. Most blocks use a combination of squares and rectangles to form a rounded yet structured pumpkin design. You’ll typically need orange or patterned fabric for the body and brown or green for the stem.
Sew your pieces together following a standard piecing technique. Always use a 1/4″ seam allowance for consistency. Press your seams as you go to keep the block flat and accurate.
Some variations of the block include leaf or vine appliqués for extra charm. If you want to add dimension, consider using fusible web to attach appliqués before stitching them down with a decorative topstitch.
Don’t worry if your first block isn’t perfect—quilting is as much about practice and patience as it is precision. With each block, you’ll improve your alignment and sewing skills.
Once your pumpkin blocks are complete, trim them to the same size. Uniformity will make assembling the table runner much easier in the next step.
And remember, each Pumpkin Quilt Block is a miniature piece of art. Enjoy the process and have fun mixing and matching fabrics to create a festive patchwork.
3. Creating and Finishing the Table Runner
With your blocks assembled, it’s time to put everything together to complete your Pumpkin Quilt Block and Table Runner Tutorial FREE PATTERN project. This is where the individual elements come together to form a cohesive and eye-catching centerpiece.
Arrange your pumpkin blocks in a row. Depending on your desired length, you might choose to make three, five, or seven blocks. Add sashing (strips between the blocks) if you want more space or contrast between them.
Next, choose a border fabric that complements your pumpkins. Borders help frame your quilt and add a finished look. A darker border often works well to ground the bright pumpkin colors.
Now it’s time to layer your quilt. Create a quilt sandwich using your table runner top, batting in the middle, and backing fabric underneath. Use safety pins or spray adhesive to baste the layers together.
Quilt the layers using straight-line quilting, free-motion, or even hand-quilting, depending on your style. Simple diagonal lines or echo quilting around the pumpkins look great and are beginner-friendly.
After quilting, trim the edges and attach binding around the runner. Binding gives the edges a clean, durable finish. You can machine-stitch the binding or hand-sew it for a traditional touch.
Once done, your Pumpkin Table Runner is ready to adorn your dining table, coffee table, or even hang as seasonal wall art. It’s both functional and festive!
4. Display Ideas and Seasonal Uses
Now that your Pumpkin Quilt Block and Table Runner is complete, let’s explore how to use and showcase it throughout the season. A handmade runner like this can elevate your home’s fall aesthetic with just one thoughtful touch.
Place your runner down the center of your dining table, and layer it with a bowl of gourds, candles, or a vase of dried flowers to create a striking autumnal display.
Use it on a console table in your entryway to greet guests with a welcoming seasonal vibe. Add rustic lanterns or wooden signs for extra charm.
You can even use it on a coffee table or buffet to protect surfaces while adding a cozy touch. Since it’s washable, it’s practical as well as decorative.
This table runner also makes a heartfelt gift. Consider making one for a friend, teacher, or family member. The fact that it’s handmade makes it especially meaningful.
Want to turn this into a fun family project? Let your kids choose the fabrics or help arrange the blocks. It’s a great way to introduce them to quilting and seasonal crafts.
And don’t forget to take photos and share your work online! Many crafters use blogs or social media to showcase their Pumpkin Quilt Block and Table Runner Tutorial FREE PATTERN creations, inspiring others in the process.
FAQ – Pumpkin Quilt Block and Table Runner Tutorial FREE PATTERN
Q1: Is this project suitable for beginners?
Yes! This Pumpkin Quilt Block and Table Runner Tutorial FREE PATTERN is beginner-friendly. The blocks use simple shapes and standard techniques that are perfect for learning and practicing quilting skills.
Q2: How long does it take to complete the table runner?
Depending on your sewing experience, it typically takes 1–2 days to complete the project, including cutting, piecing, quilting, and binding.
Q3: Can I use this pattern for a quilt instead of a table runner?
Absolutely! Just make more pumpkin blocks and join them to form a larger quilt. This design is very adaptable.
Q4: Where can I find the FREE PATTERN mentioned?
Most free quilting patterns are available on craft blogs, quilting community websites, or pattern directories. Always look for reliable sources offering print-ready or downloadable instructions.
Q5: What are the finished dimensions of the table runner?
That depends on how many blocks you use. A common size is approximately 14″ x 42″ using five blocks, but you can adjust it based on your table length.
Q6: Do I need a sewing machine or can this be done by hand?
While you can hand-sew the blocks, a sewing machine will make the process much faster and more precise—especially when quilting the layers together.
This Pumpkin Quilt Block and Table Runner Tutorial FREE PATTERN brings the warmth of autumn into your home in the most delightful, hands-on way. From selecting your fabrics to displaying the final piece, this tutorial has walked you through each step with clear, practical guidance.
Whether you’re sewing for yourself, a loved one, or your seasonal décor, the joy of creating something by hand is always rewarding. Quilting traditions continue to thrive because they blend creativity, craftsmanship, and heart.
We hope you enjoyed this tutorial! Feel free to leave your honest feedback and share any suggestions or ideas you’d love to see next. Your insights help shape our content and inspire future quilting projects. Happy stitching! 🍂🧵